Table of Contents
Why Microsoft Graph PowerShell SDK?
You might be curious about our preference for the Graph PowerShell SDK over other modules like Entra ID. Here’s why: The Graph PowerShell SDK serves as a robust interface for Microsoft Graph APIs, making the complete API suite accessible within PowerShell. This SDK provides a rich set of cmdlets that empower Microsoft 365 administrators to efficiently manage and automate bulk operations within Entra ID, formerly known as Entra ID.
Another important factor to consider is Microsoft’s deprecation of fundamental PowerShell modules such as MS Online and Entra ID. To stay ahead and align with Microsoft’s future direction, adopting the Graph PowerShell module is the wiser choice.
Pre-requisites
Before you begin, you need to ensure the following:
- A computer with Windows PowerShell 5.1+ or PowerShell 7+ (Mac or Linux)
- Installed Microsoft Graph PowerShell SDK.
Or you can open a new PowerShell (Terminal) window then run the below commands to install the Microsoft Graph PowerShell SDK.
Install-Module Microsoft.Graph -Force
Install-Module Microsoft.Graph.Beta -AllowClobber -Force
What attributes are required for creating a new user?
When creating a new user account in your Azure Active Directory (or Microsoft 365), there is a minimum amount of information you must define, for your user creation request to be successful.
The following Attributes must be defined always when using the New-MgUser cmdlet:
- -DisplayName “String”
- -PasswordProfile @{HashTable}
- -AccountEnabled
- -MailNickName “String”
- -UserPrincipalName “String”
How to create a password profile
An important part of creating a new user is defining the password settings that will apply. These password settings, as you can see written above, are defined within a hash table.
$PasswordProfile = @{
  Password = 'Helo123!'
  ForceChangePasswordNextSignIn = $true
  ForceChangePasswordNextSignInWithMfa = $true
}
There are 3 settings you can define within the hash table, which you can see an example of below:
Password – This is the password that is assigned to the user when the account is created. This is the only required value pair within the hash table, which means the other settings are optional but recommended. It can be pre-defined or can be pulled from a pipeline (in the next section).
ForceChangePasswordNextSignIn – When this value is set to $true, when the user next signs in, they will be forced to update their password. If this option is not specified, the default setting is $false.
- ForceChangePasswordNextSignInWithMfa – This is the same as the above settings, however this time, the user will be forced to complete MFA registration or a challenge before being asked to change their password. If this option is not specified, the default setting is $false.
Create Multiple Users in Microsoft 365 with Graph PowerShell
1️⃣ Once the PowerShell modules have been installed. We need to connect to Microsoft Graph PowerShell with the following scopes and log in with a Global Administrator user.
Connect-MgGraph -Scopes 'User.ReadWrite.All', 'Directory.ReadWrite.All'Once you are connected to Microsoft Graph PowerShell, you can proceed with creating users.
2️⃣ To bulk-create users using the Microsoft Graph PowerShell module. First create a CSV file with the headers DisplayName, UserPrincipalName and Password as per the image below.
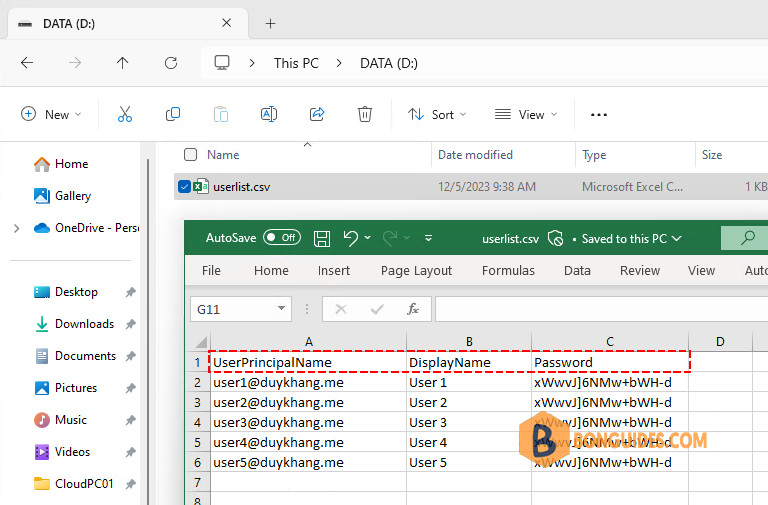
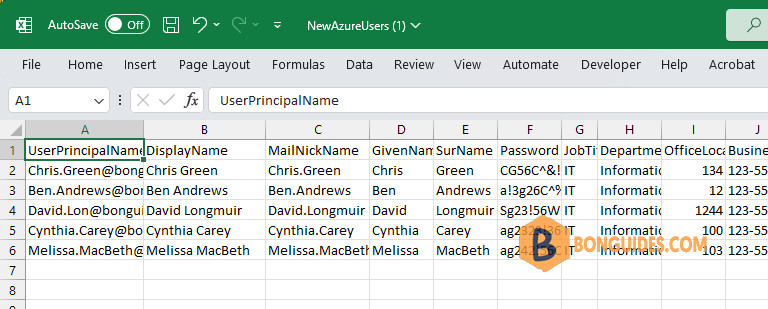
There’re a lot of properties that we can specified (in header) when creating users such as JobTitle, Department…The template can be found here.
3️⃣ After creating the CSV file, we use the below PowerShell code to:
- Import data from CSV file.
- Loop through each row containing user details in the CSV file.
- Create password profile and create new users (require users change their password at the first-time sign-in.
# Import data from CSV file
$users = Import-Csv "D:\userlist.csv"

# Loop through each row containing user details in the CSV file
foreach ($user in $users) {

    # Create password profile
    $passwordProfile = @{
        Password = $user.Password
        forceChangePasswordNextSignIn = $true
    }
    $params = @{
        DisplayName       = $user.DisplayName
        UserPrincipalName = $user.UserPrincipalName
        MailNickname      = $user.UserPrincipalName.Split("@")[0]
        PasswordProfile   = $passwordProfile
        UsageLocation     = 'PH'
        AccountEnabled    = $true
        # GivenName         = $User.GivenName
        # SurName           = $User.SurName
        # JobTitle          = $User.JobTitle
        # Department        = $User.Department
        # OfficeLocation    = $User.OfficeLocation
        # BusinessPhone     = $User.BusinessPhone
        # MobilePhone       = $User.MobilePhone
        # StreetAddress     = $User.StreetAddress
        # City              = $User.City
        # State             = $User.State
        # PostalCode        = $User.PostalCode
        # Country           = $User.Country
        # EmployeeId        = $User.EmployeeId
    }
    New-MgUser @params
}
We specify the UsageLocation property because in the next section, we’ll give you an example to create users and assign licenses to users at once. the country code can be found here.
# Output
DisplayName Id                                   Mail UserPrincipalName
----------- --                                   ---- -----------------
User 1      ea83f77f-5511-4339-bd5d-0d1967d307f6      [email protected]
User 2      e7142969-ca53-4d34-9200-09d04aecd1e2      [email protected]
User 3      ed2bac24-f282-4808-b47e-a280bfbf9d13      [email protected]
User 4      7a6e8bcc-32af-4877-a430-8107feb409c2      [email protected]
User 5      b7656fbc-8d8c-46db-bdf1-0f801357648f      [email protected]
The above steps create multiple unlicensed user accounts. So, you need to do it manually.
4️⃣ Get the list of all licenses in your tenant using the below command:
irm bonguides.com/pw/lictranslator | iexWrite-down the Skuid, we need it for later use to assign the license for users.
# Output
LicenseName                    SkuPartNumber     SkuId                                ActiveUnits ConsumedUnits
-----------                    -------------     -----                                ----------- -------------
Microsoft 365 Business Premium SPB               cbdc14ab-d96c-4c30-b9f4-6ada7cdc1d46          25             1
Microsoft Fabric (Free)        POWER_BI_STANDARD a403ebcc-fae0-4ca2-8c8c-7a907fd6c235        9999             0
5️⃣ Finally, assign the license to each user using the below code with a PowerShell loop.
# Microsoft Fabric (Free) skuid
$sku = 'a403ebcc-fae0-4ca2-8c8c-7a907fd6c235'

# Import data from CSV file
$users = Import-Csv "D:\userlist.csv"

# Loop through each row containing user details in the CSV file
foreach ($user in $users) {
  Set-MgUserLicense -UserId $user.UserPrincipalName -Addlicenses @{SkuId = $sku} -RemoveLicenses @()
}
In the next section, we’ll show you how to create users in bulk with licenses at once.
Create Multiple Users and assign a license
Below code will create users in bulk with license assignment at the same time. This time, we create users with same password and don’t require users to change their password at the first-time login.
# Create password profile
$passwordProfile = @{
  Password = 'xWwvJ]6NMw+bWH-d'
  forceChangePasswordNextSignIn = $false
}

# Microsoft Fabric (Free) skuid
$sku = 'a403ebcc-fae0-4ca2-8c8c-7a907fd6c235'

# Import data from CSV file
$users = Import-Csv "D:\userlist.csv"

# Loop through each row containing user details in the CSV file
foreach ($user in $users) {
    $params = @{
        DisplayName       = $user.DisplayName
        UserPrincipalName = $user.UserPrincipalName
        MailNickname      = $user.UserPrincipalName.Split("@")[0]
        PasswordProfile   = $passwordProfile
        UsageLocation     = 'PH'
        AccountEnabled    = $true
        # GivenName         = $User.GivenName
        # SurName           = $User.SurName
        # JobTitle          = $User.JobTitle
        # Department        = $User.Department
        # OfficeLocation    = $User.OfficeLocation
        # BusinessPhone     = $User.BusinessPhone
        # MobilePhone       = $User.MobilePhone
        # StreetAddress     = $User.StreetAddress
        # City              = $User.City
        # State             = $User.State
        # PostalCode        = $User.PostalCode
        # Country           = $User.Country
        # EmployeeId        = $User.EmployeeId
    }
    New-MgUser @params
    Set-MgUserLicense -UserId $user.UserPrincipalName -Addlicenses @{SkuId = $sku} -RemoveLicenses @()
}
If you’ve multiple subscriptions, and you want to put them into an array then run the below code to create all accounts at once. You need to change your command and put the license skuid into an array.
# Create password profile
$passwordProfile = @{
  Password = 'xWwvJ]6NMw+bWH-d'
  forceChangePasswordNextSignIn = $false
}

# License array
$skus = @(
  'a403ebcc-fae0-4ca2-8c8c-7a907fd6c235',
  'cbdc14ab-d96c-4c30-b9f4-6ada7cdc1d46'
)

# Import data from CSV file
$users = Import-Csv "D:\userlist.csv"

# Loop through each row containing user details in the CSV file
foreach ($user in $users) {
    $params = @{
        DisplayName       = $user.DisplayName
        UserPrincipalName = $user.UserPrincipalName
        MailNickname      = $user.UserPrincipalName.Split("@")[0]
        PasswordProfile   = $passwordProfile
        UsageLocation     = 'PH'
        AccountEnabled    = $true
    }
    New-MgUser @params

    # Assign the licenses to user
    foreach ($sku in $skus) {
      Set-MgUserLicense -UserId $user.UserPrincipalName -Addlicenses @{SkuId = $sku} -RemoveLicenses @()
    }
}
Using Microsoft Graph REST API
Alternatively, we can use the Microsoft Graph Rest API to create Microsoft 365 user accounts. When using this method:
- We don’t need to install any modules of the Microsoft Graph PowerShell SDK (~ 80 modules).
- We can do it from any machine with Microsoft PowerShell/ PowerShell Core installed (Linux and macOS). Because it uses the native PowerShell cmdlet Invoke-RestMethod to make a request.
- Instead of using an account for authentication and authorization, we use the app-only access (access without a user).
Before you begin, make sure you’ve created an app registration in Microsoft entra admin center and collect some required information such as clientId, tenantId and the clientSecret.
Now, replace your app’s information (clientId, tenantId and the clientSecret) into the below code. This code gets an access token and attaching the access token as a Bearer token to the Authorization header.
#Get access token
$clientId = "xxxxxxxxxxxxxxxxxxxxxxxxxxxxxxxxxxxxxxxx"
$tenantId = "xxxxxxxxxxxxxxxxxxxxxxxxxxxxxxxxxxxxxxxx"
$clientSecret = "xxxxxxxxxxxxxxxxxxxxxxxxxxxxxxxxxxxxxxxx"
$uri = "https://login.microsoftonline.com/$tenantId/oauth2/v2.0/token"

$body = @{
    Grant_Type    = "client_credentials"
    Scope         = "https://graph.microsoft.com/.default"
    client_Id     = $clientId
    Client_Secret = $clientSecret
}

$tokenRequest = Invoke-RestMethod -Uri $uri -Method POST -Body $body
$token = $tokenRequest.access_token
$headers = @{
  "Authorization" = "Bearer $token"
  "Content-Type"  = "application/json"
}
Call to Microsoft Graph REST API to create users in bulk with the PowerShell foreach loop.
# Create password profile
$passwordProfile = @{
  Password = 'xWwvJ]6NMw+bWH-d'
  forceChangePasswordNextSignIn = $false
}

# Import data from CSV file
$users = Import-Csv "D:\userlist.csv"

# Loop through each row containing user details in the CSV file
$i = 1
$uri = "https://graph.microsoft.com/v1.0/users"
foreach ($user in $users) {
  $body = @{
    "userPrincipalName" = $user.UserPrincipalName
    "displayName"       = $user.DisplayName
    "mailNickname"      = $user.UserPrincipalName.Split("@")[0]
    "accountEnabled"    = $true
    "passwordProfile"   = $passwordProfile
    "UsageLocation"     = "PH"
  }
  $body = $body | ConvertTo-Json
  Write-Host "($i/$($users.Count)) Creating $($user.DisplayName)..." -ForegroundColor Yellow
  $null = Invoke-RestMethod -Uri $uri -Headers $headers -Method POST -Body $body
  $i++
}
Manage Microsoft 365 Using Microsoft Graph
You can also take a look at the following Microsoft Graph posts that help to manage Microsoft 365 efficiently.
- Create a new user
- Create bulk users in Microsoft 365
- Get a list of all users in Microsoft 365
- Update user properties
- Add a user to a group
- Add bulk users to a group
- Remove users from a group
- Remove multiple users from a group
- Assign managers for Microsoft 365 users
- Assign licenses to users
- Removing licenses from user accounts
- Delete a user from Microsoft 365
- How to use Get-MgUser cmdlet
Not a reader? Watch this related video tutorial:


