
Table of Contents
In this post I’ll go over the process of building Windows 11 VMs in Oracle VirtualBox using PowerShell on a Windows host. Using PowerShell to create a VM helps you save a lot of time if you need to create VMs fairly often.
Prerequisites
- Oracle VirtualBox – I’m currently using version 7.10.0.
- Installation medias (ISO images) for the guest OS.
- Keep in mind that parts of the following commands (paths to ISO files, VM directory paths, vmname…) will need to be updated to match your scenario.
Building Windows VM in VirtualBox
1️⃣ Open PowerShell as administrator and to make things easier, append VirtualBox’s installation directory to the PATH environment variable. Once the path is added, you can run VBoxManage command from anywhere instead of the default VirtualBox installation location.
$Env:Path += ";C:\Program Files\Oracle\VirtualBox\"2️⃣ Next, we need to find the OS ID for Windows 11, a list of supported OS types on VirtualBox can be shown with the following command:
C:\> VBoxManage list ostypes | Select-String -Pattern "Windows11"

ID:          Windows11_64
Take note the ID, we’ll need it in the next step. The most common IDs are: Windows10_64, Windows11_64, Ubuntu_64, Windows2022_64, Windows2019_64…
3️⃣ Before the unattended installation is started, a few variables are defined. Decline needed variables then create and register an empty Windows 11 virtual machine.
- $isoFile: Path of your Windows 11 ISO image file. You need to change it to fit with yours.
- $vmName: We’ll create a Windows 11 with random suffix number using Get-Random cmdlet.
- $vmPath: The default location when create a new VirtualBox virtual machine at C:Users<username>VirtualBox VMs… In Windows, the $home variable represent for C:Users<username>. Or you can change to another drive such as “D:VMs$vmName”.
- $userName, $password, $fullName: Declare the account information when creating the VM.
$isoFile = "D:\ISOs\windows11.iso"
$vmName  = "Windows11-$(Get-Random)"
$vmPath= "$home\VirtualBox VMs\$vmName"
$userName = 'bonben'
$password = '123456'
$fullUserName = 'BonBen'
#VM Configurations
$hdSizeMb = 65536               #The virtual disk size in MB (Thin provisioning).
$memSizeMb = 8192               #The virtual memory (RAM) in MB
$vramMb = 128                   #RAM for graphics controller. Must be in range 0...128 (MB).
$nofCPUs = 3                    #Number of virtual CPUs for the VM.
$osType = 'Windows11_64'

VBoxManage createvm --name $vmName --ostype $osType --register
#Output
Virtual machine 'Windows11-1441797645' is created and registered.
UUID: 44a7abc7-f943-4cfd-bca8-05ebc96a8adb
Settings file: 'C:\Users\admin\VirtualBox VMs\Windows11-1441797645\Windows11-1441797645.vbox'The command VBoxManage create above will create a new XML virtual machine definition file with the file extension .vbox in the VM location. In this example, the file created is $vmPath$vmName.vbox.
4️⃣ Add CPU cores, RAM, VRAM, set the graphics controller, and enable the share clipboard feature on the empty VM that we’ve created in the step 3.
VBoxManage modifyvm $vmName --memory $memSizeMb --vram $vramMb --cpus $nofCPUs `
    --clipboard-mode bidirectional --graphicscontroller vboxsvga
5️⃣ Create the virtual disk file that will eventually become the system drive in the virtual machine. The virtual disk would be saved in the directory $vmPath.
VBoxManage createmedium --filename "$vmPath\virtualdisk.vdi" --size $hdSizeMb#Output
0%...10%...20%...30%...40%...50%...60%...70%...80%...90%...100%
Medium created. UUID: 4bdf1fa3-5c53-4a56-8b7e-8795fa146da66️⃣ Add a SATA storage controller, specify the controller’s chipset, the port count, and set it as boot-able.
VBoxManage storagectl $vmName --name 'SATA Controller' --add sata --controller IntelAHCI7️⃣ The virtual hard disk “$vmPathvirtualdisk.vdi” needs to attach to the newly created SATA Controller .
VBoxManage storageattach $vmName --storagectl 'SATA Controller' --port 0 --device 0 --type hdd `
    --medium "$vmPath\virtualdisk.vdi"
8️⃣ The next step is configuring unattended installation. The most of information is configured such as vmname, username, password and fullname. In the below command, you need to specify the image-index, otherwise VirtualBox will installs the first one (image-index=1).
VBoxManage unattended install $vmName `
    --iso=$isoFile `
    --user=$userName `
    --password=$password `
    --full-user-name=$fullUserName `
    --image-index=6 `
    --install-additions
#Output
VBoxManage.exe: info: Preparing unattended installation of Windows11_64 in machine 'Windows11-1994699701' (eae81ccd-2b90-4798-9bdc-1188062b6b15).
VBoxManage.exe: info: Using values:
isoPath = D:\ISOs\windows11.iso
user = bonben
password = 123456
fullUserName = BonBen
productKey =
additionsIsoPath = C:\Program Files\Oracle\VirtualBox/VBoxGuestAdditions.iso
installGuestAdditions = true
validationKitIsoPath =
installTestExecService = false
locale = en_US
country = US
timeZone = SE Asia Standard Time
proxy =
hostname = Windows11-1994699701.myguest.virtualbox.org
packageSelectionAdjustments =
auxiliaryBasePath = C:\Users\admin\VirtualBox VMs\Windows11-1994699701\Unattended-eae81ccd-2b90-4798-9bdc-1188062b6b15-
imageIndex = 6
scriptTemplatePath = C:\Program Files\Oracle\VirtualBox\UnattendedTemplates\win_nt6_unattended.xml
postInstallScriptTemplatePath = C:\Program Files\Oracle\VirtualBox\UnattendedTemplates\win_postinstall.cmd
postInstallCommand =
extraInstallKernelParameters =
language = en-US
detectedOSTypeId = Windows11_64
detectedOSVersion = 10.0.22621.525
detectedOSFlavor = Professional
detectedOSLanguages = en-US
detectedOSHints =
detectedImage[0] = #1: Windows 11 Home (10.0.22621.525 / x64 / en-US)
detectedImage[1] = #2: Windows 11 Home N (10.0.22621.525 / x64 / en-US)
detectedImage[2] = #3: Windows 11 Home Single Language (10.0.22621.525 / x64 / en-US)
detectedImage[3] = #4: Windows 11 Education (10.0.22621.525 / x64 / en-US)
detectedImage[4] = #5: Windows 11 Education N (10.0.22621.525 / x64 / en-US)
detectedImage[5]* = #6: Windows 11 Pro (10.0.22621.525 / x64 / en-US)
detectedImage[6] = #7: Windows 11 Pro N (10.0.22621.525 / x64 / en-US)
detectedImage[7] = #8: Windows 11 Pro Education (10.0.22621.525 / x64 / en-US)
detectedImage[8] = #9: Windows 11 Pro Education N (10.0.22621.525 / x64 / en-US)
detectedImage[9] = #10: Windows 11 Pro for Workstations (10.0.22621.525 / x64 / en-US)
detectedImage[10] = #11: Windows 11 Pro N for Workstations (10.0.22621.525 / x64 / en-US)
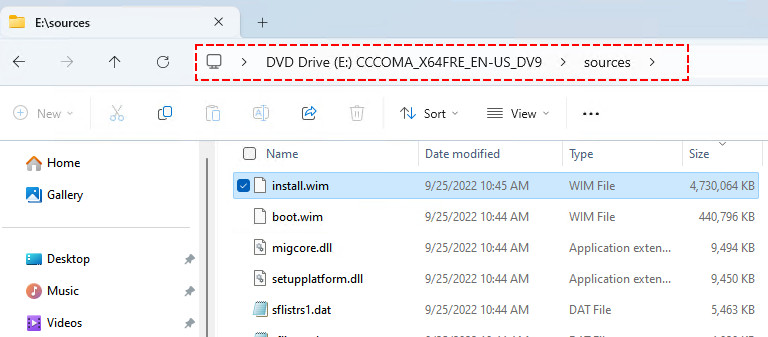
VBoxManage.exe: info: VM 'Windows11-1994699701' (eae81ccd-2b90-4798-9bdc-1188062b6b15) is ready to be started (e.g. VBoxManage startvm).To get the list of editions and they index numbers in a Windows ISO image. Let’s mount the iso image into your host computer then run the below command:
PS C:\> dism /Get-WimInfo /WimFile:E:\sources\install.wim

Deployment Image Servicing and Management tool
Version: 10.0.22621.1

Details for image : E:\sources\install.wim

Index : 6
Name : Windows 11 Pro
Description : Windows 11 Pro
Size : 16,479,089,353 bytes
In our example, our Windows 11 iso image is mounted into E drive. When checking the file E:sourcesinstall.wim, we can find the index number of the Windows edition that we want to install. We want to install Windows 11 Pro, so 6 is image-index number that we need to specify in the unattended command.
PS C:\> dism /Get-WimInfo /WimFile:J:\sources\install.wim

Deployment Image Servicing and Management tool
Version: 10.0.22621.1

Details for image : J:\sources\install.wim

Index : 1
Name : Windows 10 Home
Description : Windows 10 Home
Size : 15,098,360,792 bytes

Index : 2
Name : Windows 10 Home N
Description : Windows 10 Home N
Size : 14,326,729,982 bytes

Index : 3
Name : Windows 10 Home Single Language
Description : Windows 10 Home Single Language
Size : 15,101,147,257 bytes

Index : 4
Name : Windows 10 Education
Description : Windows 10 Education
Size : 15,438,612,142 bytes

Index : 5
Name : Windows 10 Education N
Description : Windows 10 Education N
Size : 14,676,047,995 bytes

Index : 6
Name : Windows 10 Pro
Description : Windows 10 Pro
Size : 15,435,570,649 bytes

Index : 7
Name : Windows 10 Pro N
Description : Windows 10 Pro N
Size : 14,673,174,575 bytes

Index : 8
Name : Windows 10 Pro Education
Description : Windows 10 Pro Education
Size : 15,438,550,560 bytes

Index : 9
Name : Windows 10 Pro Education N
Description : Windows 10 Pro Education N
Size : 14,675,985,513 bytes

Index : 10
Name : Windows 10 Pro for Workstations
Description : Windows 10 Pro for Workstations
Size : 15,438,581,351 bytes

Index : 11
Name : Windows 10 Pro N for Workstations
Description : Windows 10 Pro N for Workstations
Size : 14,676,016,754 bytes

The operation completed successfully.
9️⃣ Finally, start the VM using the command below.
VBoxManage startvm $vmName #Output
Waiting for VM "Windows11-1994699701" to power on...
VM "Windows11-1994699701" has been successfully started.The VM should be started automatically. The unattended installation process will do the rest actions. You can click the Show button to observe the installation process. Or you can keep it running in the background.
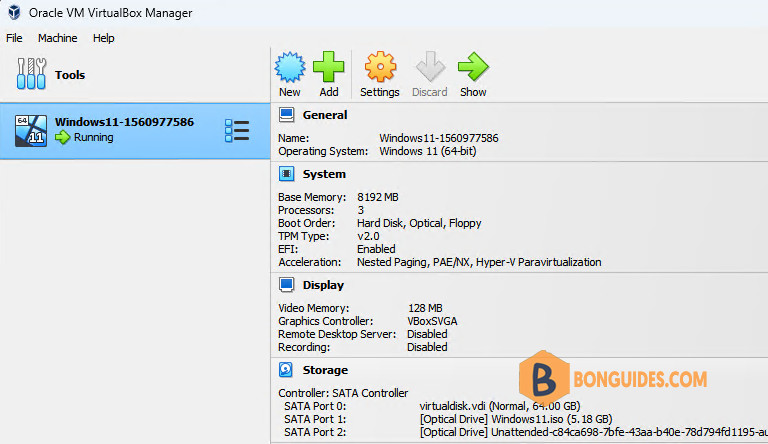
After 5-10 minutes, your VM is already to use with the VirtualBox Guest Additions is preinstalled.
Building a PowerShell script
Running individual commands sometimes can be tired, so you can create a PowerShell script (.ps1). When you need to create a new VM, you just need to run the script with a single command.
Copy the below script, change the variables to fit with your requirements, save it as a PowerShell script (.ps1).
$Env:Path += ";C:\Program Files\Oracle\VirtualBox\"

$isoFile = "D:\ISOs\windows11.iso"
$vmName  = "Windows11-$(Get-Random)"
$vmPath= "$home\VirtualBox VMs\$vmName"
$userName = 'bonben'
$password = '123456'
$fullUserName = 'BonBen'
#VM Configurations
$hdSizeMb = 65536               #The virtual disk size in MB (Thin provisioning).
$memSizeMb = 8192               #The virtual memory (RAM) in MB
$vramMb = 128                   #RAM for graphics controller. Must be in range 0...128 (MB).
$nofCPUs = 3                    #Number of virtual CPUs for the VM.
$osType = 'Windows11_64'

VBoxManage createvm --name $vmName --ostype $osType --register

VBoxManage modifyvm $vmName --memory $memSizeMb --vram $vramMb --cpus $nofCPUs --clipboard-mode bidirectional --graphicscontroller vboxsvga
VBoxManage createmedium --filename "$vmPath\virtualdisk.vdi" --size $hdSizeMb
VBoxManage storagectl $vmName --name 'SATA Controller' --add sata --controller IntelAHCI
VBoxManage storageattach $vmName --storagectl 'SATA Controller' --port 0 --device 0 --type hdd --medium "$vmPath\virtualdisk.vdi"
VBoxManage unattended install $vmName --iso=$isoFile --user=$userName --password=$password --full-user-name=$fullUserName --image-index=6 --install-additions

VBoxManage startvm $vmName
PS C:\> D:\scripts\win11.ps1
0%...10%...20%...30%...40%...50%...60%...70%...80%...90%...100%
Medium created. UUID: 994f848f-1080-4c65-88cb-d93ce1df33fe
VBoxManage.exe: info: Preparing of Windows11_64 in machine 'Windows11-602056380'.
VBoxManage.exe: info: Using values:
....
VBoxManage.exe: info: VM 'Windows11-602056380'is ready to be started (e.g. VBoxManage startvm).
Waiting for VM "Windows11-602056380" to power on...
VM "Windows11-602056380" has been successfully started.Conclusion
While building VMs from PowerShell might seem intimidating if you’re not used with the command line, the process isn’t really that intricate and can end up saving you a lot of time if you tear down and build new VMs fairly often.

