Table of Contents
The process of creating a Windows 10 bootable disk is very simple if you’re using a Windows PC, but the process becomes slightly more complicated if you’re using a Mac. We’ll cover how to create a Windows 10 bootable disk using macOS below.
What You Will Need Before Starting
- An 8GB or larger (16GB is preferred) USB drive that you don’t mind formatting.
- Your MacBook power adaptor should be plugged in, as you don’t want your battery to run out during the process.
- An active internet connection, to download the Windows 10 ISO.
Download the Windows 10 ISO
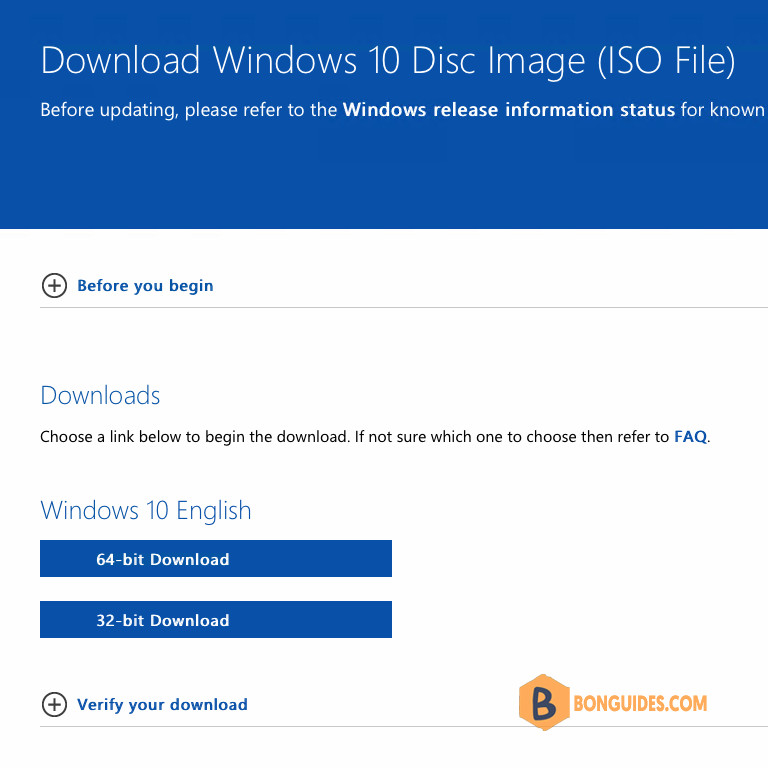
The first step is to download the Windows 10 ISO, which is available for free from the Microsoft website.
Select Windows 11 from the Download Windows 10 Disk Image (ISO) section and choose preferred language from Select the product language, then press Confirm and download the installer on your Mac by selecting 64-bit Download.
Create Windows 10 Bootable Disk Using Boot Camp on Inter Macs
The first method involves using Boot Camp on Intel Macs. Boot Camp Assistant can be used to install Windows on a Mac and create a bootable USB installer drive.
1. Launch Boot Camp on your Mac, you can do this from Applications > Utilities in Finder or by using Spotlight.

2. In Boot Camp, click Continue, and check the box to Create a Windows 10 or later install disk.
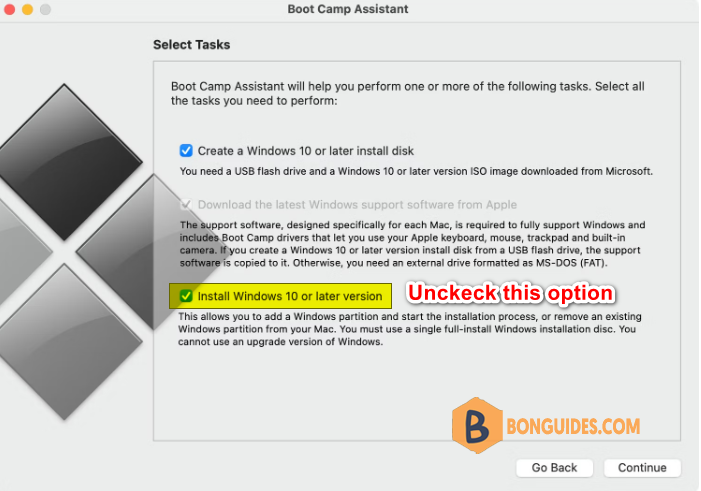
3. Click Continue when you’re done then browse and select the Windows 10 ISO file you downloaded.
4. Under Destination Disk, select your USB drive, and click Continue.
5. Boot Camp will format your USB. Press Continue to proceed. The installation process will now start. Let it run, and you’ll see a window saying the Windows support software has been saved. That’s it.
Create Windows 10 Bootable Disk Using Terminal (Intel, M1, M2 Macs)
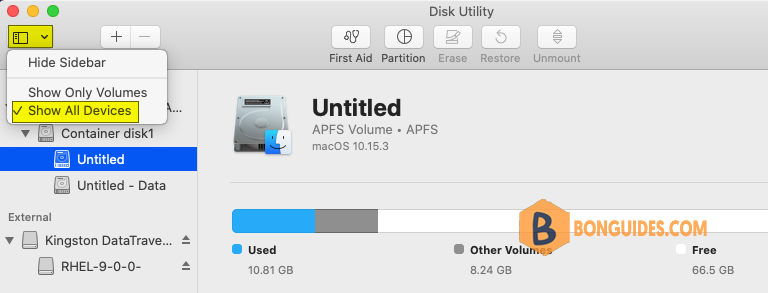
The second method we’ll cover today involves using Terminal, because Mac with Apple-based chip doesn’t support Boot Camp Assistant.
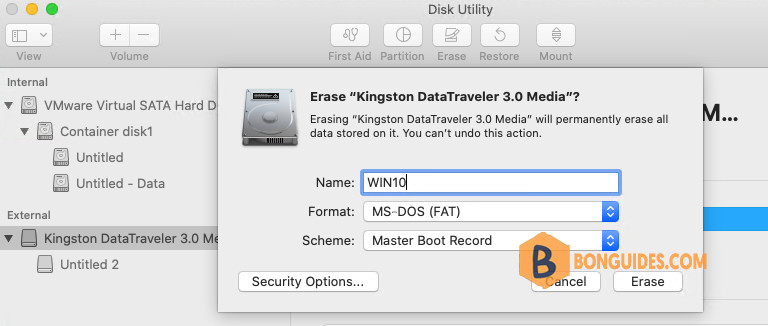
1. Open Disk Utility then enable Show All Devices option.
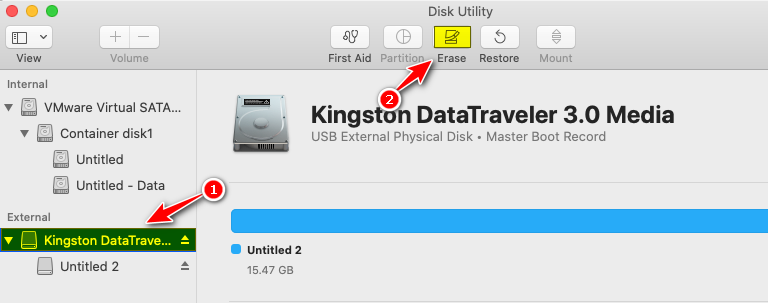
3. Erase the USB Stick following below options:
- Name: WIN10
- Format: MS-DOS
- Scheme: Master Boot Record
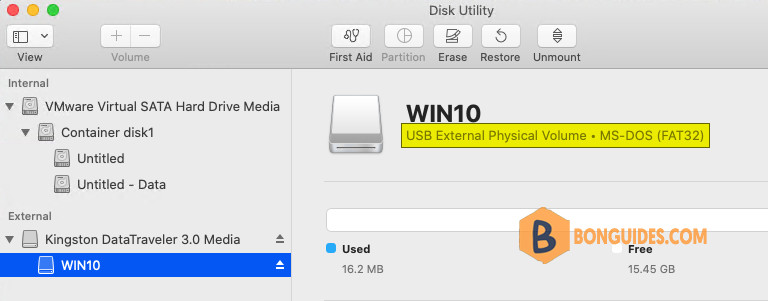
Once done, you should see the USB stick in the device list with the name WIN10.
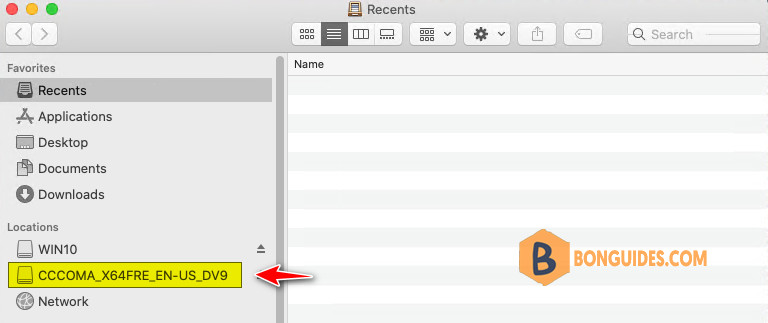
3. Mount the downloaded ISO file into your Mac. It should then show up in your Mac’s connected devices as CCCOMA_X64FRE_EN-US_DV9 or similar.
4. Open the Terminal app then run the following command to copy all files except install.wim to the USB drive.
- CCCOMA_X64FRE_EN-US_DV9: The name of mounted ISO file.
- WIN10: The name of the USB stick you’ve set when erased the device.
rsync -avh --progress \
--exclude=sources/install.wim "/Volumes/CCCOMA_X64FRE_EN-US_DV9/" "/Volumes/WIN10"
bonben@Mac ~ % rsync -avh --progress \
--exclude=sources/install.wim /Volumes/CCCOMA_X64FRE_EN-US_DV9/ /Volumes/WIN10
building file list ...
991 files to consider
autorun.inf
...
sent 950.68M bytes received 20.45K bytes 5.24M bytes/sec
total size is 950.49M speedup is 1.00Why we need to exclude install.wim file?

Because to make a USB bootable device, the installer requires the USB drive be formatted as FAT32, which has a file size limit of 4 GB. Seems to be on all recent Windows 10 downloads, that file size approximate 5 GB. So, we need to split the file, to able to copy into the USB stick.
Download wimlib and use it to split install.wim
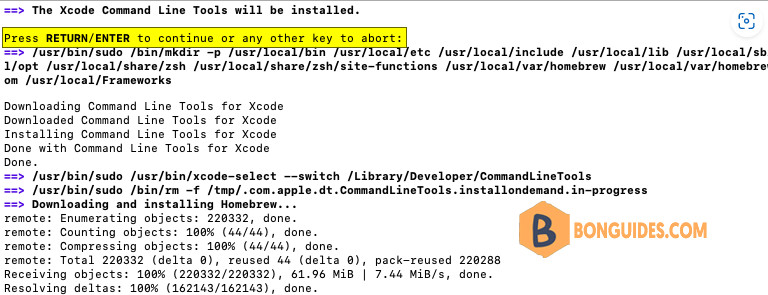
1. To install wimlib, firstly. we need to install Homebrew by execuate the following command in Terminal.
url='https://raw.githubusercontent.com/Homebrew/install/HEAD/install.sh'
/bin/bash -c "$(curl -fsSL $url)"
2. When asked, enter your user’s password and confirm if the XCode Command Line Tools need to be installed.
Warning: /opt/homebrew/bin is not in your PATH.
  Instructions on how to configure your shell for Homebrew
  can be found in the 'Next steps' section below.
==> Installation successful!
...
==> Next steps:
- Run these three commands in your terminal to add Homebrew to your PATH:
    echo '# Set PATH, MANPATH, etc., for Homebrew.' >> /Users/bonben/.zprofile
    echo 'eval "$(/opt/homebrew/bin/brew shellenv)"' >> /Users/bonben/.zprofile
    eval "$(/opt/homebrew/bin/brew shellenv)"
- Run brew help to get started
3. Once Brew is installed, we can use it to install Wimlib using below command:
brew install wimlib4. Now, you can split the install.wim file and copy it to your USB drive as follows:
wimlib-imagex split "/Volumes/CCCOMA_X64FRE_EN-US_DV9/sources/install.wim" \
"/Volumes/WIN10/sources/install.swm" 3800
In the command above, we told to execute the wimlib-imagex tool (part of Wimlib) and passed some arguments:
- split to indicate that we want to split this larger file
/Volumes/CCCOMA_X64FRE_EN-US_DV9/sources/install.wim which is the source file to split. Keep in mind that the name under /Volumes depends on the ISO name so you need to adjust this accordingly. - Volumes/WIN10/sources/install.swm the destination of where the split files should end.
3800 is the max size of the destination file, so the file will be split in a part of 3800MB and the rest.
###The output
Splitting WIM: 4883 MiB of 4883 MiB (100%) written, part 2 of 2
Finished splitting "/Volumes/CCCOMA_X64FRE_EN-US_DV9/sources/install.wim"
As you can see, the file install.wim was splitted to two parts then be copied to the source folder in the USB stick.

Finally, remove the USB drive from your Mac. It’s now ready to use as a bootable installation disk.
Cleanup
If you just want to create a Windows 10 bootable stick once. You can remove winlib and Homebrew using the following commands:
brew uninstall wimliburl='https://raw.githubusercontent.com/Homebrew/install/HEAD/uninstall.sh'
/bin/bash -c "$(curl -fsSL $url)"


