Table of Contents
After you install the Microsoft Graph module, you can connect to Microsoft Graph PowerShell. There are different methods to connect to Microsoft Graph PowerShell. In this article, we will show you how to connect to Microsoft Graph with self-signed certificate.
Azure Active Directory Graph API
The Azure Active Directory Graph API has been deprecated since June 30, 2023, so now you must migrate your apps to Microsoft Graph. Once you connect to Microsoft Graph, you can access Entra ID services and Microsoft 365 services.
Microsoft Graph has all the capabilities available in Entra ID Graph and new APIs like identity protection and authentication methods.
Install Microsoft Graph PowerShell module
1️⃣ First, you need to install the Microsoft Graph PowerShell module. We recommend you update to the latest version, because some of the cmdlets will not work.
2️⃣ Or you can open Windows PowerShell as administrator then run all below commands at once to download and install all required packages and modules.
Set-ExecutionPolicy -ExecutionPolicy RemoteSigned -Force
Install-PackageProvider -Name NuGet -Force
Install-Module PowerShellGet -Force
Set-PSRepository -Name "PSGallery" -InstallationPolicy Trusted
Install-Module Microsoft.Graph -Force
3️⃣ Once done, you can verify you have installed the Microsoft Graph PowerShell module and see which version is running using the below PowerShell cmdlet.
PS C:\> Get-InstalledModule Microsoft.Graph | ft -AutoSize

Version Name            Repository Description
------- ----            ---------- -----------
2.3.0   Microsoft.Graph PSGallery  Microsoft Graph PowerShell module
Bonus: You can always keep your PowerShell modules up to date and run the below command.
Update-Module Microsoft.GraphAfter you installed the Microsoft Graph PowerShell module, you can start to connect.
Methods to connect to Microsoft Graph PowerShell
We will show you three methods to connect to Microsoft Graph PowerShell:
- Interactive mode (delegated access)
- Certificate Based Authentication (CBA)
- Client secret (password)
The first method is the easiest as you only need to connect with PowerShell. The other two methods are similar because it requires creating a new application in Entra ID. The difference between method 2 and 3 is that there are two ways to authenticate your newly created application in Azure Active Directory.
Connect with Certificate Based Authentication
Before we can connect to Microsoft Graph with PowerShell, you need to:
- Register an application in Entra ID and assign API permissions.
- Then create a self-signed certificate to the application.
Register new application in Entra ID
First, you need to register an application, where you will get the Application (client) ID and Directory (tenant) ID. Register a new application in Microsoft Entra admin center:
1️⃣ Sign into Microsoft Entra admin center > Identity > Applications > App registrations > New registration.
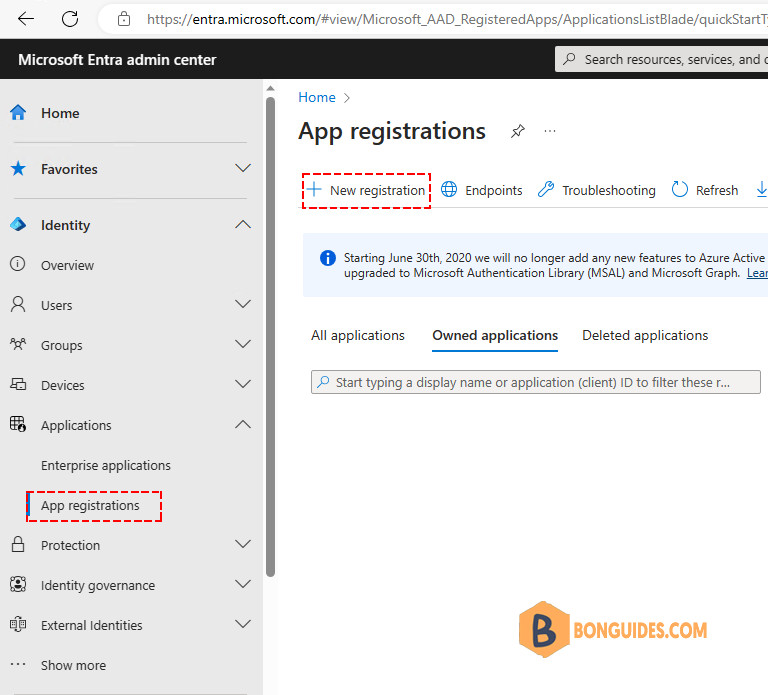
2️⃣ Register an application.
- Name your application as you want.
- Select Accounts in this organizational directory only (- Single tenant)
- Click Register
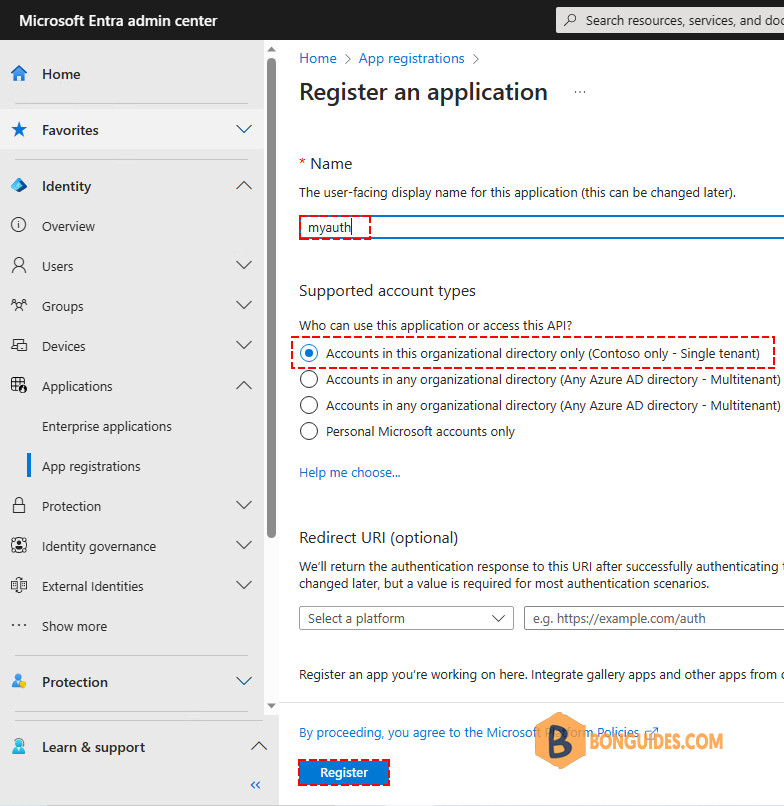
3️⃣ Successfully created application, you will be redirected to the app overview page. Copy the Application ID and Directory ID.
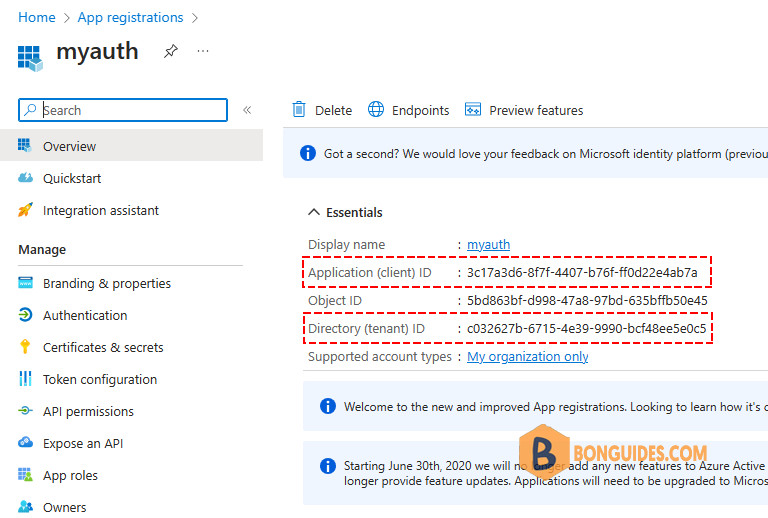
You need to copy the below values and paste them into Notepad because you need them later when connecting to Microsoft Graph:
- Application (client) ID: 3c17a3d6-8f7f-4407-b76f-ff0d22e4ab7a
- Directory (tenant) ID: c032627b-6715-4e39-9990-bcf48ee5e0c5
Assign API permissions
You must assign API permissions to the application you created.
1️⃣ Click API permission > Click Add a permission
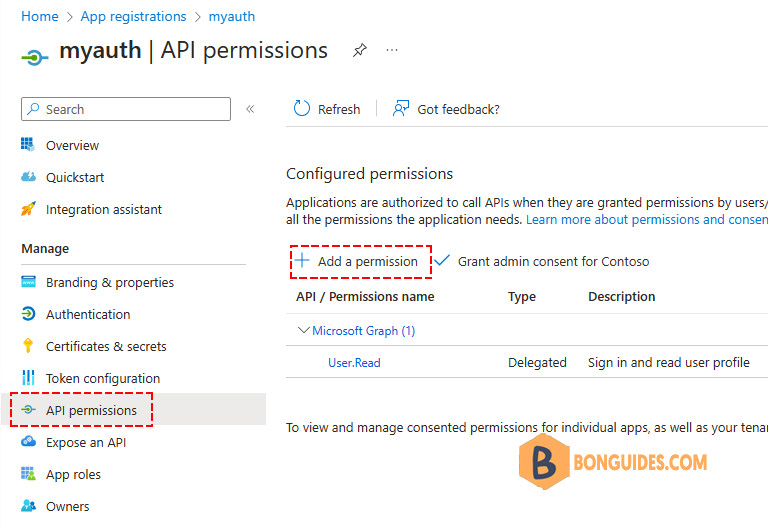
2️⃣ Under the tab Microsoft APIs > Click Microsoft Graph
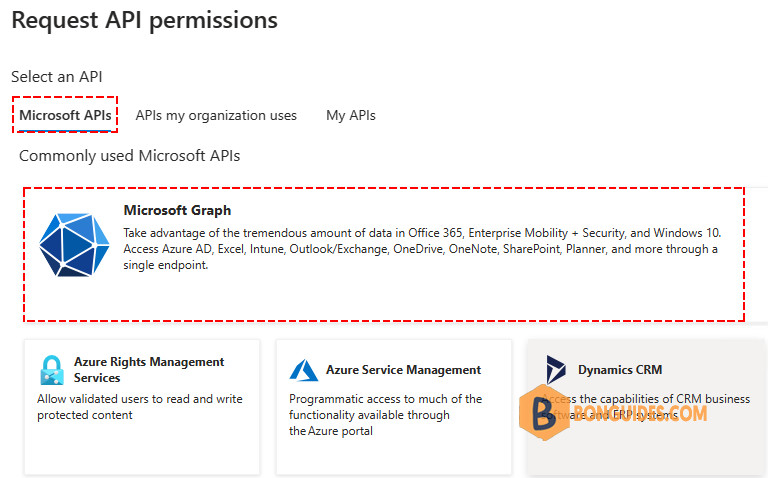
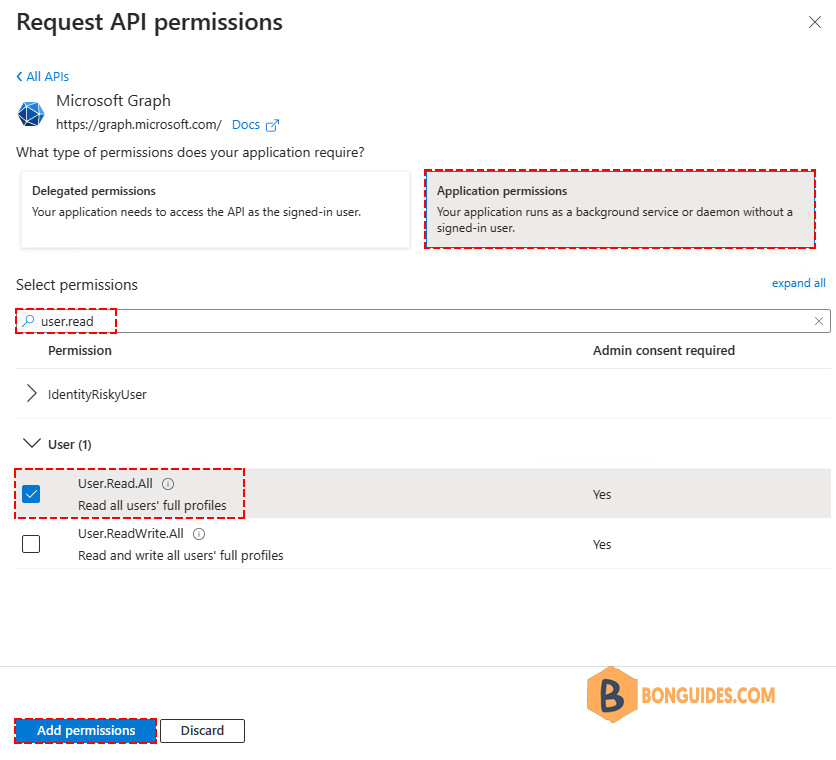
3️⃣ Click Application permissions > Search for User.Read.All > Select User > User.Read.All > Click Add permissions
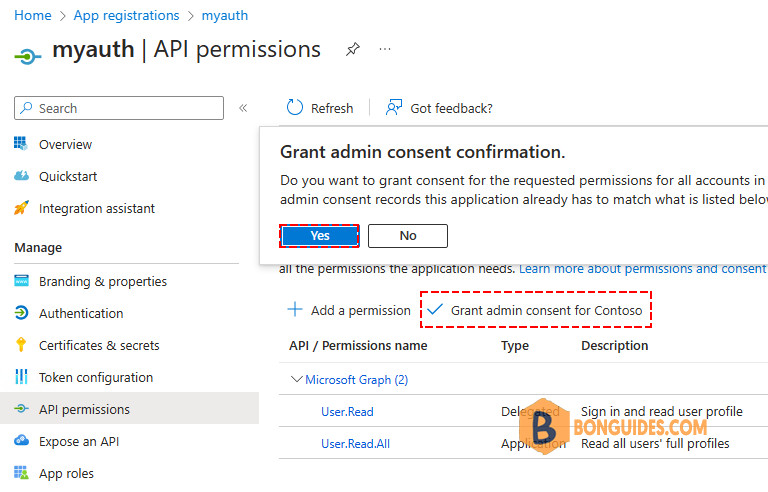
4️⃣ Click Grant admin consent for your tenant > Click Yes
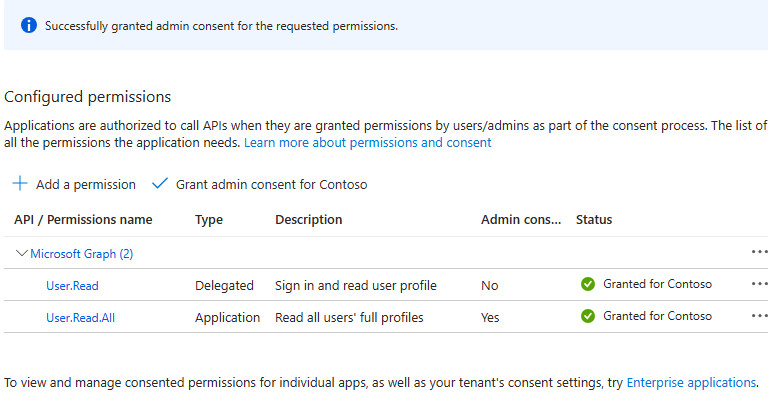
A green check mark appears that you granted admin consent successfully!
Create self-signed certificate
Once you created a new application, you can use a self-signed certificate to upload a .cer file to Entra ID.
First, you need to generate a self-signed certificate. It’s better to make the certificate on the same machine you want to run the unattended PowerShell script.
1️⃣ Log into any Windows Server or Desktop with Windows PowerShell as administrator.
2️⃣ Use the below PowerShell cmdlet to create a new self-signed certificate.
$mycert = New-SelfSignedCertificate `
    -DnsName "bonguides.com" `
    -CertStoreLocation "cert:\LocalMachine\My" `
    -NotAfter (Get-Date).AddYears(5) `
    -KeySpec KeyExchange `
    -FriendlyName "myauth"
3️⃣ The certificate is now stored, to view the thumbprint, use the below PowerShell cmdlet.
PS C:\> $mycert | Select-Object -Property Subject,Thumbprint,NotBefore,NotAfter

Subject          Thumbprint                               NotBefore             NotAfter
-------          ----------                               ---------             --------
CN=bonguides.com 4619B79D13DF75AC5A207C0692FAA2AF537007EF 8/20/2023 11:16:10 PM 8/20/2028 11:26:10 PM
4️⃣ Copy the Thumbprint and paste it into Notepad. You will need it later when you connect to Microsoft Graph PowerShell with CBA.
PS C:\> ($mycert).Thumbprint
4619B79D13DF75AC5A207C0692FAA2AF537007EF
Export to .cer file with PowerShell
We want to create a .cer file to upload later in Entra ID application. With a .cer file you can only connect to Microsoft Graph from the machine where the self-signed certificate is generated.
1️⃣ Create a folder named temp to save it in the C:\temp.
2️⃣ Use the below PowerShell cmdlet to export the certificate to .cer file.
New-Item -Path C:\temp -Type Directory
$mycert | Export-Certificate -FilePath "C:\temp\myauth.cer"
You will see the below output in PowerShell. You can find the .cer file on your computer in C:\temp.
PS C:\> $mycert | Export-Certificate -FilePath "C:\temp\myauth.cer"

    Directory: C:\temp

Mode                 LastWriteTime         Length Name
----                 -------------         ------ ----
-a----         8/20/2023  11:33 PM            808 myauth.cer
Export to .pfx file (Optional)
We will also create a .pfx file so that you can connect to Microsoft Graph from any machine. You can copy or send a .pfx file to a person so it can be installed on another machine, because the .pfx file will be retrieved during the authentication process.
$mycert | Export-PfxCertificate `
    -FilePath "C:\temp\myauth.pfx" `
    -Password $(ConvertTo-SecureString -String "123456" -AsPlainText -Force)
You can find the .pfx file on your computer in C:\temp.
PS C:\> ls C:\temp\

Mode                 LastWriteTime         Length Name
----                 -------------         ------ ----
-a----         8/20/2023  11:33 PM            808 myauth.cer
-a----         8/20/2023  11:36 PM           2693 myauth.pfx
Upload certificate to app
Now we need to upload the self-signed certificate you created earlier.
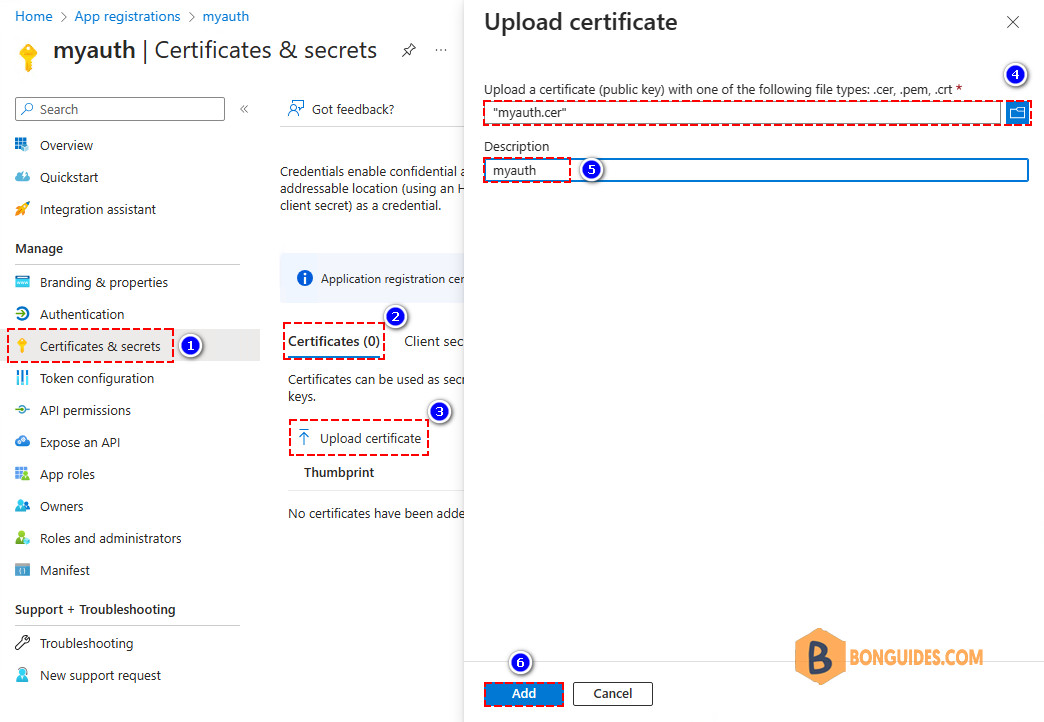
1️⃣ From the app overview:
- Click Certificates & secrets
- Select Certificates
- Click Upload certificate
- Click on the browse icon to search in C:\temp and select the myauth.cer file
- Add description
- Click Add
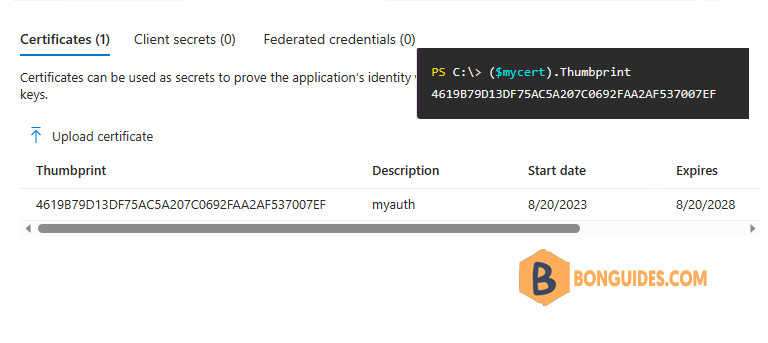
2️⃣ The certificate appears in the list with the thumbprint. Always ensure it has the same certificate thumbprint as the one you created previously.
Connect to Microsoft Graph with CBA
Type the below information to connect to Microsoft Graph PowerShell with Certificate Based Authentication. Run the below PowerShell script to connect to Microsoft Graph with CBA.
# Configuration
$ClientId = "3c17a3d6-8f7f-4407-b76f-ff0d22e4ab7a"
$TenantId = "c032627b-6715-4e39-9990-bcf48ee5e0c5"
$CertificateThumbprint = "4619B79D13DF75AC5A207C0692FAA2AF537007EF"

# Connect to Microsoft Graph with CBA
$params = @{
    ClientId = $ClientId
    TenantId = $TenantId
    CertificateThumbprint = $CertificateThumbprint
}
Connect-MgGraph @params
You are connected to Microsoft Graph. An excellent way to verify is to run the Get-MgContext cmdlet.
PS C:\> Get-MgContext

ClientId               : 3c17a3d6-8f7f-4407-b76f-ff0d22e4ab7a
TenantId               : c032627b-6715-4e39-9990-bcf48ee5e0c5
Scopes                 : {User.Read.All}
AuthType               : AppOnly
TokenCredentialType    : ClientCertificate
CertificateThumbprint  : 4619B79D13DF75AC5A207C0692FAA2AF537007EF
CertificateSubjectName :
Account                :
AppName                : myauth
ContextScope           : Process
Certificate            :
PSHostVersion          : 5.1.19041.3031
ManagedIdentityId      :
ClientSecret           :
Environment            : Global
Assign more permissions to the app
$passwordProfile = @{Password = 'xWwvJ]6NMw+bWH-d'}
$params = @{
  "DisplayName"         = "Test10"
  "MailNickName"        = "Test10"
  "UserPrincipalName"   = "[email protected]"
}

New-MgUser @params -AccountEnabled -PasswordProfile $passwordProfile
PS C:\> Get-MgContext
Scopes : {User.Read.All}
...In the previous session, we’ve assigned the Read-Only permission to the app. And then when you trying to create a new user, you should get the following error.
New-MgUser : Insufficient privileges to complete the operation.
Status: 403 (Forbidden)
ErrorCode: Authorization_RequestDenied
Date: 2023-09-13T12:42:48
This is good, because you just need to add enough permission to an app for specific actions. Anytime, you can add more permissions to the app when you need.
For example, to create a new user using Graph PowerShell. We need to add the scope Directory.ReadWrite.All to the app.
Don’t forget grant admin consent for your organization for the newly added permissions.
Once the permissions are assigned, you need to disconnect the current session then login to a new session to get the changes. As you can see, in the below, the new permission has been assigned to the app.
PS C:\> Get-MgContext

ClientId               : 4ca434dd-463e-4124-9c06-46c765ca67da
TenantId               : c032627b-6715-4e39-9990-bcf48ee5e0c5
Scopes                 : {Directory.ReadWrite.All, User.Read.All}
AuthType               : AppOnly
TokenCredentialType    : ClientSecret
This time, you should be able to create a new user using Graph PowerShell without any issue.
PS C:\> New-MgUser @params -AccountEnabled -PasswordProfile $passwordProfile

DisplayName Id                                   Mail UserPrincipalName
----------- --                                   ---- -----------------
Test10      42844506-ddc3-4c76-8337-73426ab95c56      [email protected]
Conclusion
You learned how to connect to Microsoft Graph PowerShell with a self-signed certificate, client secret, and interactive mode. Remember to update MS Graph module to the latest version, create an application and assign API permissions if you connect with client secret or CBA. With CBA, there is no more user interactions, usernames, passwords, or MFA involved to run automated scripts.
Not a reader? Watch this related video tutorial:


