Table of Contents
Bypass OS Selection Autounattend.xml When Installing Windows
Sometimes, you want to bypass the OS selection when installing Windows. For example, you want to install the same Windows edition on multiple computers, or you want to install a Windows guest VM automatically.
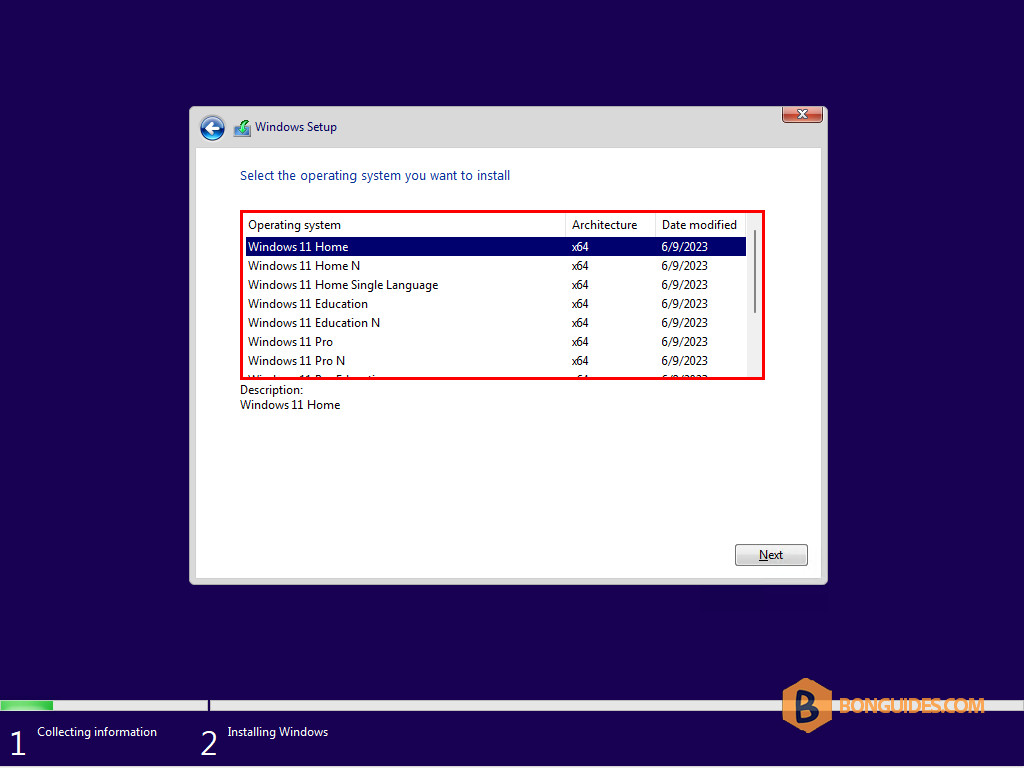
You can use the XML answer file for the Windows unattended installation, but it still prompts you to select the edition to install like below.
To bypass the OS selection page, add the <InstallFrom> tag inside the <ImageInstall> tag as follows.
...
<ImageInstall>
    <OSImage>
        <InstallTo>
            <DiskID>0</DiskID>
            <PartitionID>4</PartitionID>
        </InstallTo>
        <InstallFrom>
            <MetaData wcm:action="add">
                <Key>/IMAGE/INDEX</Key>
                <Value>6</Value>
            </MetaData>
        </InstallFrom>
    </OSImage>
</ImageInstall>
...
The content of the unattended.xml file should look like this:
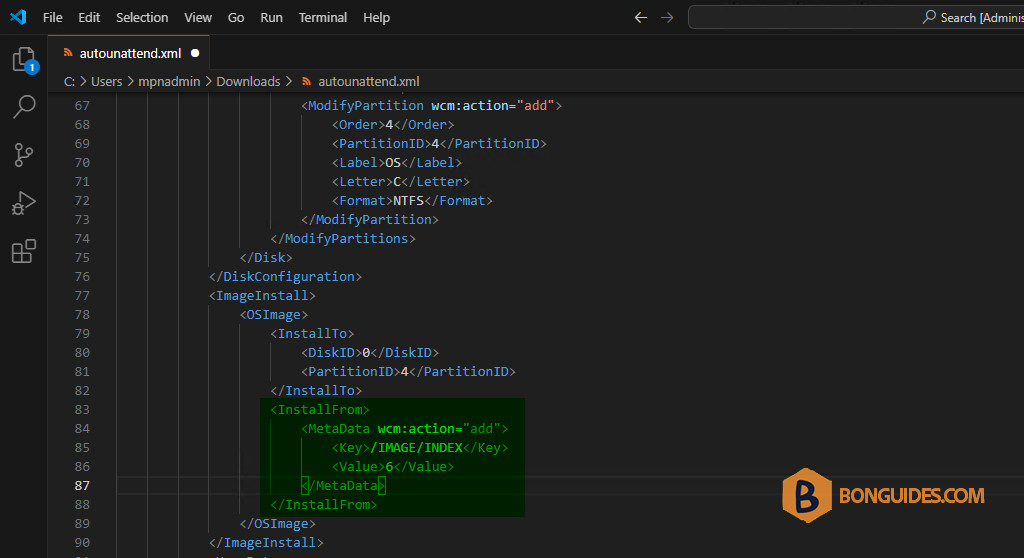
Inside the <InstallFrom> tag, you should modify the Value number to match your own. In our example, 6 is standard for the Windows Pro edition.
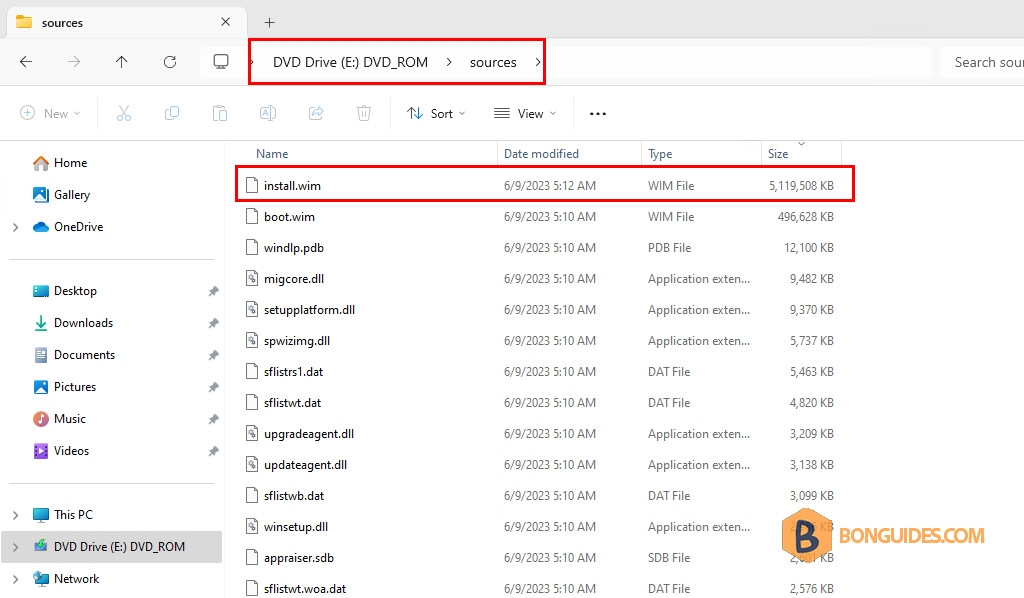
You can find the index number in the install.wim file. The .wim file is in the Sources folder on the USB bootable drive or ISO image file. For example, we mount the ISO image and then check the index number in the ISO image.
Open PowerShell as an administrator, then run the following command to obtain the index numbers. Make sure to modify the path of the .wim file to match yours.
dism /Get-WimInfo /WimFile:F:\Sources\install.wimDeployment Image Servicing and Management tool
Version: 10.0.20348.681
Details for image : F:\Sources\install.wim
...
Index : 6
Name : Windows 10 Pro
Description : Windows 10 Pro
Size : 15,433,359,014 bytes
...
Index : 11
Name : Windows 10 Pro N for Workstations
Description : Windows 10 Pro N for Workstations
Size : 14,666,223,138 bytes
The operation completed successfully.After booting from a USB drive or ISO image file, the setup starts immediately without prompting you to select the Windows edition to install.

<?xml version="1.0" encoding="utf-8"?>
<unattend xmlns="urn:schemas-microsoft-com:unattend" xmlns:wcm="http://schemas.microsoft.com/WMIConfig/2002/State">
	<settings pass="windowsPE">
		<component name="Microsoft-Windows-International-Core-WinPE" processorArchitecture="amd64" publicKeyToken="31bf3856ad364e35" language="neutral" versionScope="nonSxS">
			<SetupUILanguage>
				<UILanguage>en-US</UILanguage>
			</SetupUILanguage>
			<InputLocale>0409:00000409</InputLocale>
				<SystemLocale>en-US</SystemLocale>
				<UILanguage>en-US</UILanguage>
				<UILanguageFallback>en-US</UILanguageFallback>
			<UserLocale>en-US</UserLocale>
		</component>
		<component name="Microsoft-Windows-Setup" processorArchitecture="amd64" publicKeyToken="31bf3856ad364e35" language="neutral" versionScope="nonSxS">
			<DiskConfiguration>
				<Disk wcm:action="add">
					<DiskID>0</DiskID>
					<WillWipeDisk>true</WillWipeDisk>
					<CreatePartitions>
						<!-- Windows RE Tools partition -->
						<CreatePartition wcm:action="add">
							<Order>1</Order>
							<Type>Primary</Type>
							<Size>300</Size>
						</CreatePartition>
						<!-- System partition (ESP) -->
						<CreatePartition wcm:action="add">
							<Order>2</Order>
							<Type>EFI</Type>
							<Size>500</Size>
						</CreatePartition>
						<!-- Microsoft reserved partition (MSR) -->
						<CreatePartition wcm:action="add">
							<Order>3</Order>
							<Type>MSR</Type>
							<Size>128</Size>
						</CreatePartition>
						<!-- Windows partition -->
						<CreatePartition wcm:action="add">
							<Order>4</Order>
							<Type>Primary</Type>
							<Extend>true</Extend>
						</CreatePartition>
					</CreatePartitions>
					<ModifyPartitions>
						<!-- Windows RE Tools partition -->
						<ModifyPartition wcm:action="add">
							<Order>1</Order>
							<PartitionID>1</PartitionID>
							<Label>WINRE</Label>
							<Format>NTFS</Format>
							<TypeID>DE94BBA4-06D1-4D40-A16A-BFD50179D6AC</TypeID>
						</ModifyPartition>
						<!-- System partition (ESP) -->
						<ModifyPartition wcm:action="add">
							<Order>2</Order>
							<PartitionID>2</PartitionID>
							<Label>System</Label>
							<Format>FAT32</Format>
						</ModifyPartition>
						<!-- MSR partition does not need to be modified -->
							<ModifyPartition wcm:action="add">
							<Order>3</Order>
							<PartitionID>3</PartitionID>
							</ModifyPartition>
						<!-- Windows partition -->
						<ModifyPartition wcm:action="add">
							<Order>4</Order>
							<PartitionID>4</PartitionID>
							<Label>OS</Label>
							<Letter>C</Letter>
							<Format>NTFS</Format>
						</ModifyPartition>
					</ModifyPartitions>
				</Disk>
			</DiskConfiguration>
			<ImageInstall>
				<OSImage>
					<InstallTo>
						<DiskID>0</DiskID>
						<PartitionID>4</PartitionID>
					</InstallTo>
					<InstallToAvailablePartition>false</InstallToAvailablePartition>
				</OSImage>
			</ImageInstall>
			<UserData>
				<ProductKey>
					<!-- Leave the Key element blank if you are using trial ISOs -->
					<!-- <Key></Key> -->
					<!-- This is a key used only for installation, not for activation -->
					<!-- Microsoft Generic Volume License Key (GVLK): https://learn.microsoft.com/en-us/windows-server/get-started/kms-client-activation-keys -->
					<!-- Windows 10/11 Pro -->
					<!-- <Key>W269N-WFGWX-YVC9B-4J6C9-T83GX</Key> -->
					<!-- Windows 10/11 Pro for Workstations -->
					<Key>NRG8B-VKK3Q-CXVCJ-9G2XF-6Q84J</Key>
					<WillShowUI>OnError</WillShowUI>
				</ProductKey>
				<AcceptEula>true</AcceptEula>
				<FullName>admin</FullName>
				<Organization></Organization>
			</UserData>
		</component>
	</settings>
	<settings pass="offlineServicing">
		<component name="Microsoft-Windows-LUA-Settings" processorArchitecture="amd64" publicKeyToken="31bf3856ad364e35" language="neutral" versionScope="nonSxS">
			<EnableLUA>false</EnableLUA>
		</component>
	</settings>
	<settings pass="generalize">
		<component name="Microsoft-Windows-Security-SPP" processorArchitecture="amd64" publicKeyToken="31bf3856ad364e35" language="neutral" versionScope="nonSxS">
			<SkipRearm>1</SkipRearm>
		</component>
	</settings>
	<settings pass="specialize">
		<component name="Microsoft-Windows-International-Core" processorArchitecture="amd64" publicKeyToken="31bf3856ad364e35" language="neutral" versionScope="nonSxS">
			<InputLocale>0409:00000409</InputLocale>
			<SystemLocale>en-US</SystemLocale>
			<UILanguage>en-US</UILanguage>
			<UILanguageFallback>en-US</UILanguageFallback>
			<UserLocale>en-US</UserLocale>
		</component>
		<component name="Microsoft-Windows-Security-SPP-UX" processorArchitecture="amd64" publicKeyToken="31bf3856ad364e35" language="neutral" versionScope="nonSxS">
			<SkipAutoActivation>true</SkipAutoActivation>
		</component>
		<component name="Microsoft-Windows-SQMApi" processorArchitecture="amd64" publicKeyToken="31bf3856ad364e35" language="neutral" versionScope="nonSxS">
			<CEIPEnabled>0</CEIPEnabled>
		</component>
		<component name="Microsoft-Windows-Shell-Setup" processorArchitecture="amd64" publicKeyToken="31bf3856ad364e35" language="neutral" versionScope="nonSxS">
			<ComputerName></ComputerName>
			<!-- <ProductKey>W269N-WFGWX-YVC9B-4J6C9-T83GX</ProductKey> -->
		</component>
	</settings>
	<settings pass="oobeSystem">
		<component name="Microsoft-Windows-Shell-Setup" processorArchitecture="amd64" publicKeyToken="31bf3856ad364e35" language="neutral" versionScope="nonSxS">
			<AutoLogon>
				<Password>
					<Value></Value>
					<PlainText>true</PlainText>
				</Password>
				<Enabled>true</Enabled>
				<Username>admin</Username>
			</AutoLogon>
			<OOBE>
				<HideEULAPage>true</HideEULAPage>
				<HideOEMRegistrationScreen>true</HideOEMRegistrationScreen>
				<HideOnlineAccountScreens>true</HideOnlineAccountScreens>
				<HideWirelessSetupInOOBE>true</HideWirelessSetupInOOBE>
				<NetworkLocation>Work</NetworkLocation>
				<SkipUserOOBE>true</SkipUserOOBE>
				<SkipMachineOOBE>true</SkipMachineOOBE>
				<ProtectYourPC>3</ProtectYourPC>
			</OOBE>
			<UserAccounts>
				<LocalAccounts>
					<LocalAccount wcm:action="add">
						<Password>
							<Value></Value>
							<PlainText>true</PlainText>
						</Password>
						<Description></Description>
						<DisplayName>admin</DisplayName>
						<Group>Administrators</Group>
						<Name>admin</Name>
					</LocalAccount>
				</LocalAccounts>
			</UserAccounts>
			<RegisteredOrganization></RegisteredOrganization>
			<RegisteredOwner>admin</RegisteredOwner>
			<DisableAutoDaylightTimeSet>false</DisableAutoDaylightTimeSet>
			<FirstLogonCommands>
				<SynchronousCommand wcm:action="add">
					<Description>Control Panel View</Description>
					<Order>1</Order>
					<CommandLine>reg add "HKEY_CURRENT_USER\Software\Microsoft\Windows\CurrentVersion\Explorer\ControlPanel" /v StartupPage /t REG_DWORD /d 1 /f</CommandLine>
					<RequiresUserInput>true</RequiresUserInput>
				</SynchronousCommand>
				<SynchronousCommand wcm:action="add">
					<Order>2</Order>
					<Description>Control Panel Icon Size</Description>
					<RequiresUserInput>false</RequiresUserInput>
					<CommandLine>reg add "HKEY_CURRENT_USER\Software\Microsoft\Windows\CurrentVersion\Explorer\ControlPanel" /v AllItemsIconView /t REG_DWORD /d 0 /f</CommandLine>
				</SynchronousCommand>
				<SynchronousCommand wcm:action="add">
					<Order>3</Order>
					<RequiresUserInput>false</RequiresUserInput>
					<CommandLine>cmd /C wmic useraccount where name="admin" set PasswordExpires=false</CommandLine>
					<Description>Password Never Expires</Description>
				</SynchronousCommand>
			</FirstLogonCommands>
			<TimeZone>SE Asia Standard Time</TimeZone>
		</component>
	</settings>
</unattend>Not a reader? Watch this related video tutorial: