Table of Contents
As we know that to do database management easily, we can take advantage of free open-source software tools such as phpMyAdmin. Without these two tools, we should be familiar with the MySQL or MariaDB variable system through the command line interface.
In this post, we will install and configure phpMyAdmin manually on CentOS 7 with Nginx & PHP-FPM running inside the machine.
Prerequisites
Before moving into the installation procedure make sure to meet the following requirements:
- A vps on cloud or bare metal running under distro CentOS 7.
- Must have NGINX and PHP-FPM installed on the machine.
- Superuser Privileges (Root Access).
- Server IPv4 Address & Its Password.
- PuTTY SSH Client for Windows or Linux terminal app.
Install phpMyAdmin Manually on CentOS 7
1. First of all please directly download the latest stable release of phpMyAdmin using wget command.
cd /usr/share
sudo yum install epel-release unzip -y
sudo wget https://files.phpmyadmin.net/phpMyAdmin/5.2.0/phpMyAdmin-5.2.0-all-languages.zip
2. Extract the downloaded file phpMyAdmin-5.2.0-all-languages.zip using the unzip command and rename the extracted directory to phpmyadmin then remove the downloaded zip file from your server.
sudo unzip phpMyAdmin-5.2.0-all-languages.zip
sudo mv phpMyAdmin-5.2.0-all-languages phpmyadmin
sudo rm -f phpMyAdmin-5.2.0-all-languages.zip
3. Create a symbolic link between your phpmyadmin directory to the public folder or documents root of your NGINX web server. In this case, my site located in /var/www/bonguides.me.
sudo ln -s /usr/share/phpmyadmin /var/www/bonguides.meThen I run the following command to verify the symlink was created:
ls -l /var/www/bonguides.me/
total 224
-rw-r--r--.  1 nginx nginx   405 Feb  6  2020 index.php
-rw-r--r--.  1 nginx nginx 19915 Dec 31  2021 license.txt
lrwxrwxrwx   1 nginx nginx    21 Nov  4 05:35 phpmyadmin -> /usr/share/phpmyadmin
-rw-r--r--.  1 nginx nginx  7389 Sep 16 18:27 readme.html
5. Grant permission for user nginx then restart php-fpm and nginx services.
sudo chown -R nginx: /var/www/bonguides.me
sudo chown nginx:nginx /var/lib/php/session
sudo systemctl restart php-fpm && sudo systemctl restart nginxFinally, you can access phpMyAdmin for the first time at the following URLs:
###Using the server ip address
http(s)://server_IPv4_address/phpmyadmin

###Using domain name
http(s)://yourdomain.com/phpmyadmin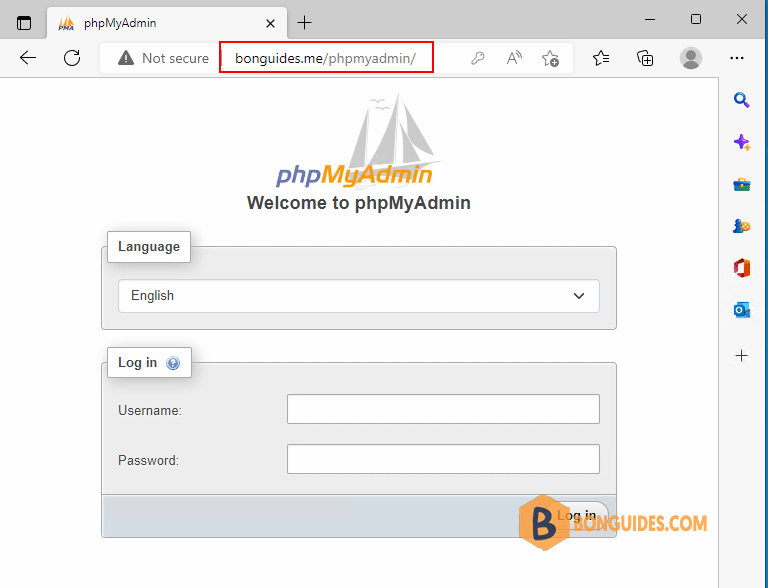
Secure phpMyAdmin
Changing phpMyAdmin’s Default Location
One way to protect your phpMyAdmin installation is by making it harder to find. Bots will scan for common paths, like /phpmyadmin, /pma, /admin, /mysql, and other similar names.
Changing the interface’s URL from /phpmyadmin to something non-standard will make it much harder for automated scripts to find your phpMyAdmin installation and attempt brute-force attacks.
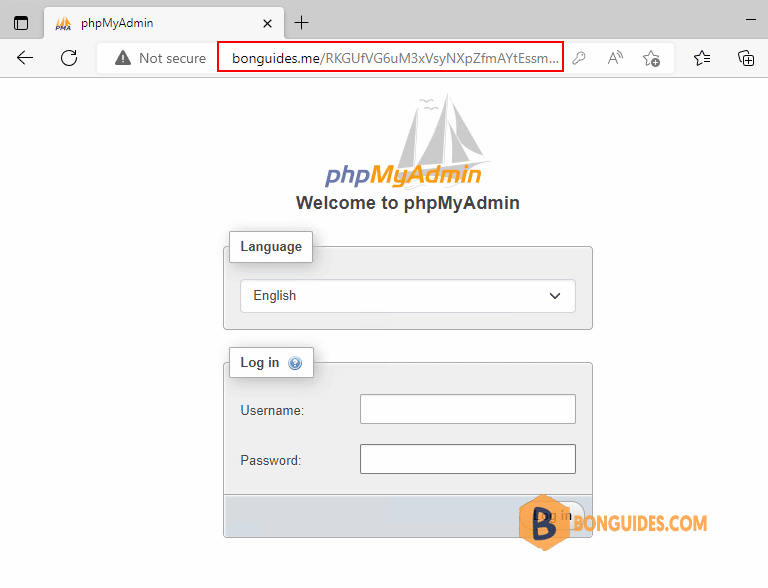
In the previous step, you created a symbolic link in your Nginx web root pointing to /usr/share/phpmyadmin, where the actual phpMyAdmin application files are located. You can rename this symbolic link to change phpMyAdmin’s interface URL.
cd /var/www/your_domain/
sudo mv phpmyadmin RKGUfVG6uM3xVsyNXpZfmAYtEssmrSv8qZ
# ls -l /var/www/bonguides.me/
...
lrwxrwxrwx 1 root root 21 Nov 4 RKGUfVG6uM3xVsyNXpZfmAYtEssmrSv8qZ -> /usr/share/phpmyadmin
...Now when you go to the URL you previously used to access phpMyAdmin, you’ll get a 404 error:
You can instead access your phpMyAdmin interface at the new URL you just configured.
Creating an Authentication Gateway
Hiding your phpMyAdmin installation in an unusual location might sidestep some automated bots scanning the network, but it’s useless against targeted attacks. To better protect a web application with restricted access, it’s generally more effective to stop attackers before they can even reach the application. This way, they’ll be unable to use generic exploits and brute-force attacks to guess access credentials.
1. Create an encrypted password using openssl passwd command. You will be prompted to enter and confirm the password that you wish to use. The utility will then display an encrypted version of the password that will look something like this:
# openssl passwd
Password:
Verifying - Password:
Warning: truncating password to 8 characters
KM1..mx3Z6Nnk
2. Copy this value, as you will need to include it in the authentication file you are about to create.
3. Now, create an authentication file. For the purposes of this guide, we’ll call this file pma_pass and place it in the Nginx configuration directory.
In this example the user is named tonny, but you can choose any username you’d like. This doesn’t need to be the name of an existing user profile on your CentOS server or that of a MySQL user.
echo 'tonny:KM1..mx3Z6Nnk' >> /etc/nginx/pma_pass4. Verify the file was created using cat command.
# cat /etc/nginx/pma_pass
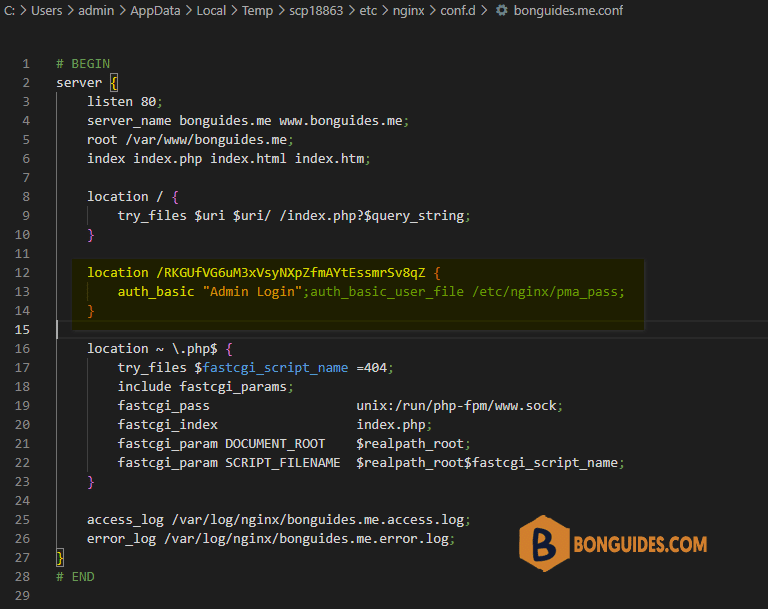
tonny:KM1..mx3Z6Nnk5. Next, you’ll need to modify the Nginx configuration file. Add the following highlighted lines within the main server block.
server {
	listen 80;
	server_name bonguides.me;
    ...
    ...
    location /RKGUfVG6uM3xVsyNXpZfmAYtEssmrSv8qZ {
        auth_basic "Admin Login";auth_basic_user_file /etc/nginx/pma_pass;
        }
}
6. Restart the nginx and php-fpm services.
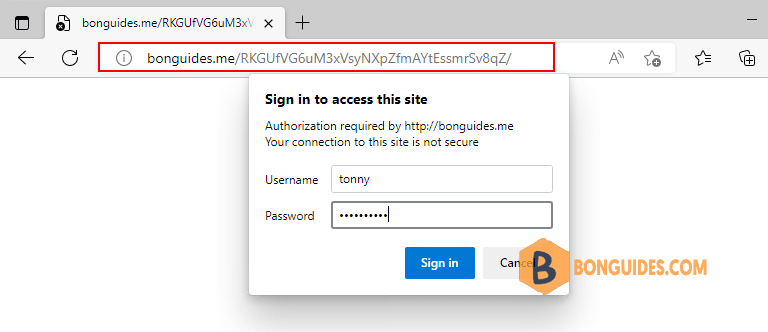
sudo systemctl restart php-fpm && sudo systemctl restart nginx7. Now when you visit the phpMyAdmin URL in your web browser, you will be prompted for the username and password you added to the pma_pass file:
8. Once you enter your credentials, you’ll be taken to the standard phpMyAdmin login page.