Table of Contents
Windows Sandbox
You use Windows Sandbox a lot for testing packages or software. Sometimes you want to start it with specific options. This post shows you how to map folders into the sandbox automatically.
You can use configuration files to customize Windows Sandbox options. A .wsb file is a configuration file that specifies how Windows Sandbox should run. It can include settings such as networking options, shared folders, mapped drives, startup commands, and more. Here is a list of the options that can be configured:
- vGPU (virtualized GPU): Enable or disable the virtualized GPU. If vGPU is disabled, the sandbox will use Windows Advanced Rasterization Platform (WARP).
- Networking: Enable or disable network access within the sandbox.
- Mapped folders: Share folders from the host with read or write permissions. Note that exposing host directories may allow malicious software to affect the system or steal data.
- Logon command: A command that’s executed when Windows Sandbox starts.
- Audio input: Shares the host’s microphone input into the sandbox.
- Video input: Shares the host’s webcam input into the sandbox.
- Protected client: Places increased security settings on the RDP session to the sandbox.
- Printer redirection: Shares printers from the host into the sandbox.
- Clipboard redirection: Shares the host clipboard with the sandbox so that text and files can be pasted back and forth.
- Memory in MB: The amount of memory, in megabytes, to assign to the sandbox.
For example, we’ll create a shared folder on the host machine, map it into the sandbox on starts then install some apps from the mapped folder in the sandbox automatically.
Create a share folder
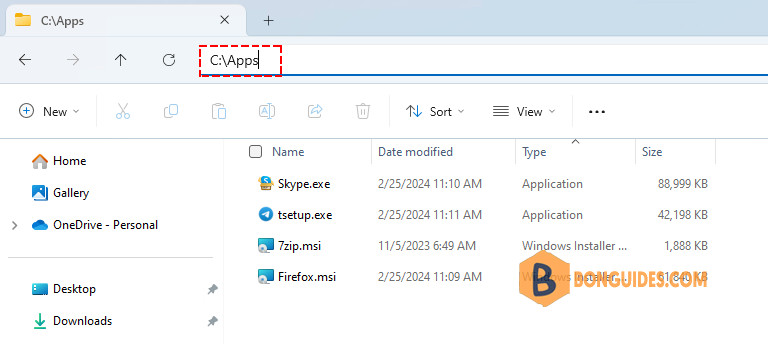
1. Create the C:\Apps folder on the host machine. Download the installers or setup files then copy them to that folder on the host machine. For example, we’ll install 7-Zip, Firefox, Skype and Telegram when the sandbox starts.

2. Create a batch script in the C:\Apps folder on the host machine using any text editor. Below is the content of the script to install the apps automatically when the sandbox starts.
@echo on
msiexec /i C:\Apps\7zip.msi /qn
msiexec /i C:\Apps\Firefox.msi /qn

C:\Apps\skype.exe /VERYSILENT /NORESTART /SUPPRESSMSGBOXES /DL=1
C:\Apps\tsetup.exe /verysilent
For instance, we’ve created a batch script C:\Apps\install.bat using the Notepad.

How to Create Shared Folder in Windows Sandbox
Below are the steps to create a .wsb file to map a folder from the host to the sandbox. Then run a logon command to install apps automatically when the sandbox is started.
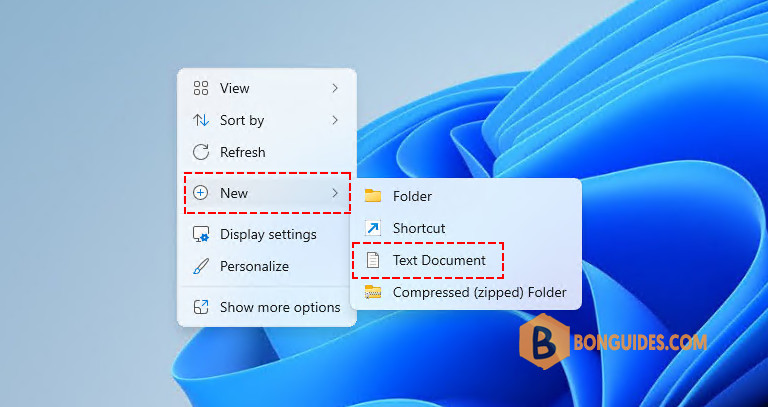
1. Right click on the desktop then create a new text document.

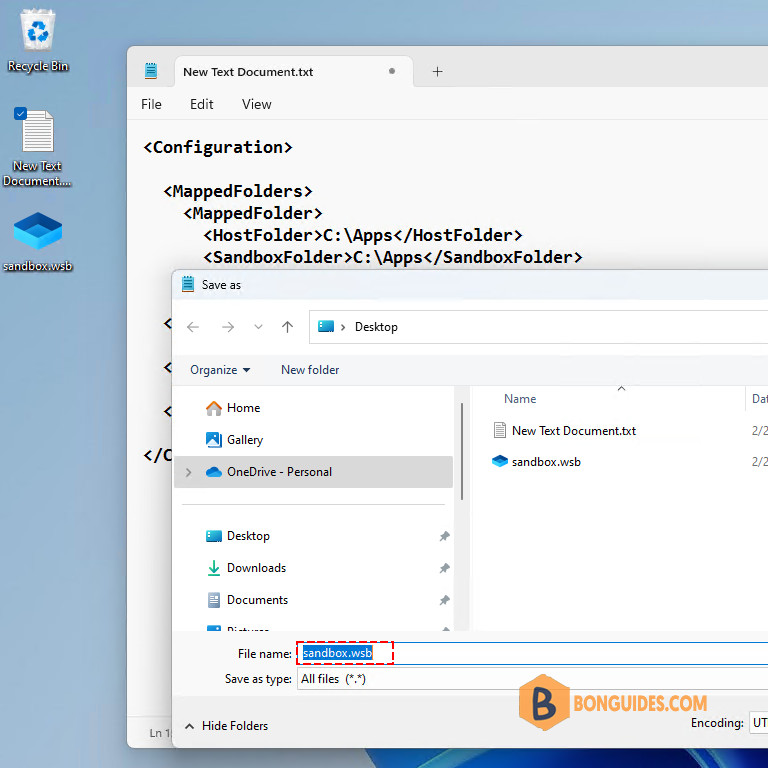
2. Below is an example of sandbox configuration file. When a sandbox instance starts:
- The folder C:\Apps would be mapped to the sandbox at C:\Apps.
- The logon command will run the batch script then install all the apps automatically.
Sandbox mapped folder configurations:
- At this time, relative paths aren’t supported.
- HostFolder: Specifies the folder on the host machine to share into the sandbox. The folder must already exist on the host, or the container will fail to start.
SandboxFolder: Specifies the destination in the sandbox to map the folder to. If the folder doesn’t exist, it will be created. If no sandbox folder is specified, the folder will be mapped to the container desktop.
ReadOnly: If true, enforces read-only access to the shared folder from within the container. Supported values: true/false. Defaults to false.
<Configuration>

  <MappedFolders>
    <MappedFolder>
      <HostFolder>C:\Apps</HostFolder>
      <SandboxFolder>C:\Apps</SandboxFolder>
      <ReadOnly>false</ReadOnly>
    </MappedFolder>
  </MappedFolders>

  <LogonCommand>
    <Command>C:\Apps\install.bat</Command>
  </LogonCommand>

</Configuration>
3. Save the file with any name, but make sure the file extension is .wsb.


Every time you run a new sandbox session, the C:\Apps folder will be mapped into the sandbox container automatically. The logon command will be executed, and the apps will be installed.
More examples about logon command
LogonCommand is a single command that will be invoked automatically after the sandbox logs on. Although very simple commands will work (such as launching an executable or script), more complicated scenarios involving multiple steps should be placed into a script file. This script file may be mapped into the container via a shared folder, and then executed via the LogonCommand directive.
1. Open Command Prompt when the sandbox starts:
<Configuration>
  <LogonCommand>
    <Command>powershell -executionpolicy unrestricted -command "start cmd {-noexit}"</Command>
  </LogonCommand>
</Configuration>
2. Open PowerShell when the sandbox starts:
<Configuration>
  <LogonCommand>
    <Command>powershell -executionpolicy unrestricted -command "start cmd {-noexit}"</Command>
  </LogonCommand>
</Configuration>
3. Open a website when the sandbox starts.
<Configuration>
  <LogonCommand>
    <Command>powershell -executionpolicy unrestricted -command "start msedge {-noexit https://bonguides.com}"</Command>
  </LogonCommand>
</Configuration>
4. Start the Windows sandbox with the Windows Package Manager pre-installed.
<Configuration>
  <LogonCommand>
    <Command>powershell -executionpolicy unrestricted -command "start powershell {-noexit irm bonguides.com/winget | iex}"</Command>
  </LogonCommand>
</Configuration>
5. Start the Windows sandbox with the Windows Terminal pre-installed.
<Configuration>
  <LogonCommand>
    <Command>powershell -executionpolicy unrestricted -command "start powershell {-noexit irm bonguides.com/terminal | iex}"</Command>
  </LogonCommand>
</Configuration>
6. Start the Windows sandbox with the Microsoft Visual Studio Code (VSCode) pre-installed.
<Configuration>
  <LogonCommand>
    <Command>powershell -executionpolicy unrestricted -command "start powershell {-noexit irm bonguides.com/vscode | iex}"</Command>
  </LogonCommand>
</Configuration>Not a reader? Watch this related video tutorial:


