Table of Contents
When you add aliases, functions, and variables, you are actually adding them only to the current Windows PowerShell session. If you exit the session or close Windows PowerShell, the changes are lost.
To retain these changes, you can create a Windows PowerShell profile and add the aliases, functions, and variables to the profiles. The profile is loaded every time that Windows PowerShell starts.
To load a profile, your Windows PowerShell execution policy must permit you to load configuration files. If it does not, the attempt to load the profile fails and Windows PowerShell displays an error message.
Understanding PowerShell Profiles
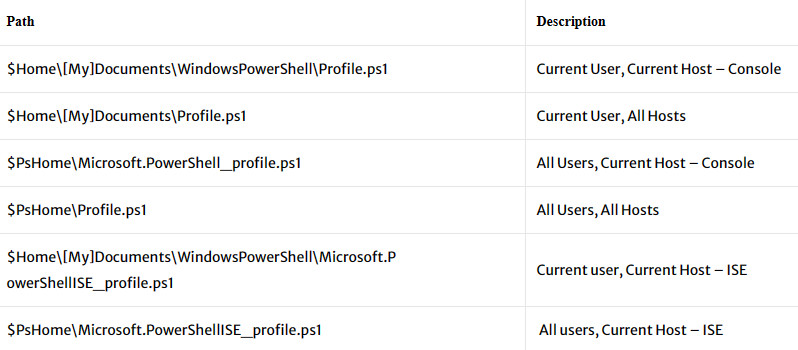
You can have six different profiles in Windows PowerShell. The profiles are listed in load order. The most specific profiles have precedence over less specific profiles where they apply. The following Table lists the six profiles and their associated locations.

In above table, Console refers to the Windows PowerShell command prompt and ISE refers to the Windows PowerShell Integrated Scripting Environment.
Creating a Profile
To save the variables, aliases, functions, and commands that you use routinely, and make them available in every Windows PowerShell session, you need to add them to your Windows PowerShell profile. You can also create, share, and distribute profiles to enforce a consistent view of Windows PowerShell in a larger enterprise.
Windows PowerShell profiles are not created automatically. To create a profile, create a text file with the specific name in the specified location. Typically, you will use the user-specific, shell-specific profile, known as the Windows PowerShell user profile. The location of this profile is stored in the $profile variable.
To display the path to the Windows PowerShell profile, you can use $profile variable as shown below:
PS C:\> $PROFILE
C:\Users\admin\Documents\WindowsPowerShell\Microsoft.PowerShell_profile.ps1
To determine whether a Windows PowerShell profile has been created on the system, you can use Test-Path cmdlet as shown below. If the profile exists, the command will return True; otherwise, it returns False.
PS C:\> Test-Path $profile
False
To create a Windows PowerShell profile file, use the following command:
PS C:\> New-Item -Path $profile -ItemType File -Force

    Directory: C:\Users\admin\Documents\WindowsPowerShell

Mode                 LastWriteTime         Length Name
----                 -------------         ------ ----
-a----         8/10/2023  12:07 AM              0 Microsoft.PowerShell_profile.ps1
If you want to create other profile, such as the profile that applies to all users and all shells, you can use the following command:
PS C:\> New-Item -Path $pshome\profile.ps1 -ItemType file -Force

    Directory: C:\Windows\System32\WindowsPowerShell\v1.0

Mode                 LastWriteTime         Length Name
----                 -------------         ------ ----
-a----         8/10/2023  12:08 AM              0 profile.ps1
The profile is effective only when the file is located exactly in the path and with the file name that is stored in the $profile variable. Therefore, if you create a profile in Notepad and then save it, or if you copy a profile to your system, be sure to save the file in the path and with the file name specified in the $profile variable.
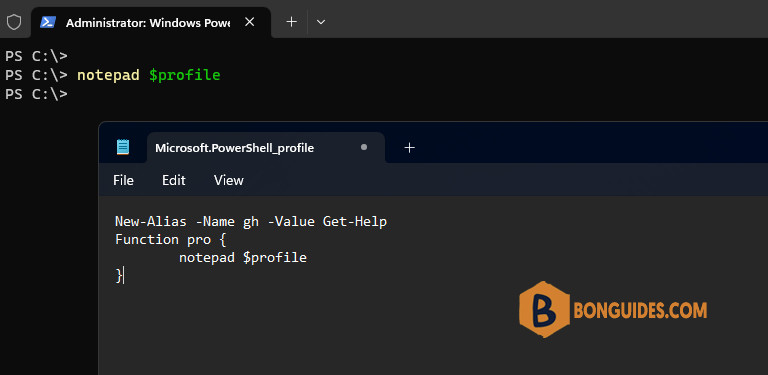
Now open the profile configuration file in Notepad using the following command:
PS C:\> New-Item -Path $pshome\profile.ps1 -ItemType file -Force

    Directory: C:\Windows\System32\WindowsPowerShell\v1.0

Mode                 LastWriteTime         Length Name
----                 -------------         ------ ----
-a----         8/10/2023  12:08 AM              0 profile.ps1
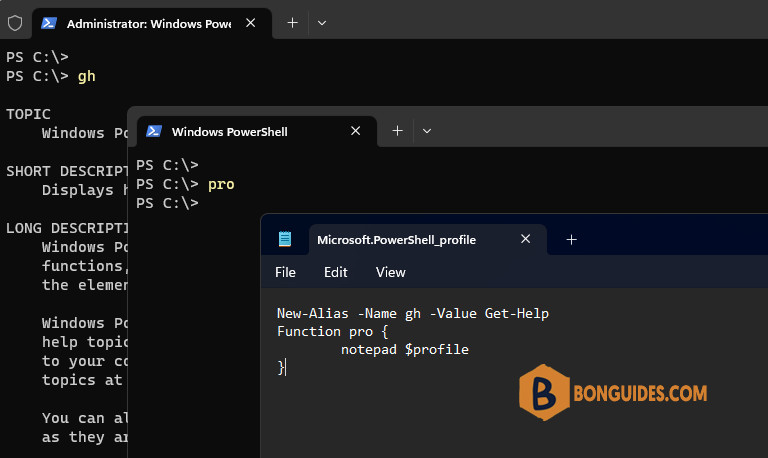
Now, use the profile to store the aliases, functions, and variables that you use routinely. For example, create an alias gh for Get-Help cmdlet which is most widely used in PowerShell. And create a function called pro that opens the user profile in Notepad. Copy and paste the following lines to $profile file which is opened into notepad:

Now save the file and close the notepad. Keep adding your own aliases and functions to your profile in order to load them automatically every time you open a new PowerShell session. A well-designed profile can make it even easier to use Windows PowerShell and to administer the system.

Create a Transcript
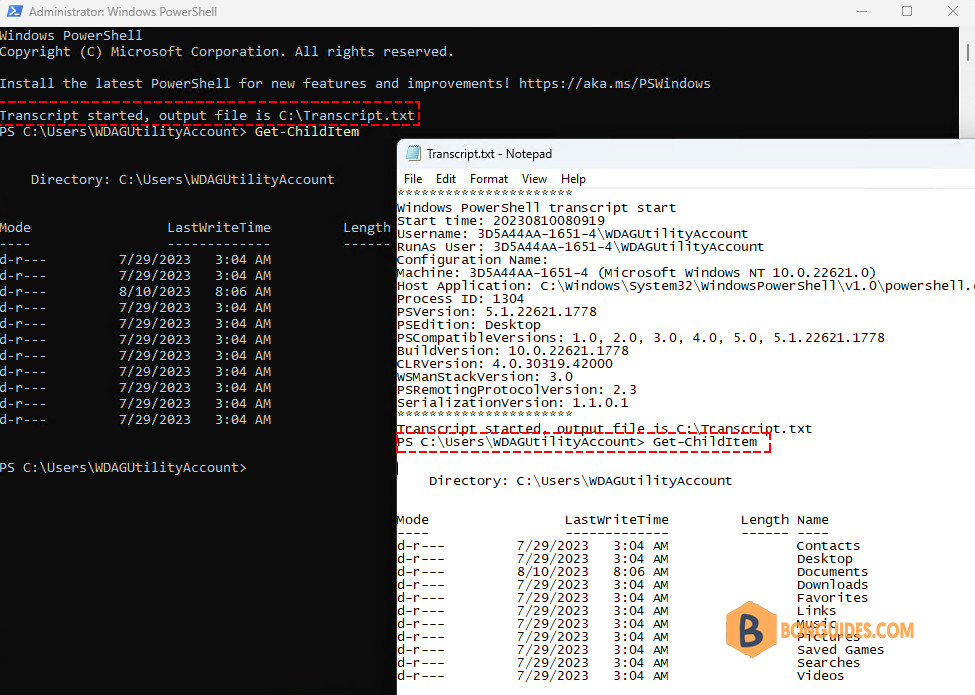
The PowerShell includes a transcript feature to help you record all your activities at the PowerShell prompt. The Start-Transcript cmdlet creates a record of all command that the user types and all output that appears on the console.
Starting in Windows PowerShell 5.0, Start-Transcript includes the host name in the generated file name of all transcripts. This is especially useful when your enterprise’s logging is centralized. Files that are created by Start-Transcript include random characters in names to prevent overwriting or duplication when two or more transcripts are started nearly simultaneously, and to help prevent unauthorized discovery of transcripts that are stored in a centralized file share. Additionally in Windows PowerShell 5.0, the Start-Transcript cmdlet also works with Windows PowerShell ISE.
You can use Start-Transcript cmdlet in your PowerShell profile to automatically start logging of your PowerShell session every time you open a session. To do this open the profile using notepad and add the Start-Transcript command and save the profile file. Alternatively, you can run the following command:
Add-Content $profile "Start-Transcript C:\Transcript.txt -Append -ErrorAction SilentlyContinue"The -Append parameter allow you to always add the new transcript to the end of an existing file. The -ErrorAction SilientlyContinue is used to suppress any errors during profile loading. To stop recording the session, use Stop-Transcript cmdlet.


