Table of Contents
I have created many PowerShell scripts for the last couple of years. All with a single purpose to automate my IT work as much as possible. But this week I needed to create a script that could be run by the users themselves. And users and command line aren’t the best combination, so let’s take a look at using the PowerShell GUI.
The objective of this chapter is to cover the basics of creating a graphical user interface (GUI) using Windows PowerShell. Although Windows PowerShell itself does not include any GUI capabilities, it does have access to the .NET framework, including the WinForms programming interface.
Overview of WinForms
WinForms is a subset of the .NET framework designed specifically for the creation of Windows based GUIs. It allows GUI controls (such as buttons and labels) to be placed in containers (such as a form) and displayed to the user.
In addition, an event handling mechanism allows the programmer to define what actions are taken when a user interacts with a control or container (for example clicking on a button or resizing a dialog). Through the use of properties, the programmer is also able to control the appearance and behavior of controls and containers, for example changing the text displayed by a label.
In the remainder of this chapter, we will work through some examples which cover the key aspects of WinForms based GUI development using Windows PowerShell.
Loading the Winforms .NET Assembly
As outlined in the chapter entitled An Overview of Windows PowerShell 1.0 and .NET, only a few .NET assemblies are loaded into Windows PowerShell by default. As WinForms is not amongst the pre-loaded assemblies, it is necessary to load WinForms prior to creating GUIs. Assemblies are loaded using the static LoadWith PartialName method of the [reflection.assembly] class, passing through the name of the WinForms assembly as an argument:
Add-Type -AssemblyName System.Windows.Forms, System.DrawingOnce loaded, we are ready to create a simple GUI from within Windows PowerShell.
Basic Windows PowerShell GUI
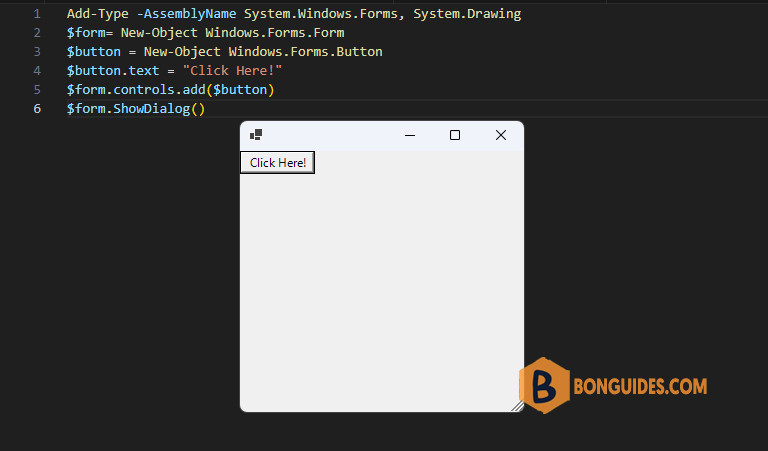
Once the WinForms assembly has been loaded the next step is to create a simple example. As previously discussed, WinForms GUIs consist of containers, controls and events. With this in mind, the following example creates a form (container) and a button (control), adds the button to the form and displays the dialog:
Add-Type -AssemblyName System.Windows.Forms, System.Drawing
$form= New-Object Windows.Forms.Form
$button = New-Object Windows.Forms.Button
$button.text = "Click Here!"
$form.controls.add($button)
$form.ShowDialog()
When executed, the resulting dialog will appear as follows:
Windows PowerShell and WinForms Events
The next area to cover involves the handling of events. An event is typically triggered when a user interacts with a control. For example, clicking on a button control will trigger an event. Event handlers are nothing more than lines of code which define what is to happen when the event is triggered (for example, an event handler may be written to exit the application when a Close button is clicked).
In Windows PowerShell, event handlers take the form of scriptblocks, which are essentially sequences of commands wrapped in braces ({}).
Event handlers are added to a control using methods which have the following syntax:
add_<eventname> ({scriptblock})Where <eventname> is the name of the event to be handled and <scriptblock> is the code to be executed when the event is triggered. For example, to close the dialog in the above example when the button is clicked:
$button.add_click({ $form.close() })Using scriptblocks would quickly become unwieldy if all the code to be executed had to be included along with the add_<eventname> method. An alternative to this approach is to call a function instead. The following adaptation of our example defines a function called MyFunction and subsequently references it in the event handler scriptblock:
Add-Type -AssemblyName System.Windows.Forms, System.Drawing
function MyFunction
{
     $form.close()
}

$form= New-Object Windows.Forms.Form
$button = New-Object Windows.Forms.Button
$button.text = "Click Here!"
$button.add_click({MyFunction})
$form.controls.add($button)
$form.ShowDialog()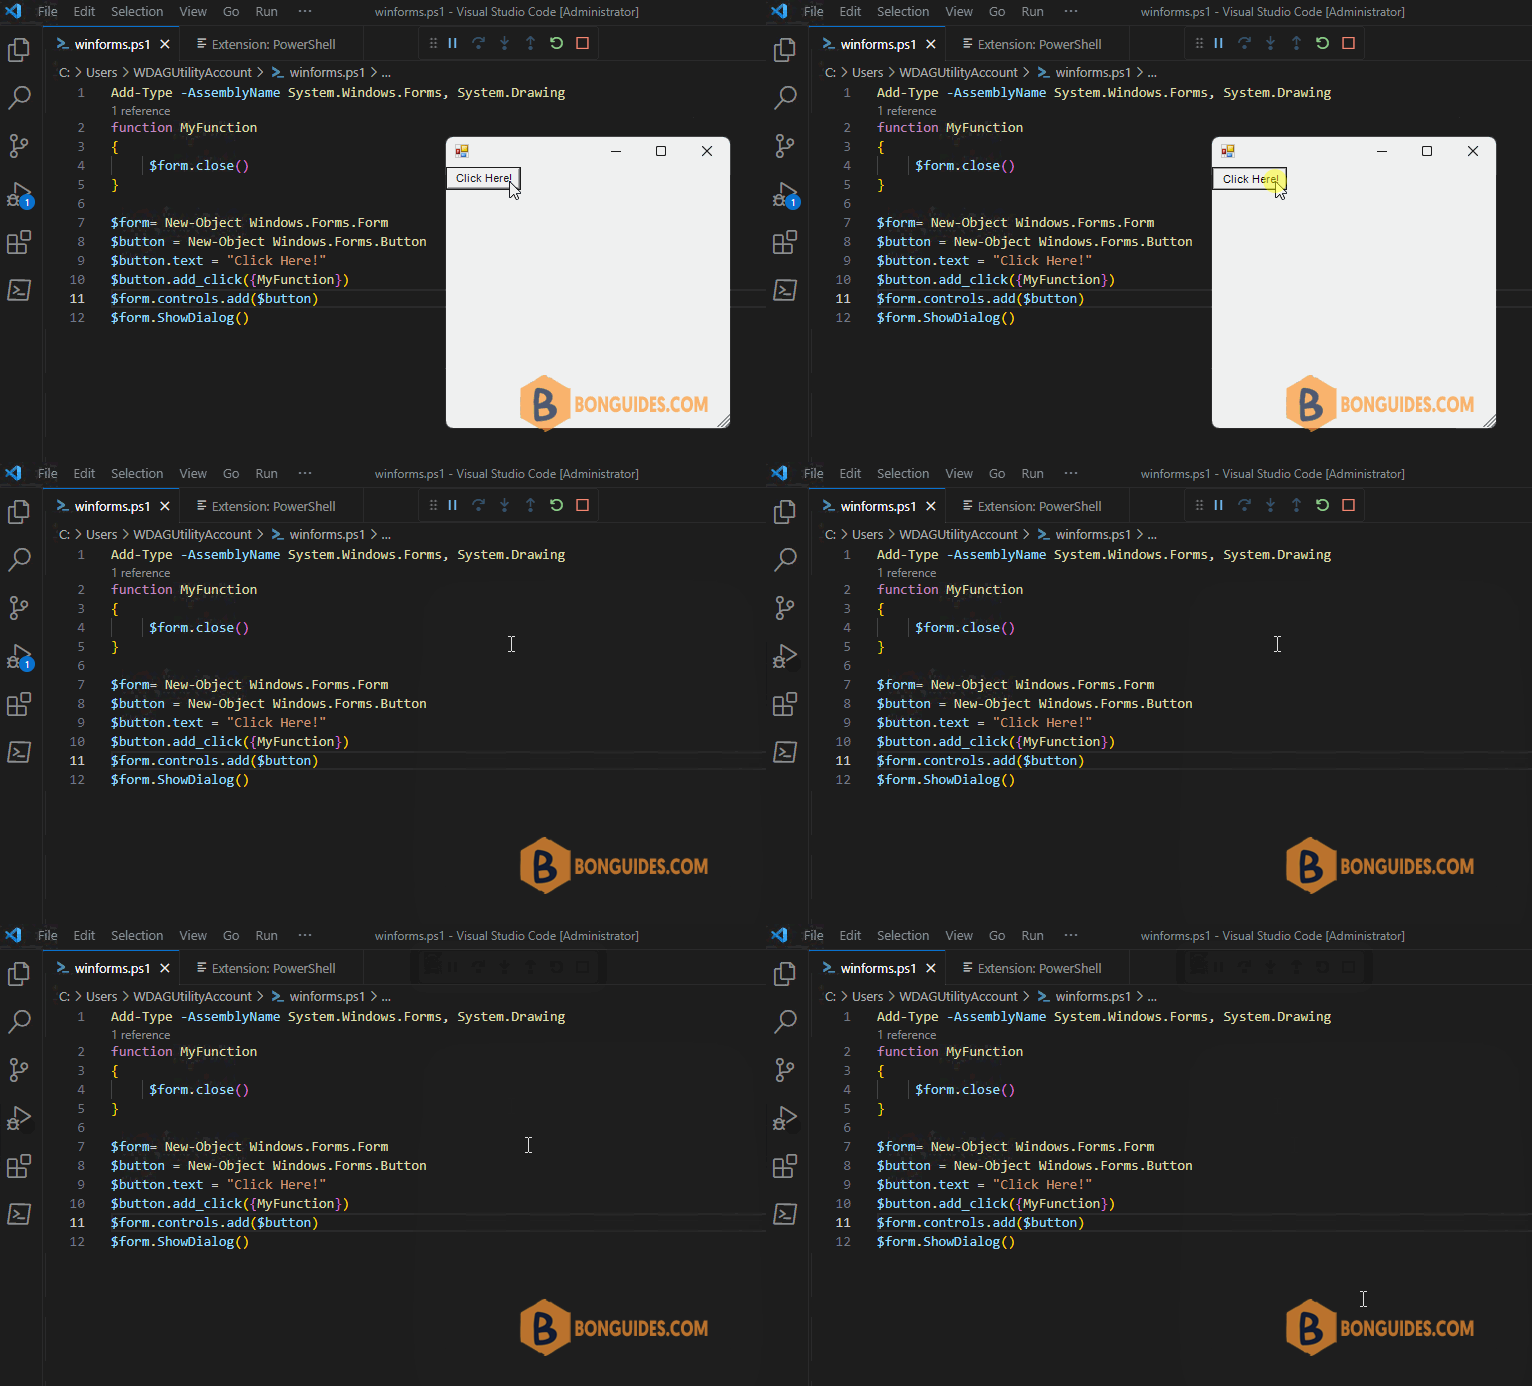
Setting WinForms Properties
WinForms components are essentially objects, and as such, have properties which can be set to alter component appearance and behavior. As with other object properties, these can be accessed using standard dot notation. In the previous example, we used this approach to set the text of the button control:
$button.text = "Click Here!"Similarly, we could set the title of the form using the form object’s text property:
$form.text = "PowerShell WinForms Example"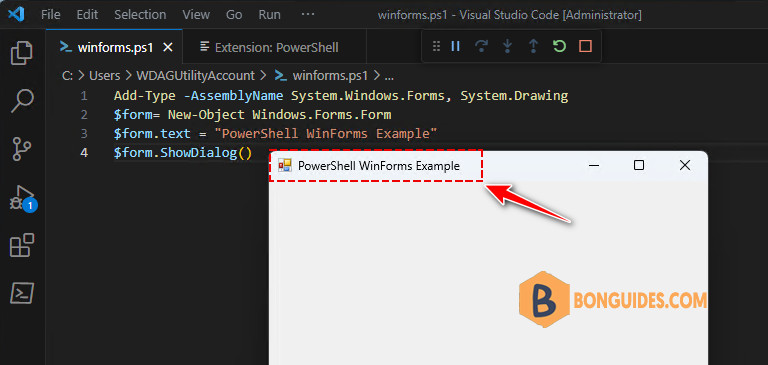
Bringing it all Together
Now that we have seen a simple GUI created in Windows PowerShell and covered some of the basic techniques we can create a slightly more complex GUI.
The following script creates a GUI containing a label, button and text field. An event handler is configured on the button such that when it is clicked the text is extracted from the text field and used to construct a message which is then displayed on the label control.
# Load the Winforms assembly
Add-Type -AssemblyName System.Windows.Forms, System.Drawing

# Create the form
$form = New-Object Windows.Forms.Form

#Set the dialog title
$form.text = "PowerShell WinForms Example"

# Create the label control and set text, size and location
$label = New-Object Windows.Forms.Label
$label.Location = New-Object Drawing.Point 50,30
$label.Size = New-Object Drawing.Point 200,15
$label.text = "Enter your name and click the button"

# Create TextBox and set text, size and location
$textfield = New-Object Windows.Forms.TextBox
$textfield.Location = New-Object Drawing.Point 50,60
$textfield.Size = New-Object Drawing.Point 200,30

# Create Button and set text and location
$button = New-Object Windows.Forms.Button
$button.text = "Greeting"
$button.Location = New-Object Drawing.Point 100,90

# Set up event handler to extarct text from TextBox and display it on the Label.
$button.add_click({
$label.Text = "Hello " + $textfield.text
})

# Add the controls to the Form
$form.controls.add($button)
$form.controls.add($label)
$form.controls.add($textfield)

# Display the dialog
$form.ShowDialog()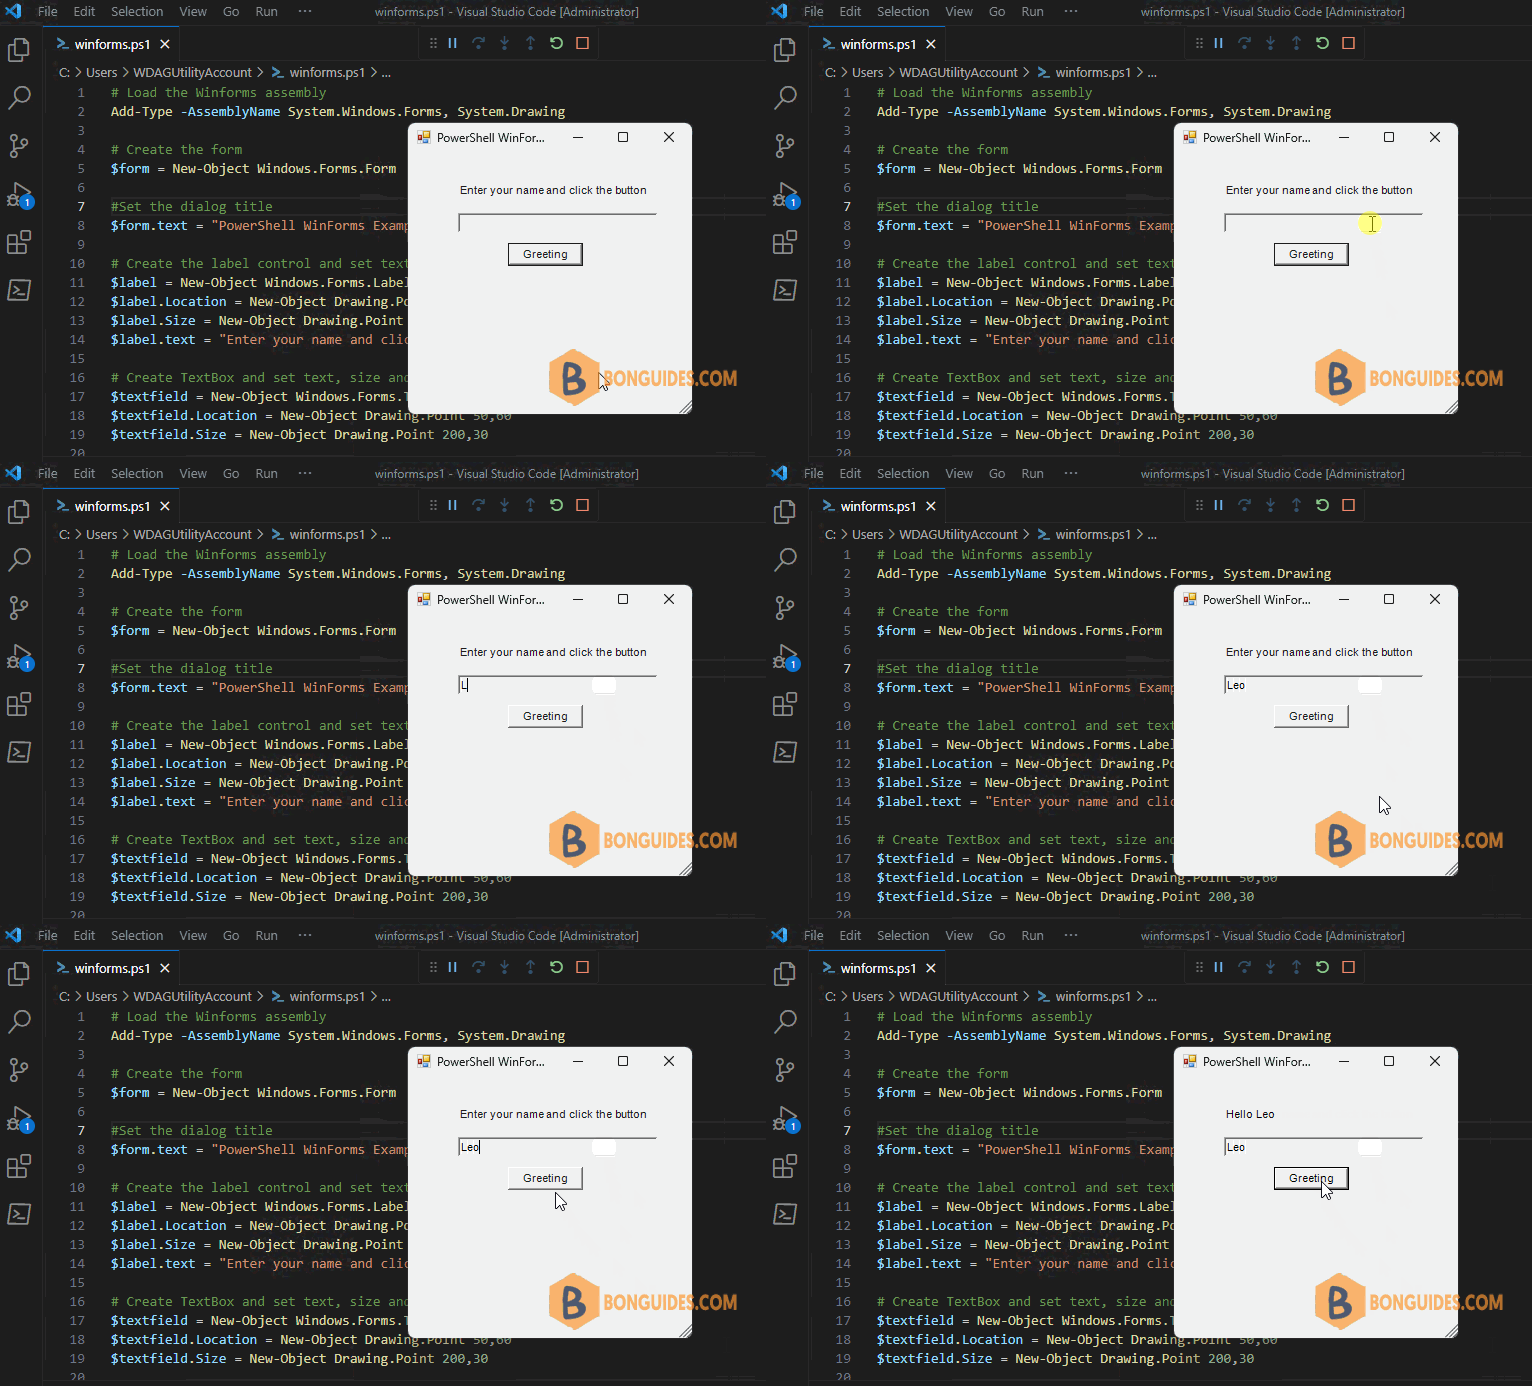
When adding controls to the form to display them in the GUI. You can add them one by one, or you can add all of them using AddRange property.
...
# Add the controls to the Form
$form.controls.add($button)
$form.controls.add($label)
$form.controls.add($textfield)

# Add the controls to the Form
$form.controls.AddRange(@($button,$label,$textfield))
...
Adding controls to the form
We have the following controls that we can use on our forms:
So, let’s create some controls on our form. Add the code below to your script. Make sure that ShowDialog is at the end of your script.
Using a textbox
The textbox control is used to accept and display an input as a single line of text. For example, the following script creates a GUI containing a label, button and text field. An event handler is configured on the button such that when it is clicked the text is extracted from the text field and used to construct a message which is then displayed on the label control.
# Load the .Net assemblies
Add-Type -AssemblyName System.Windows.Forms, System.Drawing
[System.Windows.Forms.Application]::EnableVisualStyles()

# Create the form
$form           = New-Object Windows.Forms.Form
$form.Text      = 'www.bonguides.com'
$form.Size      = New-Object System.Drawing.Size(330,150)

# Create a label control
$label           = New-Object System.Windows.Forms.Label
$label.Location  = New-Object System.Drawing.Point(30,20)
$label.Text      = 'Enter your name then click Submit button:'
$label.ForeColor = 'Blue'
$label.AutoSize  = $true

# Create a textbox control
$textbox           = New-Object System.Windows.Forms.TextBox
$textbox.Location  = New-Object System.Drawing.Point(30,40)
$textbox.Font      = New-Object System.Drawing.Font("Consolas",9,[System.Drawing.FontStyle]::Bold)
$textbox.ForeColor = 'Blue'
$textbox.AutoSize  = $true

# Create a button control
$submitButton                   = New-Object System.Windows.Forms.Button
$submitButton.BackColor         = "green"
$submitButton.text              = "Submit"
$submitButton.Size                = New-Object System.Drawing.Point (70,30)
$submitButton.location          = New-Object System.Drawing.Point(28,70)
$submitButton.ForeColor         = "#ffffff"

# Create a label control
$label1           = New-Object System.Windows.Forms.Label
$label1.Location  = New-Object System.Drawing.Point(110,77)
$label1.Font      = New-Object System.Drawing.Font("Consolas",11,[System.Drawing.FontStyle]::Bold)
$label1.ForeColor = 'Red'
$label1.AutoSize  = $true

# Event handler when click the button
$submitButton.add_click({
    $label1.Text      = 'Hello ' + $textbox.Text
})

# Add the controls to the form then display the dialog.
$form.controls.AddRange(@($textbox,$label,$label1,$submitButton))
[void]$form.ShowDialog()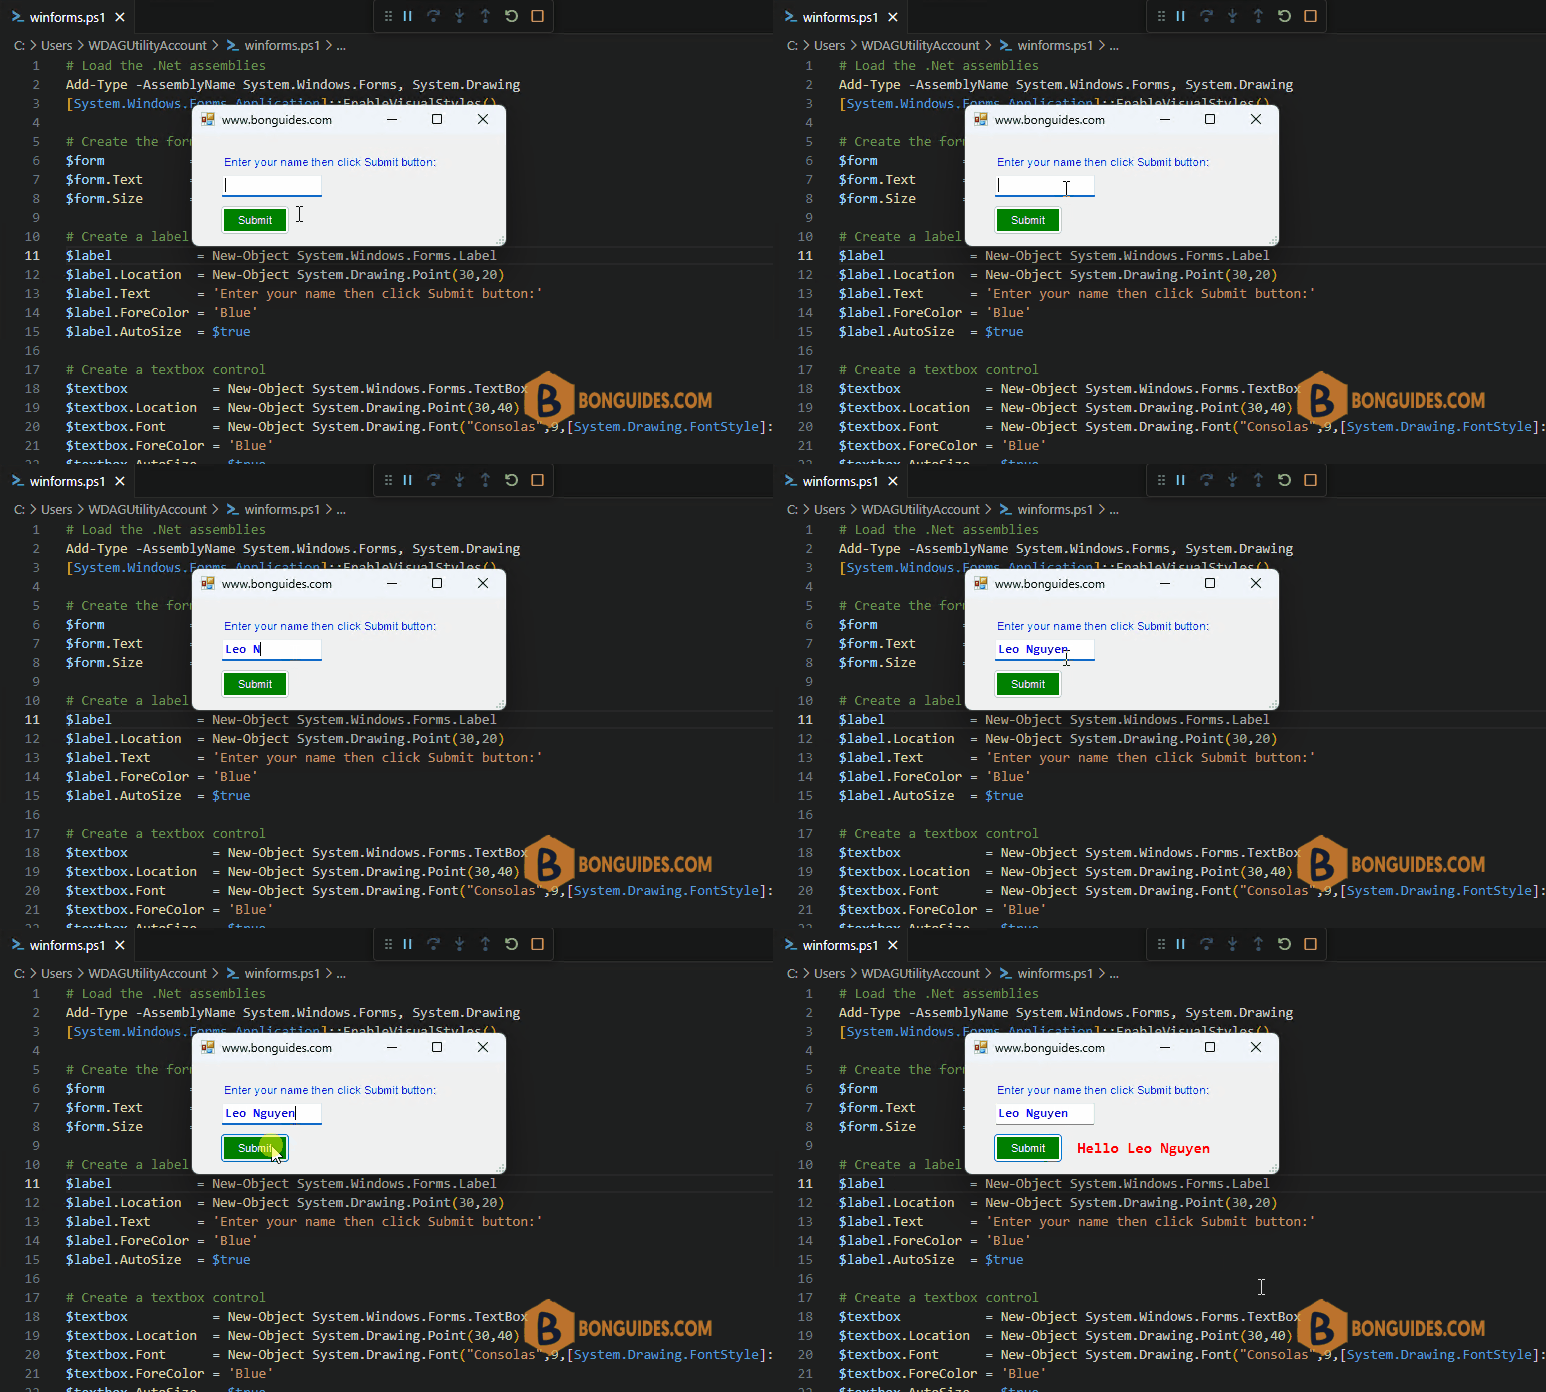
Using a label
The place of the controls is based on points/pixels from the left side and the top side. So, the location 30,50 is 30 pixels from the left side and 50 points from the top side. And you can configure additional prroperties for the label control such as drawing size, font family, font size…
Add-Type -AssemblyName System.Windows.Forms, System.Drawing
$form           = New-Object Windows.Forms.Form

$label          = New-Object System.Windows.Forms.Label
$label.text     = "Select a category:."
$label.location = New-Object System.Drawing.Point(30,50)
$label.Size     = New-Object System.Drawing.Size(100,20)
$label.AutoSize = $true
$label.Font     = 'Microsoft Sans Serif,10'


$form.controls.add($label)
$form.ShowDialog()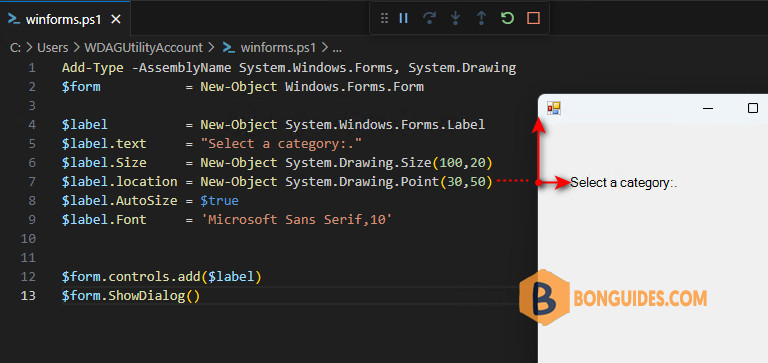
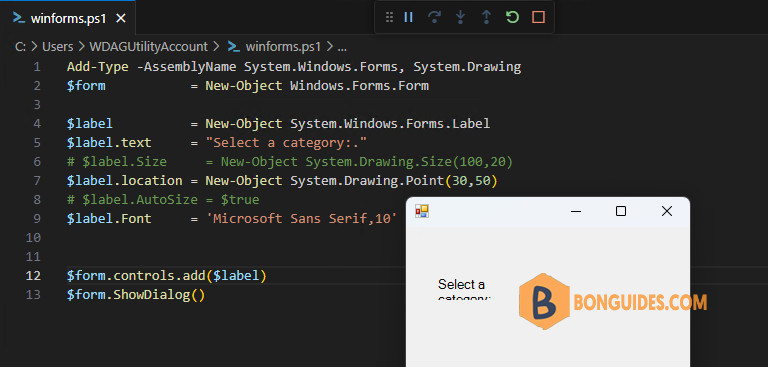
You can define the width and height of each control by $control.Size, but if your content is longer then the element it will only be partially displayed. So, by setting the Autosize to true, you are assured that the user can read the whole label.
Using a dropdown list (Combobox)
The next control you can add to the form is ComboBox (Dropdown list). The code below is pretty clear I think, we create the combo box and add the items with a single line foreach loop to the list. Again, we also define the position and I have set the size for the control.
Add-Type -AssemblyName System.Windows.Forms, System.Drawing
$form           = New-Object Windows.Forms.Form

$label          = New-Object System.Windows.Forms.Label
$label.Text     = "Select a category:."
$label.Location = New-Object System.Drawing.Point(30,30)
$label.AutoSize = $true

$combobox = New-Object system.Windows.Forms.ComboBox
$combobox.Text = ""
$combobox.Size = New-Object Drawing.Point 150,20
$combobox.location = New-Object System.Drawing.Point(30,60)
# $combobox.Autosize = $true

# Add the items in the dropdown list
@('PowerShell','Microsoft 365','Windows Server') | ForEach-Object {$combobox.Items.Add($_)}

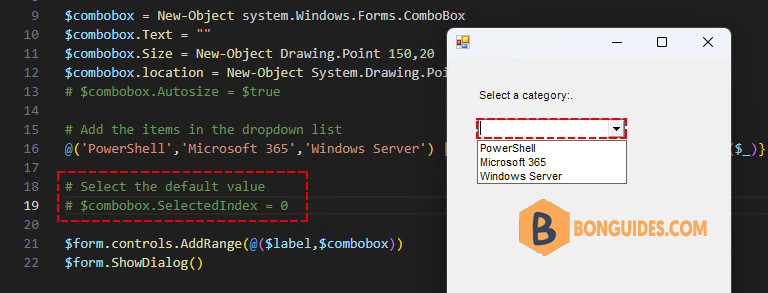
# Select the default value
$combobox.SelectedIndex = 0

$form.controls.AddRange(@($label,$combobox))
$form.ShowDialog()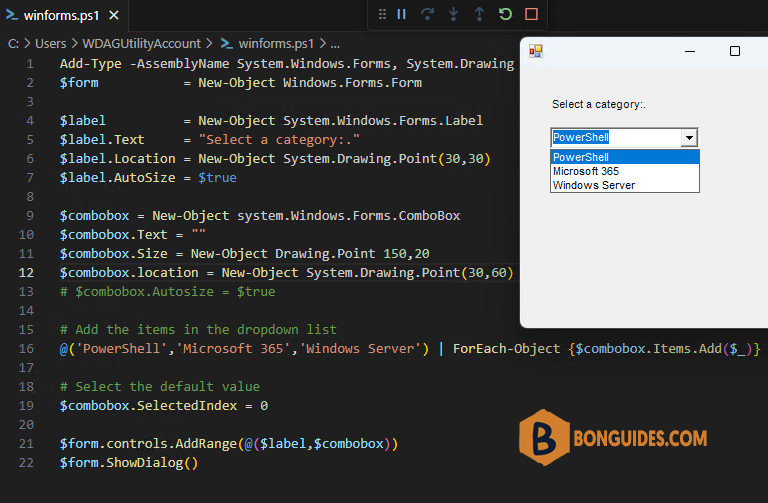
You can set a default value for your dropdown list by selecting the index. Below is output if we’re not configured the default value for the combobox.
Using a button
In the previous section, we got the handling of events when a user interacts with a control. Now, in this section we’ll get more detail with a button in a PowerShell winforms. A button can have a standard action, like (
OK, Cancel, Abort, Retry, Ignore, Yes, or No) or you can assign a custom function to it.
The buttons we are going to add are Cancel and Enter.
- Cancel button will just close the form and does nothing else.
- Enter button will run our logic to show a text. Add the buttons with the code below, again make sure you add the variables of the buttons to the $form.controls.AddRange
Add-Type -AssemblyName System.Windows.Forms, System.Drawing
[System.Windows.Forms.Application]::EnableVisualStyles()

$form           = New-Object Windows.Forms.Form
$form.Size      = New-Object System.Drawing.Size(400,200)

$label          = New-Object System.Windows.Forms.Label
$label.Text     = "Select a category:."
$label.Location = New-Object System.Drawing.Point(30,30)
$label.AutoSize = $true

$label1           = New-Object System.Windows.Forms.Label
$label1.Location  = New-Object System.Drawing.Point(30,100)
$label1.Font      = New-Object System.Drawing.Font("Consolas",11,[System.Drawing.FontStyle]::Bold)
$Label1.ForeColor = 'Blue'
$label1.AutoSize  = $true

$combobox          = New-Object system.Windows.Forms.ComboBox
$combobox.Text     = ""
$combobox.location = New-Object System.Drawing.Point(30,60)
$combobox.Size     = New-Object System.Drawing.Size(100,30)
$combobox.Autosize = $true
@('PowerShell','Microsoft 365','Windows Server') | ForEach-Object {$combobox.Items.Add($_)}

$enterButton                   = New-Object System.Windows.Forms.Button
$enterButton.BackColor         = "green"
$enterButton.text              = "Enter"
$enterButton.Size                = New-Object System.Drawing.Point (90,30)
$enterButton.location          = New-Object System.Drawing.Point(140,57)
$enterButton.ForeColor         = "#ffffff"

$cancelButton                  = New-Object system.Windows.Forms.Button
$cancelButton.BackColor        = "red"
$cancelButton.text             = "Cancel"
$cancelButton.Size             = New-Object System.Drawing.Point (90,30)
$cancelButton.location         = New-Object System.Drawing.Point(230,57)
$cancelButton.ForeColor        = "#ffffff"

$enterButton.add_click({
    $index = $combobox.SelectedIndex
    $combobox.SelectedItem = $combobox.Items[$index]
    $label1.Text = "Selected: " + $combobox.SelectedItem
})

$cancelButton.add_click({ $form.close() })

$form.controls.AddRange(@($label,$label1,$combobox,$enterButton,$cancelButton,$pictureBox))
[void]$form.ShowDialog()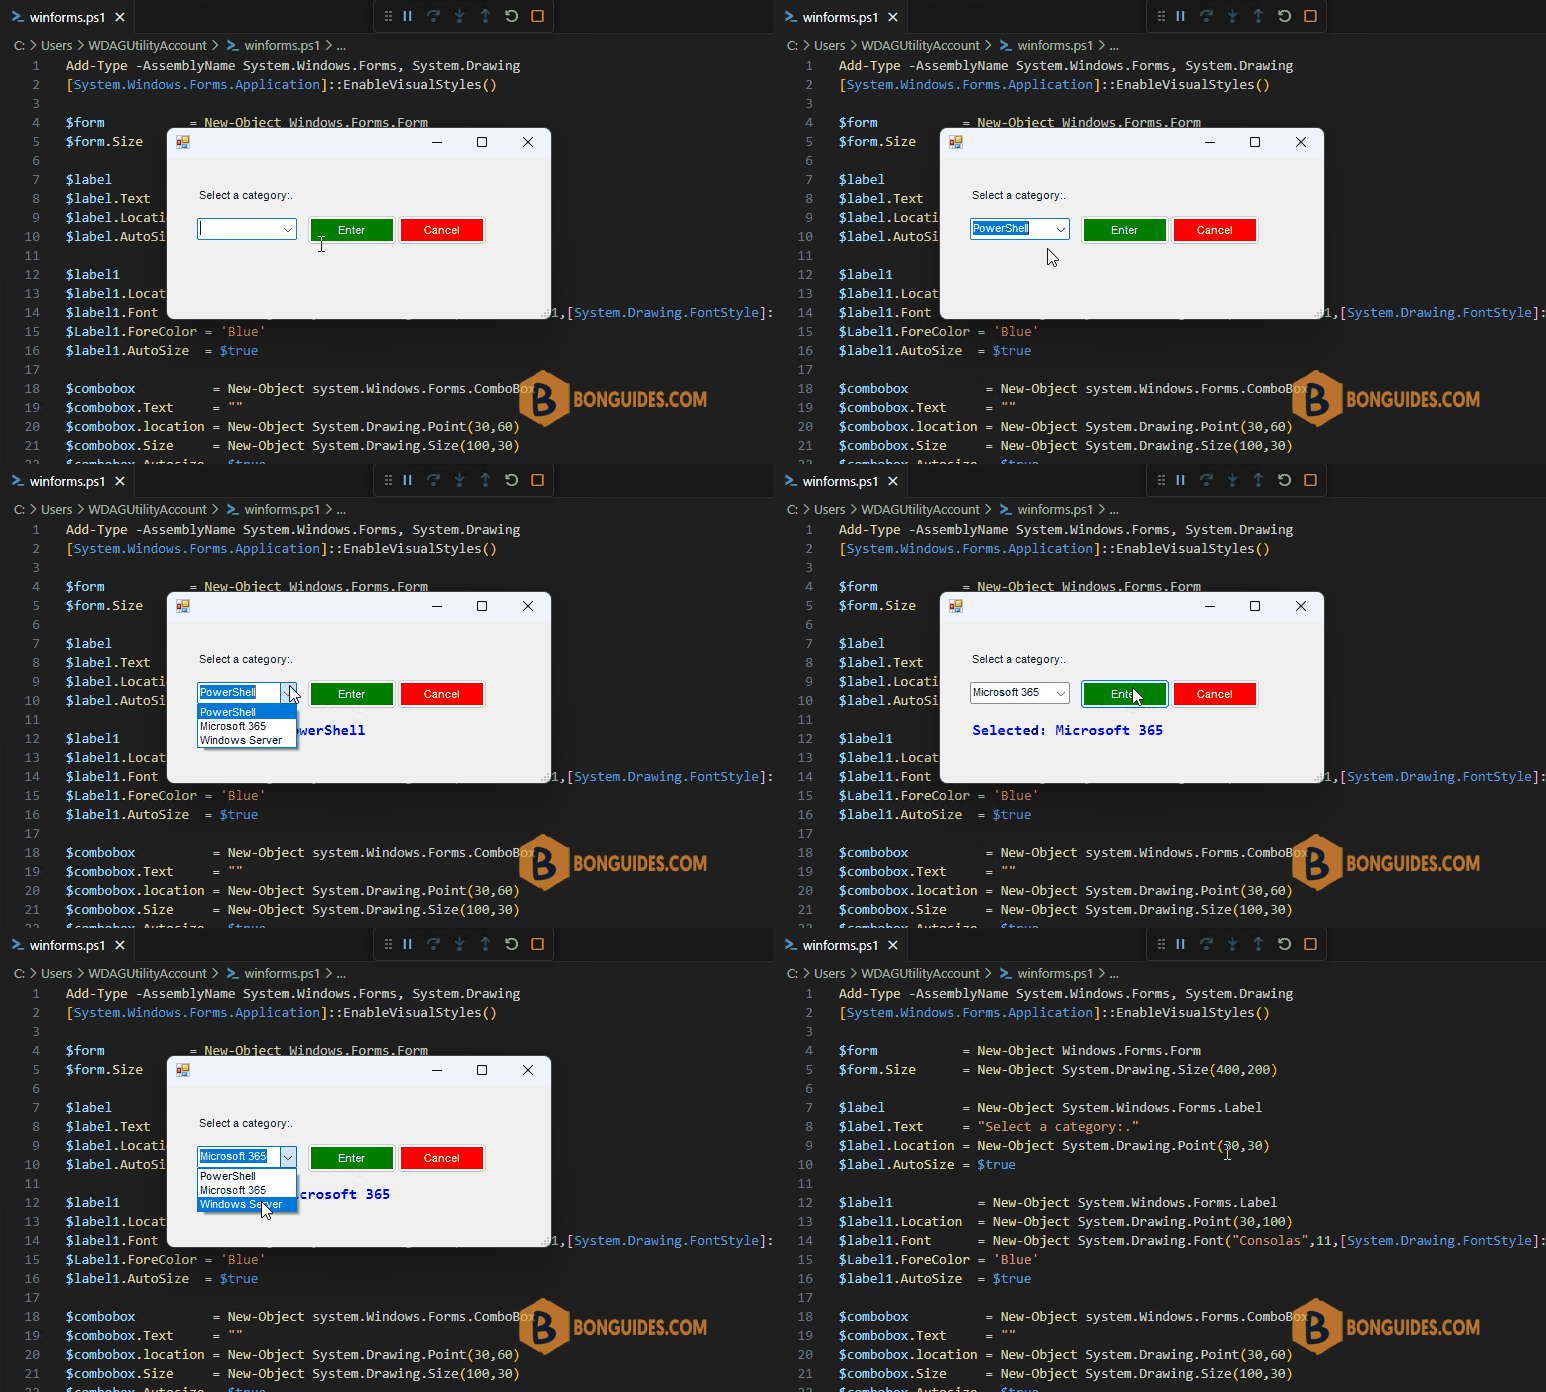
Using a PictureBox
PictureBox is a rectangular region for an image. It supports many image formats. It has an adjustable size. It can access image files from your disk or from the Internet.
A picture can be loaded to the form from your local computer with ImageLocation property as follows:
# Load the .Net assemblies
Add-Type -AssemblyName System.Windows.Forms, System.Drawing
[System.Windows.Forms.Application]::EnableVisualStyles()

# Create the form
$form           = New-Object Windows.Forms.Form
$form.Text      = 'www.bonguides.com'
$form.Size      = New-Object System.Drawing.Size(300,180)
$form.AutoScale = $true
$form.AutoSize  = $true

# Create a PictureControl control
$pictureBox           = New-Object System.Windows.Forms.PictureBox
$pictureBox.Location  = New-Object System.Drawing.Point(20,20)
$pictureBox.ImageLocation = "C:\images\chart.png"
$pictureBox.AutoSize  = $true

# Add the controls to the form then display the dialog.
$form.controls.AddRange(@($pictureBox))
[void]$form.ShowDialog()
The image cannot be shown if the script runs on another computer. You can upload the image to any cloud location, get the direct link of the image then Load it into the form.
# Load the .Net assemblies
Add-Type -AssemblyName System.Windows.Forms, System.Drawing
[System.Windows.Forms.Application]::EnableVisualStyles()

# Create the form
$form           = New-Object Windows.Forms.Form
$form.Text      = 'www.bonguides.com'
$form.Size      = New-Object System.Drawing.Size(300,180)
$form.AutoScale = $true
$form.AutoSize  = $true

# Create a PictureControl control
$pictureBox           = New-Object System.Windows.Forms.PictureBox
$pictureBox.Location  = New-Object System.Drawing.Point(20,20)
$pictureBox.Load('https://bonguides.com/img/143614112023.png')
$pictureBox.AutoSize  = $true

# Add the controls to the form then display the dialog.
$form.controls.AddRange(@($pictureBox))
[void]$form.ShowDialog()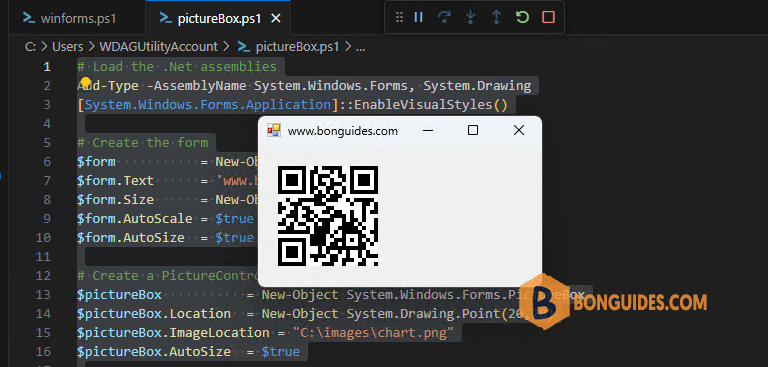
Using a checkbox
The checkbox is a very common element in forms. The most common usage I have seen for checkboxes is on a survey, or when you agree to a license agreement during a software install. The script below is a nice example of how to enable and disable the OK button by checking the checkbox.
# Load the .Net assemblies
Add-Type -AssemblyName System.Windows.Forms, System.Drawing
[System.Windows.Forms.Application]::EnableVisualStyles()

# Create the form
$form           = New-Object Windows.Forms.Form
$form.Text      = 'www.bonguides.com'
$form.Size      = New-Object System.Drawing.Size(300,180)

# Create a label
$label           = New-Object System.Windows.Forms.Label
$label.Location  = New-Object System.Drawing.Point(140,84)
$label.Font      = New-Object System.Drawing.Font("Consolas",9,[System.Drawing.FontStyle]::Bold)
$label.AutoSize  = $true

# Create your checkbox
$checkbox1          = New-Object System.Windows.Forms.checkbox
$checkbox1.Location = New-Object System.Drawing.Size(20,20)
$checkbox1.Size     = New-Object System.Drawing.Size(250,20)
$checkbox1.Text     = "Enable/Disable OK button"

# Add an OK button
$OKButton           = New-Object System.Windows.Forms.Button
$OKButton.Location  = New-Object System.Drawing.Size(20,70)
$OKButton.Size      = New-Object System.Drawing.Size(100,40)
$OKButton.Text      = "OK"
$OKButton.Enabled   = $false
$OKButton.Add_Click({$Form.Close()})

# Do something when the state of the checkbox changes
$checkbox1.Add_CheckStateChanged({
    $OKButton.Enabled   = $checkbox1.Checked
})

# Add the controls to the form then display the dialog.
$form.controls.AddRange(@($checkbox1,$OKButton,$label))
$form.ShowDialog()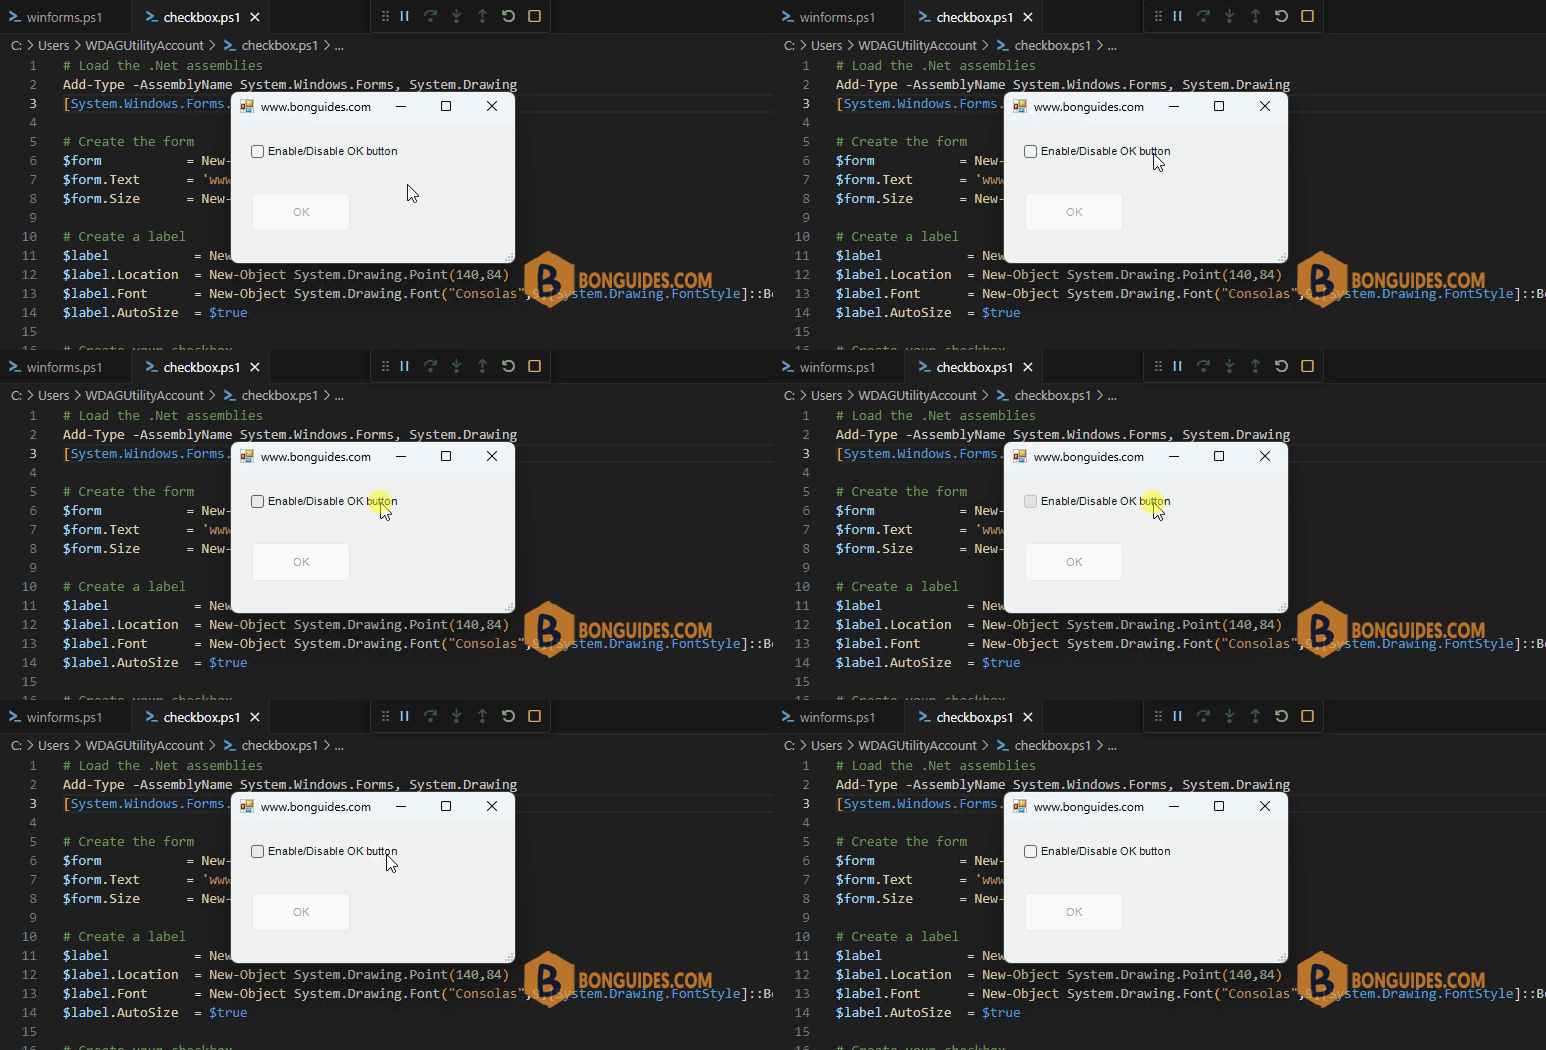
Using a Groupbox
GroupBox combines a header with a box around other control. Nest a Grid within GroupBox. With a GroupBox, we can place them within a box that has a header. This makes interfaces easier to understand and interact with.
In a GroupBox we can nest another control. We used the Grid, Label, CheckBox… controls within a GroupBox. For example, we’ll create a groupbox with combobox, label, picturebox, textbox and button.
# Load the .Net assemblies
Add-Type -AssemblyName System.Windows.Forms, System.Drawing
[System.Windows.Forms.Application]::EnableVisualStyles()

# Create the form
$form           = New-Object Windows.Forms.Form
$form.Text     = 'www.bonguides.com'
$form.Size      = New-Object System.Drawing.Size(450,350)

# Create a group that will contain your radio buttons
$groupBox           = New-Object System.Windows.Forms.GroupBox
$groupBox.Location  = '20,20'
$groupBox.Size      = '400,220'
$groupBox.Text     = "Do you like Coffee?"
$groupBox.Font      = New-Object System.Drawing.Font("Consolas",9,[System.Drawing.FontStyle]::Bold)
$groupBox.SendToBack()

# Create the collection of radio buttons
$RadioButton1           = New-Object System.Windows.Forms.RadioButton
$RadioButton1.Location  = '20,40'
$RadioButton1.AutoSize  = $true
$RadioButton1.Checked   = $true
$RadioButton1.Text     = "Yes - I like Coffee."

$RadioButton2           = New-Object System.Windows.Forms.RadioButton
$RadioButton2.Location  = '20,70'
$RadioButton2.AutoSize  = $true
$RadioButton2.Checked   = $false
$RadioButton2.Text     = "No - I don't like Coffee."

$RadioButton3           = New-Object System.Windows.Forms.RadioButton
$RadioButton3.Location  = '20,100'
$RadioButton3.AutoSize  = $true
$RadioButton3.Checked   = $false
$RadioButton3.Text     = "This is not a Coffee related response."

$pictureBox = New-Object Windows.Forms.PictureBox
$pictureBox.Location = New-Object System.Drawing.Size(320,30)
$pictureBox.Load('https://bonguides.com/img/163014112023.png')
$pictureBox.Size = New-Object System.Drawing.Size(50,50)
$pictureBox.SizeMode = 'StretchImage'
$pictureBox.BringToFront()

# Create button control
$submitButton                   = New-Object System.Windows.Forms.Button
$submitButton.BackColor         = "green"
$submitButton.Text             = "Submit"
$submitButton.Size              = New-Object System.Drawing.Point (70,30)
$submitButton.Location          = New-Object System.Drawing.Point(20,260)
$submitButton.ForeColor         = "#ffffff"

$cancelButton                   = New-Object System.Windows.Forms.Button
$cancelButton.BackColor         = "red"
$cancelButton.Text             = "Cancel"
$cancelButton.Size              = New-Object System.Drawing.Point (70,30)
$cancelButton.Location          = New-Object System.Drawing.Point(100,260)
$cancelButton.ForeColor         = "#ffffff"

# Create a label control
$label1           = New-Object System.Windows.Forms.Label
$label1.Location  = New-Object System.Drawing.Point(20,140)
$label1.Text     = 'Leave a comment:'
$label1.Font      = New-Object System.Drawing.Font("Consolas",11,[System.Drawing.FontStyle]::Regular)
$label1.AutoSize  = $true

# Create a textbox control
$textbox           = New-Object System.Windows.Forms.TextBox
$textbox.Location  = New-Object System.Drawing.Point(20,163)
$textbox.Font      = New-Object System.Drawing.Font("Consolas",11,[System.Drawing.FontStyle]::Bold)
$textbox.Size      = New-Object System.Drawing.Size(350,50)

# Add radio buttons into the groupbox control
$groupBox.Controls.AddRange(@($Radiobutton1,$RadioButton2,$RadioButton3,$pictureBox,$label1,$textbox))

# Event handler when click the buttons
$submitButton.add_click({})
$cancelButton.add_click({
    $form.Close()
})

# Add the controls to the form then display the dialog.
$form.controls.AddRange(@($groupBox,$cancelButton,$submitButton))
[void]$form.ShowDialog()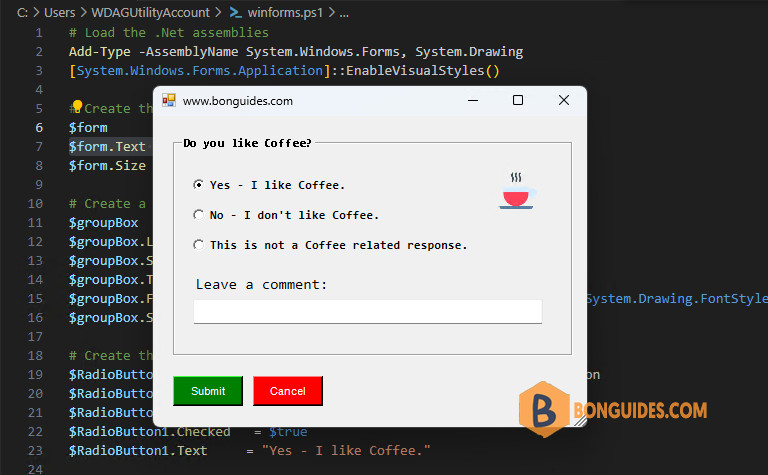
Using a RadioButton
Radio buttons are another element used when creating forms. They allow an end-user to select one option from a group. For example, you post a question on a form – Do you like coffee? – The options for the answer would be:
- Yes – I like coffee.
- No – I don’t like coffee.
- Sometimes – depending on the type of coffee.
These answers cover all the possible answers to the question. When presented to the end user you only want them to select one option from the group.
To set this up in PowerShell we have to do a few things:
- Create a group for the radio buttons,
- Create the radio buttons and give them values,
- Create the form and add the usual Submit and Cancel buttons.
The code for all of this is below:
# Load the .Net assemblies
Add-Type -AssemblyName System.Windows.Forms, System.Drawing
[System.Windows.Forms.Application]::EnableVisualStyles()

# Create the form
$form           = New-Object Windows.Forms.Form
$form.Text      = 'www.bonguides.com'
$form.Size      = New-Object System.Drawing.Size(450,350)

# Create a group that will contain your radio buttons
$groupBox           = New-Object System.Windows.Forms.GroupBox
$groupBox.Location  = '20,20'
$groupBox.Size      = '400,150'
$groupBox.Text      = "Do you like Coffee?"
$groupBox.Font      = New-Object System.Drawing.Font("Consolas",9,[System.Drawing.FontStyle]::Bold)
$groupBox.SendToBack()

# Create the collection of radio buttons
$RadioButton1           = New-Object System.Windows.Forms.RadioButton
$RadioButton1.Location  = '20,40'
$RadioButton1.AutoSize  = $true
$RadioButton1.Checked   = $true
$RadioButton1.Text      = "Yes - I like Coffee."

$RadioButton2           = New-Object System.Windows.Forms.RadioButton
$RadioButton2.Location  = '20,70'
$RadioButton2.AutoSize  = $true
$RadioButton2.Checked   = $false
$RadioButton2.Text      = "No - I don't like Coffee."

$RadioButton3           = New-Object System.Windows.Forms.RadioButton
$RadioButton3.Location  = '20,100'
$RadioButton3.AutoSize  = $true
$RadioButton3.Checked   = $false
$RadioButton3.Text      = "This is not a Coffee related response."

# Add radio buttons into the groupbox control
$groupBox.Controls.AddRange(@($Radiobutton1,$RadioButton2,$RadioButton3,$pictureBox))

$pictureBox = New-Object Windows.Forms.PictureBox
$pictureBox.Location = New-Object System.Drawing.Size(320,30)
$pictureBox.Load('https://bonguides.com/img/163014112023.png')
$pictureBox.Size = New-Object System.Drawing.Size(50,50)
$pictureBox.SizeMode = 'StretchImage'
$pictureBox.BringToFront()

# Create button control
$submitButton                   = New-Object System.Windows.Forms.Button
$submitButton.BackColor         = "green"
$submitButton.text              = "Submit"
$submitButton.Size              = New-Object System.Drawing.Point (70,30)
$submitButton.location          = New-Object System.Drawing.Point(20,190)
$submitButton.ForeColor         = "#ffffff"

$cancelButton                   = New-Object System.Windows.Forms.Button
$cancelButton.BackColor         = "red"
$cancelButton.text              = "Cancel"
$cancelButton.Size              = New-Object System.Drawing.Point (70,30)
$cancelButton.location          = New-Object System.Drawing.Point(100,190)
$cancelButton.ForeColor         = "#ffffff"

# Create a label control
$label1           = New-Object System.Windows.Forms.Label
$label1.Location  = New-Object System.Drawing.Point(20,250)
$label1.Font      = New-Object System.Drawing.Font("Consolas",11,[System.Drawing.FontStyle]::Bold)
$label1.ForeColor = 'Green'
$label1.AutoSize  = $true

# Event handler when click the buttons
# Check the current state of each radio button and respond accordingly
$submitButton.add_click({
    if ($RadioButton1.Checked) {
        # So the popup
        # [System.Windows.Forms.MessageBox]::Show("You like Coffee." , "Great")
        # Print message into the form
        $label1.Text      = "You like Coffee. Great"
    } elseif ($RadioButton2.Checked) {
            [System.Windows.Forms.MessageBox]::Show("So your not a fan of Coffee." , "Awe")
        }
      elseif ($RadioButton3.Checked) {
        [System.Windows.Forms.MessageBox]::Show("That's OK - You don't have to answer the questions" , "'No' to coffee")
      }
})

$cancelButton.add_click({
    $form.Close()
})

# Add the controls to the form then display the dialog.
$form.controls.AddRange(@($groupBox,$cancelButton,$submitButton,$label1,$pictureBox))
[void]$form.ShowDialog()Using a ProgressBar
This indicates the progress of an operation. ProgressBar is best used on a long-running computation or task. The ProgressBar control is often used with a threading mechanism such as BackgroundWorker. It helps let your users know the application is still active. Below is the code to showing a progressbar when downloading a file. The logic is:

# Load the .Net assemblies
Add-Type -AssemblyName System.Windows.Forms, System.Drawing
[System.Windows.Forms.Application]::EnableVisualStyles()

# Create the form
$form           = New-Object Windows.Forms.Form
$form.Text      = 'www.bonguides.com'
$form.Size      = New-Object System.Drawing.Size(320,250)

# Create button control
$downloadButton                   = New-Object System.Windows.Forms.Button
$downloadButton.BackColor         = "Green"
$downloadButton.Text              = "> Click to download"
$downloadButton.Font              = New-Object System.Drawing.Font("Consolas",11,[System.Drawing.FontStyle]::Bold)
$downloadButton.Size              = New-Object System.Drawing.Point (220,50)
$downloadButton.Location          = New-Object System.Drawing.Point(40,40)
$downloadButton.ForeColor         = "#ffffff"

# Create a label control
$label1           = New-Object System.Windows.Forms.Label
$label1.Location  = New-Object System.Drawing.Point(40,140)
$label1.Font      = New-Object System.Drawing.Font("Consolas",9,[System.Drawing.FontStyle]::Bold)
$label1.ForeColor = 'Green'
$label1.AutoSize  = $true

# Create a progressbar control
$ProgressBar                        = New-Object System.Windows.Forms.ProgressBar
$ProgressBar.Location               = New-Object System.Drawing.Size(40,100)
$ProgressBar.Size                   = New-Object System.Drawing.Size(218,10)
$ProgressBar.Style                  = "Marquee"
$ProgressBar.MarqueeAnimationSpeed  = 10
$ProgressBar.Hide()

# Create the function
function PSDownloader {
    $downloadButton.BackColor   = "#1F1F1F"
    $downloadButton.Text        = "Downloading..."
    $ProgressBar.Visible        = $true
    $label1.Text                = "It could take a while to complete..."

    $job = Start-Job -ScriptBlock {
        Invoke-WebRequest 'http://ipv4.download.thinkbroadband.com/10MB.zip' -OutFile 'C:\10MB.zip'
    }
    do { [System.Windows.Forms.Application]::DoEvents() } until ($job.State -eq "Completed")
    Remove-Job -Job $job -Force

    $downloadButton.BackColor   = "Green"
    $downloadButton.Text        = "> Click to download"
    $ProgressBar.Hide()
    $label1.Text                = "Completed"
  }

# Event handler when click the buttons (call function)
$downloadButton.add_click({PSDownloader})

# Add the controls to the form then display the dialog.
$form.Controls.AddRange(@($downloadButton,$label1,$ProgressBar))
[void]$form.ShowDialog()Using a listbox
ListBox stores several text items. It can interact with other controls. In the below example code, we create a list of DNS server, this will be used as a data source. Select a DNS server from the list then click Submit button to check online status of it.
# Load the .Net assemblies
Add-Type -AssemblyName System.Windows.Forms, System.Drawing
[System.Windows.Forms.Application]::EnableVisualStyles()

# Create the form
$form           = New-Object Windows.Forms.Form
$form.Text      = 'www.bonguides.com'
$form.Size      = New-Object System.Drawing.Size(500,400)

$label          = New-Object System.Windows.Forms.Label
$label.Location = New-Object System.Drawing.Point(20,10)
$label.Size     = New-Object System.Drawing.Size(280,20)
$label.Font     = New-Object System.Drawing.Font("Consolas",10,[System.Drawing.FontStyle]::Regular)
$label.Text     = 'Please select a DNS server:'

# Create a listbox control
$listbox           = New-Object System.Windows.Forms.ListBox
$listbox.Location  = New-Object System.Drawing.Point(20,30)
$listbox.Font      = New-Object System.Drawing.Font("Consolas",10,[System.Drawing.FontStyle]::Regular)
$listbox.Size      = New-Object System.Drawing.Size(450,70)

# Add the items in the listbox
@('8.8.8.8','8.8.4.4','1.1.1.1') | ForEach-Object {$listbox.Items.Add($_)}

# Create button control
$submitButton                   = New-Object System.Windows.Forms.Button
$submitButton.BackColor         = "Green"
$submitButton.Text              = "Submit"
$submitButton.Font              = New-Object System.Drawing.Font("Consolas",10,[System.Drawing.FontStyle]::Bold)
$submitButton.Size              = New-Object System.Drawing.Point (70,30)
$submitButton.Location          = New-Object System.Drawing.Point(20,100)
$submitButton.ForeColor         = "#ffffff"

# Create a textbox to display the output
$textboxOutput                      = New-Object system.Windows.Forms.TextBox
$textboxOutput.Multiline            = $true
$textboxOutput.Text                 = "Waiting for results..."
$textboxOutput.Font                 = New-Object System.Drawing.Font("Consolas",10,[System.Drawing.FontStyle]::Bold)
$textboxOutput.Size                 = New-Object System.Drawing.Size(450,200)
$textboxOutput.Location             = New-Object System.Drawing.Point(20,140)
$textboxOutput.BackColor            = "#1F1F1F"
$textboxOutput.ForeColor            = 'Cyan'

# Event handler when click the button
$submitButton.add_click({
    $textboxOutput.Text = (powershell -noprofile -Command "ping $($listBox.SelectedItem)" | Out-String)
})

# Add the controls to the form then display the dialog.
$form.controls.AddRange(@($listbox,$label,$submitButton,$textboxOutput))
[void]$form.ShowDialog()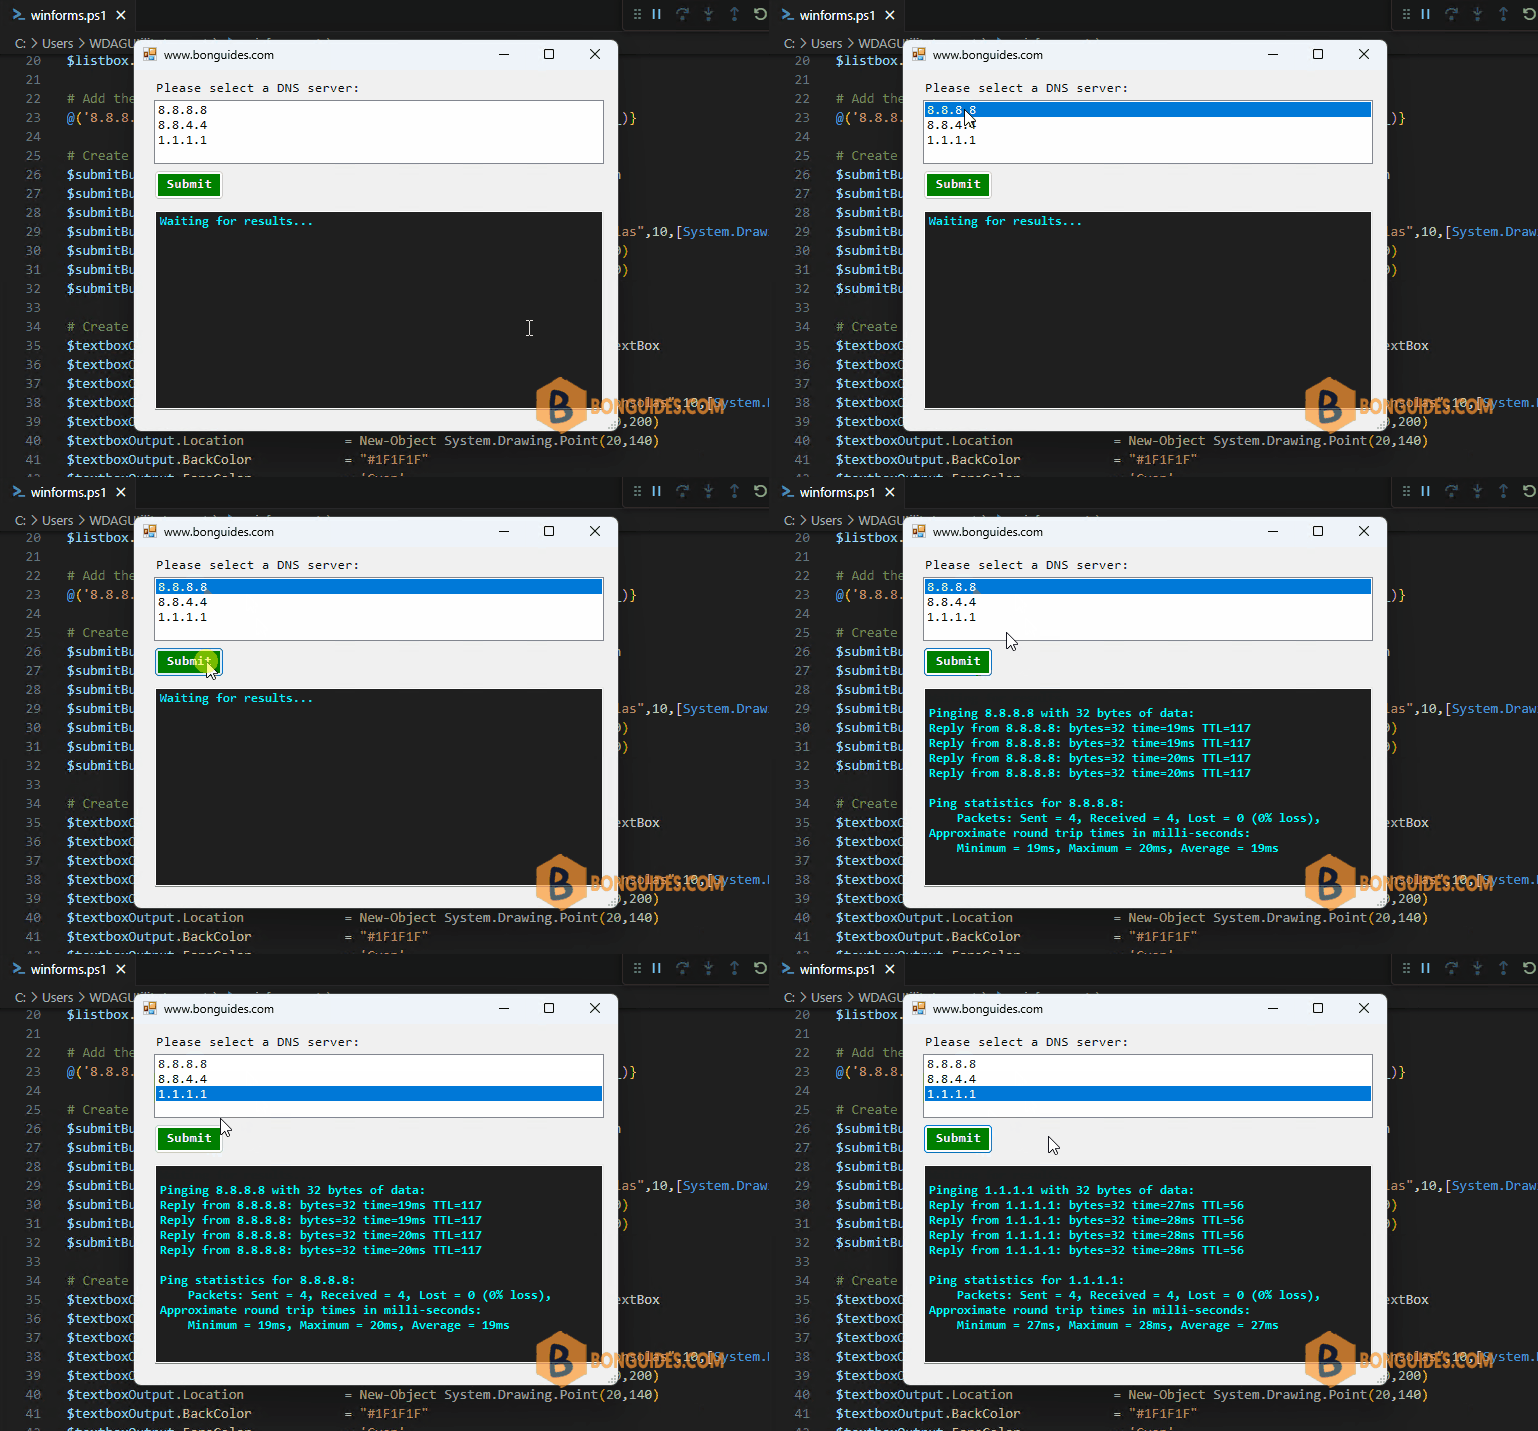
The items in a listbox can be added manually or can be passed from a pipeline. For example, below code pull the list of services or list of disabled user into the listbox.
# Add the items in the listbox manualy
# @('8.8.8.8','8.8.4.4','1.1.1.1') | ForEach-Object {$listbox.Items.Add($_)}

# Pull the list of services into the listbox
Get-Service | ForEach-Object {$listbox.Items.Add($_.Name)}

# Get the list of disabled users on Active Directory
Get-ADUser -Filter {(Enabled -eq "false")} | Foreach {$listbox.Items.Add($_.Name)}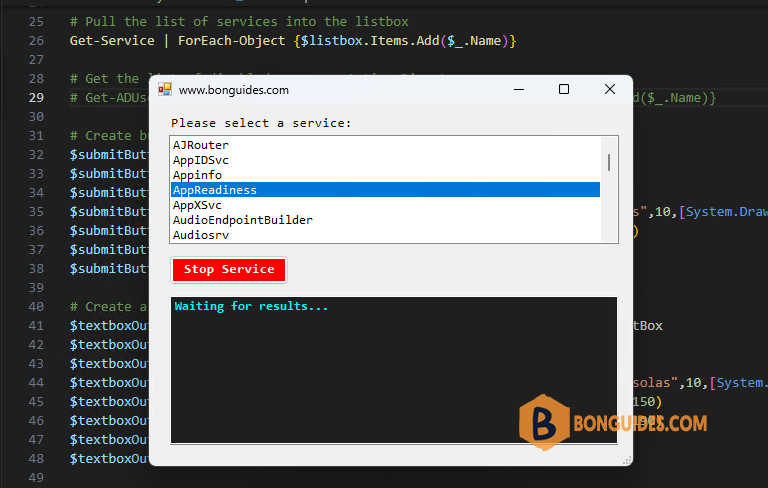
Using DataGridView Control
The DataGridView control provides a visual interface to a data object. It gives the ability to display and allow editing in a tabular format. In a GUI application, the scripters can take advantage of using this control to present the data to the user.
Below is an example of DataGridView to display the list of services on a Windows computer.
# Load the .Net assemblies
Add-Type -AssemblyName System.Windows.Forms, System.Drawing
[System.Windows.Forms.Application]::EnableVisualStyles()

# Create the form
$form           = New-Object Windows.Forms.Form
$form.Text      = 'www.bonguides.com'
$form.Size      = New-Object System.Drawing.Size(470,360)

# Get the list of services into an array
$gps = get-process | Select-Object Name,ID,Description,@{n='Memory';e={$_.WorkingSet}}
$list = New-Object System.collections.ArrayList
$list.AddRange($gps)

# Create a DataGridView control
$dataGridView = New-Object System.Windows.Forms.DataGridView
$dataGridView.Size = New-Object System.Drawing.Size(460,290)
$dataGridView.DataSource = $list
$dataGridView.ColumnHeadersVisible = $true
$dataGridView.ColumnHeadersVisible = $true
$dataGridView.AllowUserToAddRows = $true

# Add the controls to the form then display the dialog.
$form.controls.AddRange(@($dataGridView))
[void]$form.ShowDialog()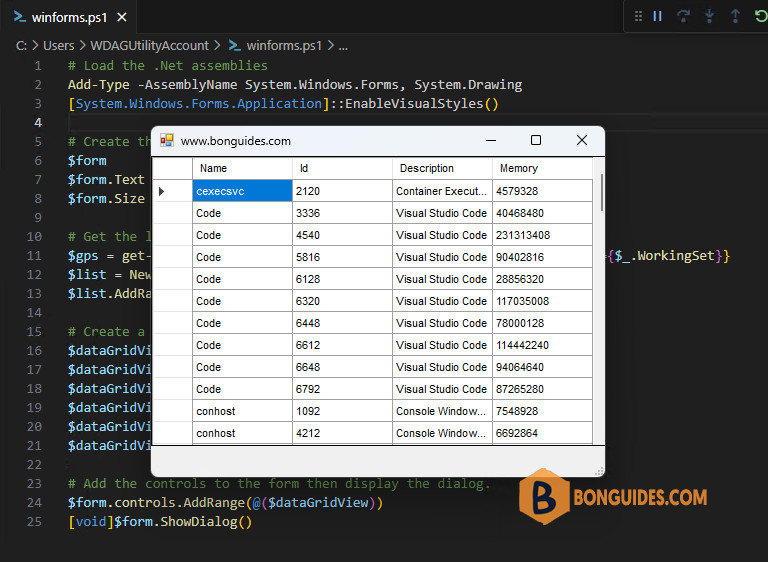
Using ColorDialog
You can allow for color selection in your PowerShell GUI with the System.Windows.Forms.ColorDialog. Below is a simple example to change the form background with ColorDialog.
# Load the .Net assemblies
Add-Type -AssemblyName System.Windows.Forms, System.Drawing
[System.Windows.Forms.Application]::EnableVisualStyles()

# Create the form
$form           = New-Object Windows.Forms.Form
$form.Text      = 'www.bonguides.com'
$form.Size      = New-Object System.Drawing.Size(400,360)

# Create colorDialog
$colorDialog = New-Object System.Windows.Forms.ColorDialog

# Create a button
$enterButton                   = New-Object System.Windows.Forms.Button
$enterButton.Size              = New-Object System.Drawing.Point (30,30)
$enterButton.FlatStyle         = [System.Windows.Forms.FlatStyle]::Flat
$enterButton.FlatAppearance.BorderSize = '0'
$enterButton.Location          = New-Object System.Drawing.Point(340,20)
$enterButton.Image             = [System.Drawing.Image]::Fromfile("E:\img\091015112023.png")

# Create event handler
$enterButton.add_click({
    $colorDialog.ShowDialog()
    $form.BackColor = $colordialog.Color
})

# Add the controls to the form then display the dialog.
$form.Controls.AddRange(@($enterButton))
[void]$form.ShowDialog()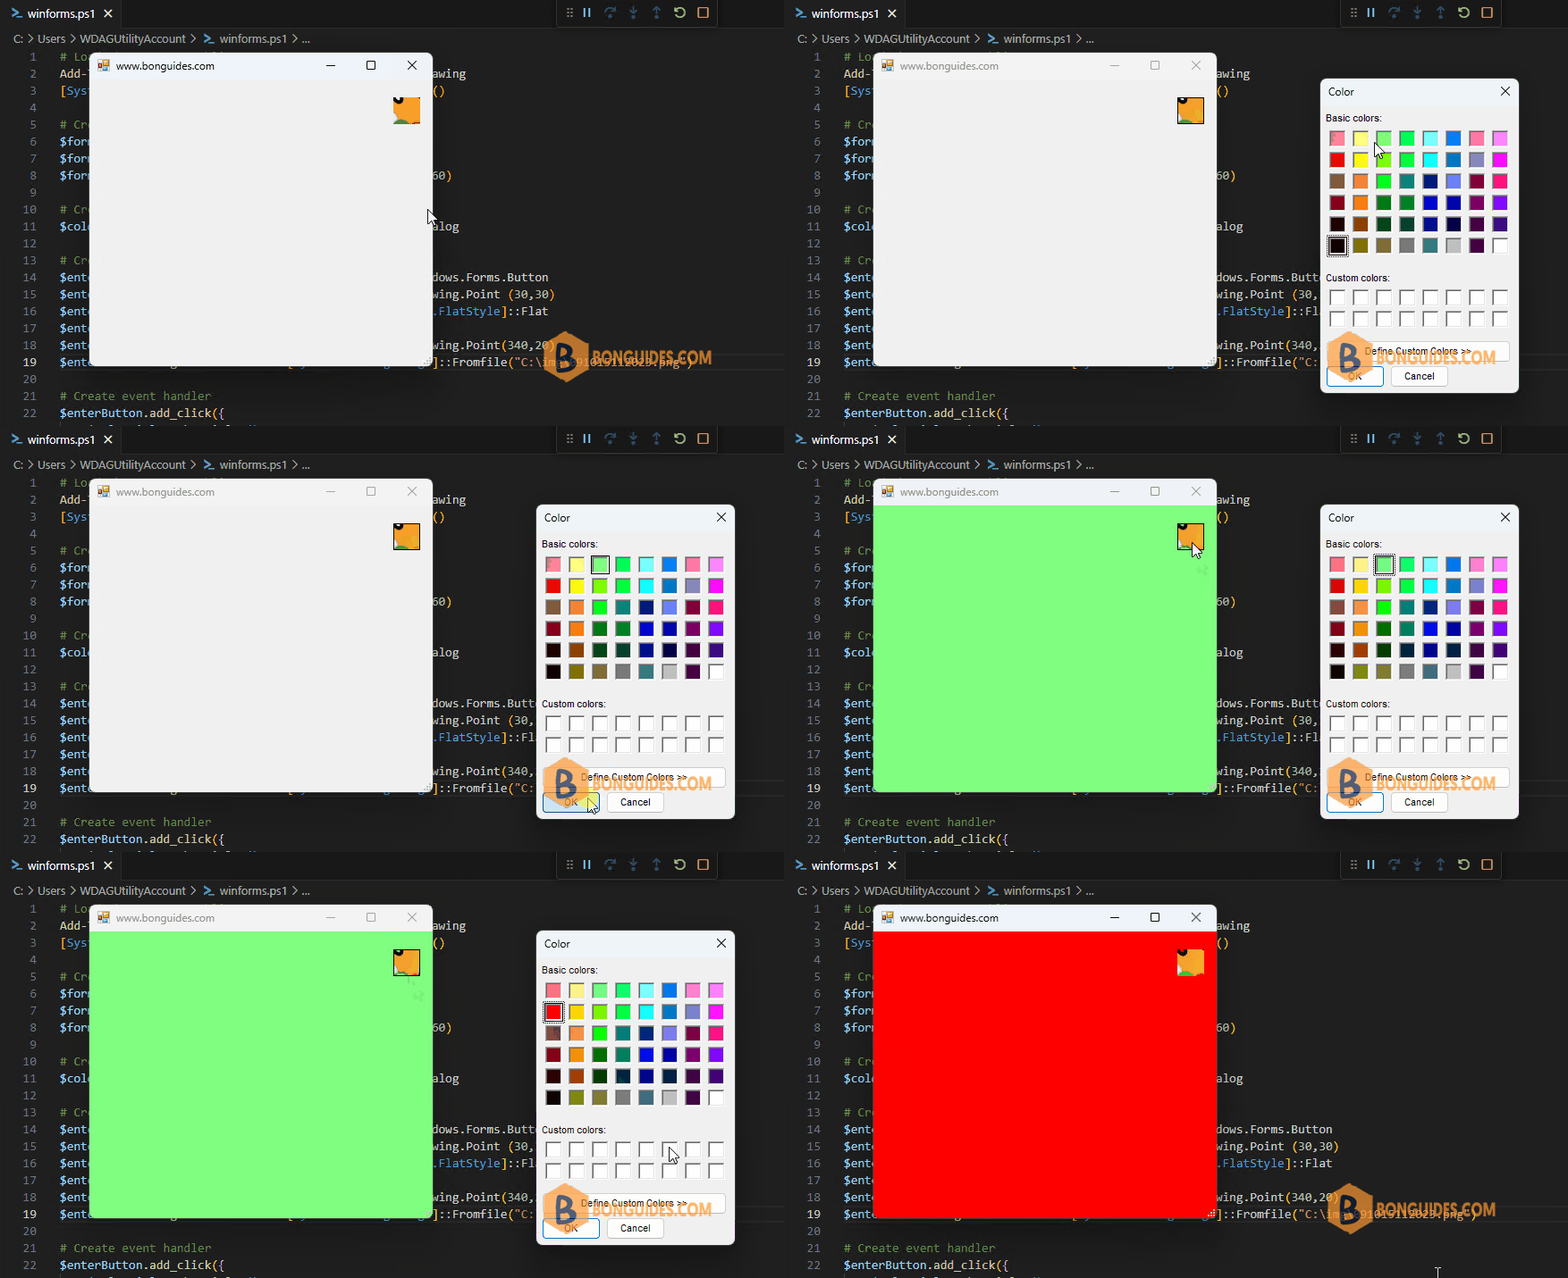


Very useful – thanks 🙂
Glad it helped.
Thanks, that’s awasome!
One thing i notice, in the sample that ping the dns servers, while it execute the ping in backgroud, the gui form is freezed.. is there a way to get the rid of this?
Thanks a nd kind regards
Juri