Table of Contents
NMState is a declarative network manager for configuring networking on Linux hosts. It’s a library that provides a command-line tool that manages host network settings.
In this guide, we look at some of the example usages of the NMState tool. For this guide, we will demonstrate this using CentOS Stream 9.
Install NMState Networking Config Tool
1. First, check the availability of the package then install NMState.
sudo dnf search nmstate
sudo dnf install nmstate -y
# rpm -qi nmstate
Name : nmstate
Version : 2.2.0
Release : 1.el9
Architecture: x86_64
Install Date: Fri 28 Oct 2022 09:46:15 AM +07
Group : Unspecified
Size : 9147321
License : LGPLv2+
Signature : RSA/SHA256, Wed 19 Oct 2022 02:41:42 PM +07, Key ID 05b555b38483c65d
Source RPM : nmstate-2.2.0-1.el9.src.rpm
Build Date : Tue 18 Oct 2022 01:13:01 AM +07
Build Host : x86-06.stream.rdu2.redhat.com
Packager : [email protected]
Vendor : CentOS
URL : https://github.com/nmstate/nmstate
Summary : Declarative network manager APIUsing NMState Configuration Tool in Linux
Get the list of the interfaces in your Linux server using ip -br -4 a command. In this post, we’ve an interface named ens160.
ip -br -4 a# ip -br -4 a
lo UNKNOWN 127.0.0.1/8
ens160 UP 192.168.1.150/24View the current network configuration of your network interface:
nmstatectl show ens160- dns-resolver: This section contains the nameserver configuration for the particular interface.
- route-rules: This stipulates the routing rules.
- routes: This includes both dynamic and static routes.
- interfaces: This section specifies both the ipv4 and ipv6 settings.
# sudo nmstatectl show ens160
dns-resolver: {}
route-rules: {}
routes:
  running:
  - destination: 0.0.0.0/0
    next-hop-interface: ens160
    next-hop-address: 191.168.1.1
    table-id: 254
interfaces:
- name: ens160
  type: ethernet
  state: up
  mac-address: 00:0C:29:8C:67:D8
  mtu: 1500
  min-mtu: 60
  max-mtu: 9000
  wait-ip: any
  ipv4:
    enabled: true
    dhcp: true
    address:
    - ip: 192.168.1.10
      prefix-length: 24
    auto-dns: true
    auto-gateway: true
    auto-routes: true
    auto-route-table-id: 0
  ipv6:
    enabled: true
    dhcp: true
...Changing Network Configuration in Linux
You can use the NMState configuration tool to configure your hosts to the desired state using either interactive or file-based modes.
- Interactive: This edits a network interface using the nmstatectl edit command. This command opens a text editor which is defined by the EDITOR environment variable. Once the changes are saved, NMState applies the new configuration immediately unless syntax errors were detected.
- File-based: In file-based mode, the interface configuration is applied using a YAML or JSON file using the nmstatectl apply command.
NMState Interactive Configuration Mode
We will use interactive mode to change the MTU (Maximum Transmission Unit) of the ena160 network interface. By default, this is set to 1500 as shown.
# sudo nmstatectl show ens160
...
interfaces:
- name: ens160
  type: ethernet
  state: up
  mac-address: 00:0C:29:8C:67:D8
  mtu: 1500
  min-mtu: 60
  max-mtu: 9000
  ...
We will change this to 4000. We will do so using the nmstatectl edit command as follows.
sudo nmstatectl edit ens160This opens the configuration in a text editor. For our case, it opens in the default vi editor.
Next, scroll all the way down and locate the mtu parameter. We will change the value to 4000. Then we will save the changes.
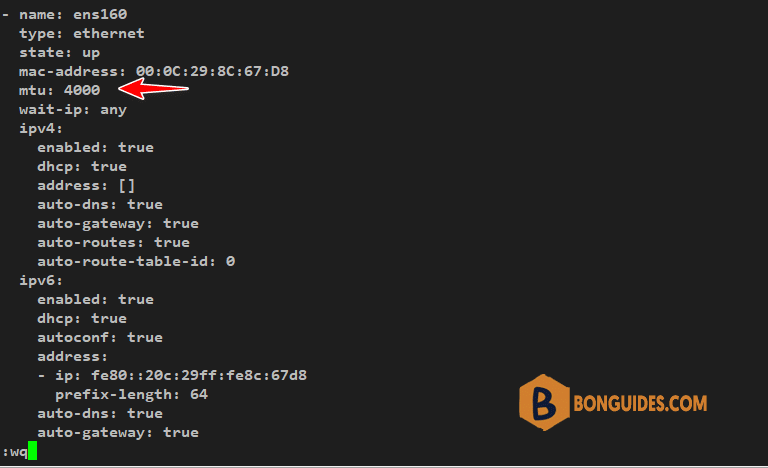
When you save and exit the file, you will see some scrambled output on the terminal as NMstate saves the changes. No intervention is required so, just sit still. Then let us now confirm that the change was made.
ip addr show ens160From the terminal output, we can see that we have successfully changed the MTU to 4000 from the default 1500 value.
# ip addr show ens160
2: ens160: <BROADCAST,MULTICAST,UP,LOWER_UP> mtu 4000 qdisc mq state UP group default qlen 1000
...
NMState File-based Configuration Mode
In this example, we are going to disable IPv6 for the ens160 network interface.
# ip -br a
lo               UNKNOWN        127.0.0.1/8 ::1/128
ens160           UP             192.168.1.150/24 fe80::20c:29ff:fe8c:67d8/64
1. The first step is to create a YAML file that will specify the desired state of the ens160 network interface. Then open it using vi editor.
sudo nmstatectl show ens160 > ens160.yml
sudo vi ens160.yml
2. Navigate to the ipv6 section. To disable IPv6, set the enabled parameter to false and delete the lines in the highlight.


3. Save the configuration and apply the new state using the YAML file as follows.
sudo nmstatectl apply ens160.yml4. Now run the command shown to verify that IPv6 has been disabled.
ip -br aThe output displayed shows that the IPv6 for the ens160 network interface is blank, implying that we have successfully disabled IPv6 on the interface.
# ip -br a
lo               UNKNOWN        127.0.0.1/8 ::1/128
ens160           UP             10.10.230.16/16
Applying Network Changes Temporarily
Another really handy functionality that NMstate provides is the ability to temporarily configure a desired networking state.
Once you are satisfied with the configuration, you can proceed and make the changes permanent. Otherwise, the changes made will roll back to the initial settings once the timeout expires.
To demonstrate this, we will temporarily set a static IP on the ens160 interface and disable DHCP.
# ip -br -4 a
lo               UNKNOWN        127.0.0.1/8
ens160           UP             10.10.230.16/16   ###DHCP: true
1. Once again, access the yaml file using a text editor.
sudo vi ens160.yml2. Scroll to the ipv4 section. Specify the static IP – in our case 10.10.5.91 and delete the lines in the highlight. In addition, be sure to set the dhcp parameter to false.

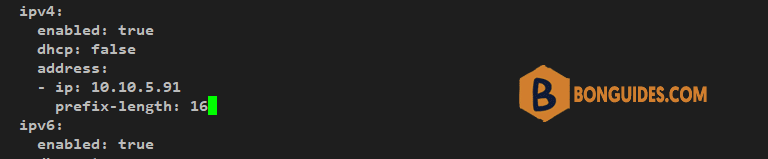
3. Save the file and temporarily commit the changes as follows:
The –no-commit option temporarily applies the changes for a period defined by the –timeout option which, in this example, is 30 seconds.
sudo nmstatectl apply --no-commit --timeout 30 ens160.yml4. To verify the temporal application of the changes, we will check the IP configuration in a time interval of 30 seconds.
ip -br -4 aFrom the output, you can see that the interface IP configuration reverted to DHCP after the time interval of 30 seconds. The IP address went back to 10.10.230.16 from the earlier statically configured IP which was 10.10.5.91.
# ip -br -4 a
lo               UNKNOWN        127.0.0.1/8
ens160           UP             10.10.5.91/16

# ip -br -4 a
lo               UNKNOWN        127.0.0.1/8
ens160           UP             10.10.230.16/16


