Table of Contents
When working with the Microsoft Graph API or introducing the API to colleagues I often get asked about the steps required to obtain an access token for the API with PowerShell.
Out in the wild, I’ve spotted many different ways and lots of implementations still relying on the ADAL (Active Directory Authentication Library) despite the fact that this client library is superseded by MSAL (Microsoft Authentication Library). So let’s talk about acquiring access token “in stile” with the most simple method available.
Why do we need an access token?
When talking about the Microsoft Graph API an access token fulfills two roles:
- First: prove authentication (proof of identity)
- Second prove authorization (permissions). Each request needs to submit a request-header that contains the access token.
For an API it’s crucial to validate the authentication and authorization for every request. Otherwise, requests could be made to resources the actor has no access to.
What’s inside the access token?
You did probably stumble over the terms “bearer authentication” or “bearer token” these describe a mechanism within the OAuth 2.0 Authorization framework to authenticate requests with access tokens. Tokens are issued by the authorization server (Entra ID) and contain a server-generated string in the format of a JSON Web Token (JWT) with the following information (the list is not exhaustive and truncated to only contain the most interesting parts):
And here is a real bearer token body which I decoded (also truncated):
{
  "aud": "00000003-0000-0000-c000-000000000000",
  "iss": "https://sts.windows.net/69271346-cb42-4bcd-b645-338c738cb57e/",
  "iat": 1609530487,
  "nbf": 1609530487,
  "exp": 1609534387,
  "app_displayname": "Graph explorer (official site)",
  "appid": "de8bc8b5-d9f9-48b1-a8ad-b748da725064",
  "idp": "https://sts.windows.net/69271346-cb42-4bcd-b645-338c738cb57e/",
  "idtyp": "user",
  "ipaddr": "91.138.12.34",
  "name": "Nicola Suter",
  "scp": "DeviceManagementConfiguration.ReadWrite.All Directory.ReadWrite.All openid profile User.Read email",
  "tid": "69271346-cb42-4bcd-b645-338c738cb57e",
}
Available options to acquire tokens
Now let’s have a look about the available options within Entra ID to obtain access tokens and some use cases:
(This list is also not exhaustive but contains the most used and adopted scenarios and flows).
App registration
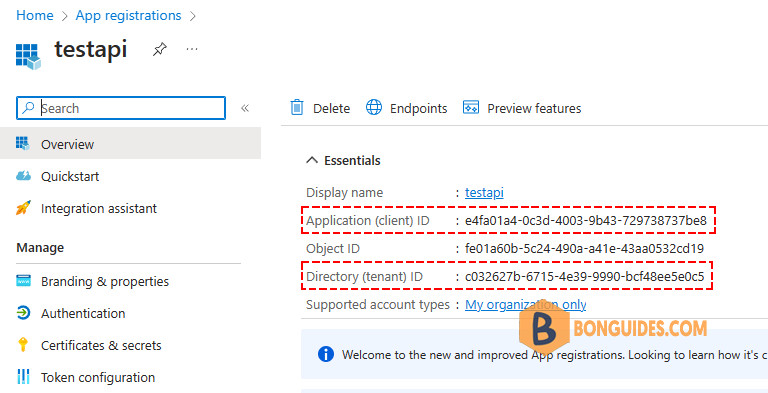
No matter which option we choose to acquire tokens and want to interact with the Graph API we need an app registration. After you created the app registration note down the following details:
- Application ID
- Tenant ID (you can also use a DNS name of a registered domain)
Reply-URLs when using Interactive (authorization code)
The authorization server (Entra ID acting as identity provider) returns access tokens for Interactive flows only to registered reply-URLs. These can be added under the “authentication” section of your app registration:
- For PowerShell 5.1 we need to add: https://login.microsoftonline.com/common/oauth2/nativeclient
- For PowerShell core: http://localhost
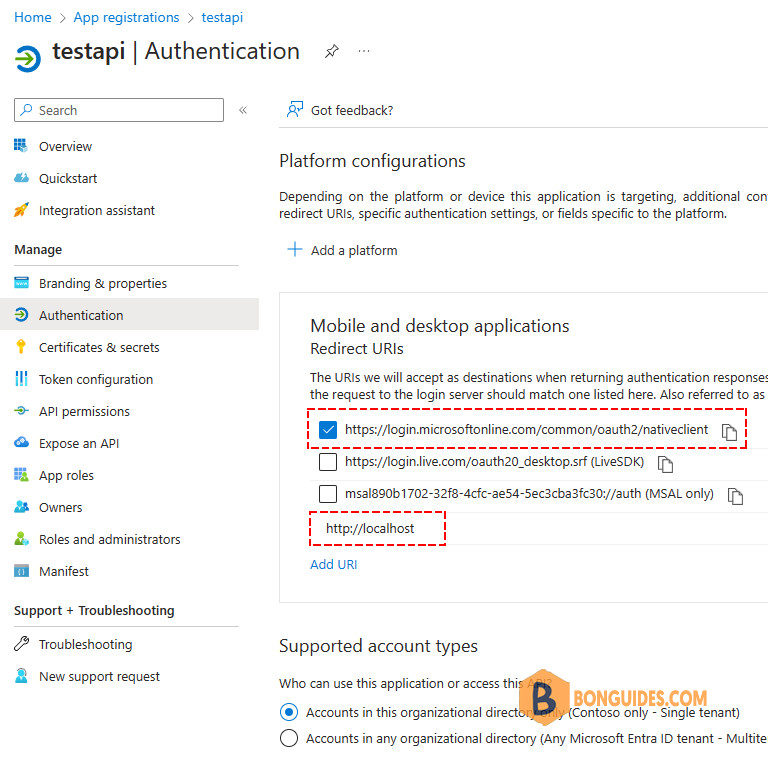
To ensure backward compatibility for other colleagues not using PowerShell core I mostly add both reply-URLs.
PowerShell examples
For the PowerShell examples we’ll use the MSAL.PS PowerShell module. It supports all recent PowerShell platforms, including PowerShell core (e.g. PowerShell 7 and Azure Functions).
As the name indicates the module relies on MSAL. Furthermore, it implements an in-memory token cache to persist acquired tokens, optionally you can enable toke caching on your disk.
You can install the module on your machine with:
Install-Module -Name MSAL.PS -Scope CurrentUserWithin the PowerShell examples I’ll use splatting which allows passing commandlet arguments with a hashtable because it looks very nice and ensures vertical density.
Interactive (authorization code flow)
The interactive authorization code flow pops-up either a login or browser window and you are prompted to enter your Entra ID username and password.
$connectionParams = @{
    'TenantId'    = 'duybao.me'
    #'TenantId'    = 'c032627b-6715-4e39-9990-bcf48ee5e0c5'
    'ClientId'    = '890b1702-32f8-4cfc-ae54-5ec3cba3fc30'
    'Interactive' = $true
}

Get-MsalToken @connectionParams
Behind the curtain we can trace a request to the OAuth 2.0 authorize endpoint which initiates the sign-in process:
PS C:\> Get-MsalToken @connectionParams

AccessToken                  : eyJ0eXAiOiJKV1QiLCJub25jZ(...truncated...)rTFrFIPk8RXM4ow
IsExtendedLifeTimeToken      : False
UniqueId                     : 647fea69-afca-4001-af45-f0cc82a2fa41
ExpiresOn                    : 9/14/2023 11:00:53 PM +00:00
ExtendedExpiresOn            : 9/14/2023 11:00:53 PM +00:00
TenantId                     : c032627b-6715-4e39-9990-bcf48ee5e0c5
Account                      : Account username: [email protected] environment login.windows.net home account id:
                               AccountId: 647fea69-afca-4001-af45-f0cc82a2fa41.c032627b-6715-4e39-9990-bcf48ee5e0c5
IdToken                      : eyJ0eXAiOiJKV1QiLCJhbGciOiJ(...truncated...)YibnSm46Sg4g
Scopes                       : {profile, openid, email, https://graph.microsoft.com/User.Read...}
CorrelationId                : eb212d60-7442-4b97-b8d5-96ccbceb1a6c
TokenType                    : Bearer
ClaimsPrincipal              : System.Security.Claims.ClaimsPrincipal
AuthenticationResultMetadata : Microsoft.Identity.Client.AuthenticationResultMetadata
Client Secret
A client secret allows unattended authentication and the secret needs to be added to your app registration. The commandlet requires the client secret as a secure string parameter.
You can create a new client secret directly from the app registration:

$connectionParams = @{
    'TenantId'     = 'duybao.me' #c032627b-6715-4e39-9990-bcf48ee5e0c5
    'ClientId'     = '890b1702-32f8-4cfc-ae54-5ec3cba3fc30'
    'ClientSecret' = 'IcZ8Q~giLdibUTXEDjiQ2nsV~RHdHL3dIaDM3aXs' | ConvertTo-SecureString -AsPlainText -Force
}
Get-MsalToken @connectionParams
PS C:\> Get-MsalToken @connectionParams
AccessToken : eyJ0eXAiOiJKV1QiLCJub(...truncated...)ipSh3f6RijhnPU-Q
IsExtendedLifeTimeToken : False
UniqueId :
ExpiresOn : 9/14/2023 11:10:32 PM +00:00
ExtendedExpiresOn : 9/14/2023 11:10:32 PM +00:00
TenantId :
Account :
IdToken :
Scopes : {https://graph.microsoft.com/.default}
CorrelationId : 2b8950ac-81fe-4699-9258-5cf5c99e87b3
TokenType : Bearer
ClaimsPrincipal :
AuthenticationResultMetadata : Microsoft.Identity.Client.AuthenticationResultMetadataCertificate
Certificates also allow unattended authentication. The certificate and the corresponding private key need to be present in an accessible store.
For this purpose a self-signed certificate is sufficient and you can easily generate one with PowerShell and export the public key:
$certParams = @{
    CertStoreLocation = "Cert:\CurrentUser\My"
    Subject = "Microsoft Graph Automation"
    Provider = "Microsoft Enhanced RSA and AES Cryptographic Provider"
}
$cert = New-SelfSignedCertificate @certParams
Export-Certificate -Cert $cert -FilePath C:\certificate.cer
PS C:\> Export-Certificate -Cert $cert -FilePath C:\certificate.cer
Directory: C:\
Mode LastWriteTime Length Name
---- ------------- ------ ----
-a---- 9/14/2023 10:23 PM 808 certificate.cerAfterward, upload the exported public key to your app registration:

PS C:\> $cert

   PSParentPath: Microsoft.PowerShell.Security\Certificate::CurrentUser\My

Thumbprint                                Subject
----------                                -------
E4F63F3AEF2EB49420B5B6FF2617619BC581C818  CN=Microsoft Graph Automation
And now you are ready to acquire your token with the certificate we just generated:
$thumbprint = Get-Item -Path 'Cert:\CurrentUser\My\E4F63F3AEF2EB49420B5B6FF2617619BC581C818'
$connectionParams = @{
    'TenantId'          = 'c032627b-6715-4e39-9990-bcf48ee5e0c5'
    'ClientId'          = '890b1702-32f8-4cfc-ae54-5ec3cba3fc30'
    'ClientCertificate' = $thumbprint
}
Get-MsalToken @connectionParams
PS C:\> Get-MsalToken @connectionParams
AccessToken : eyJ0eXAiOiJKV1QiLCJub2(...truncated...)M4CN1CkydhfDxDpRKQA
IsExtendedLifeTimeToken : False
UniqueId :
ExpiresOn : 9/14/2023 11:38:02 PM +00:00
ExtendedExpiresOn : 9/14/2023 11:38:02 PM +00:00
TenantId :
Account :
IdToken :
Scopes : {https://graph.microsoft.com/.default}
CorrelationId : 357f6456-a179-49aa-ad3c-f3e3f03ee8bf
TokenType : Bearer
ClaimsPrincipal :
AuthenticationResultMetadata : Microsoft.Identity.Client.AuthenticationResultMetadataBuilding a request header
To actually use the acquired access token we need to build a request header that we include in http requests to the Graph API. A PowerShell object instantiated from the Get-MsalToken commandlet exposes a method called CreateAuthorizationHeader() to include the Bearer token in the request header you use for subsequent requests:
PS C:\> Get-MsalToken @connectionParams

AccessToken                  : eyJ0eXAiOiJKV1QiLCJub2(...truncated...)M4CN1CkydhfDxDpRKQA
IsExtendedLifeTimeToken      : False
UniqueId                     :
ExpiresOn                    : 9/14/2023 11:38:02 PM +00:00
ExtendedExpiresOn            : 9/14/2023 11:38:02 PM +00:00
TenantId                     :
Account                      :
IdToken                      :
Scopes                       : {https://graph.microsoft.com/.default}
CorrelationId                : 357f6456-a179-49aa-ad3c-f3e3f03ee8bf
TokenType                    : Bearer
ClaimsPrincipal              :
AuthenticationResultMetadata : Microsoft.Identity.Client.AuthenticationResultMetadataToken cache
In memory tokens can be cleared with:
Clear-MsalTokenCacheFor non-interactive flows you can pass the -ForceRefresh parameter to acquire a new token which is not served from the token cache.
Conclusion
This very detailed post guided you through different ways to obtain access tokens for your next PowerShell automation with the Microsoft Graph API. As a takeaway I always recommend using the MSAL.PS PowerShell module because this will save you lots of time instead of writing custom code to acquire access tokens.
Furthermore, for unattended scenarios I always recommend using certificates over client secret because they are better protected instead of a clear text client secret.
There has been a lot of Auth 2.0 and OpenID Connect terminology and if you want to follow up about these frameworks I can recommend you the following resources:
Not a reader? Watch this related video tutorial:


