Table of Contents
Enable WSL using Windows Features
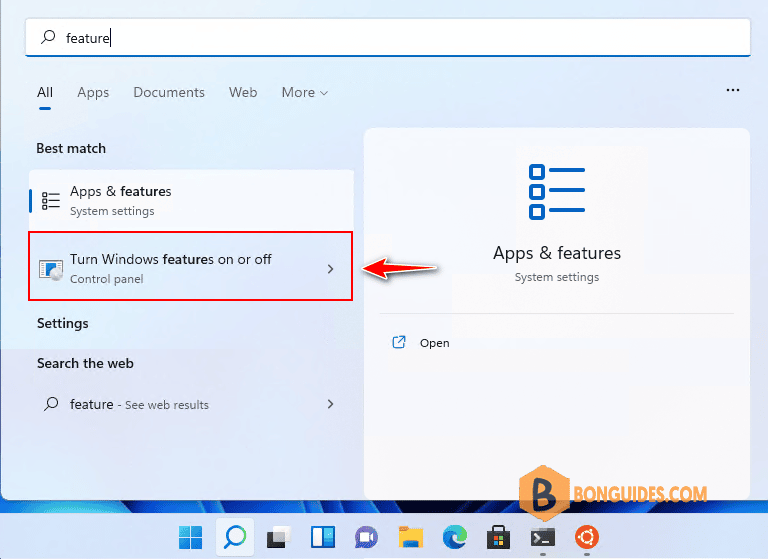
1. Search then open Turn Windows Features On or Off in Windows 11.

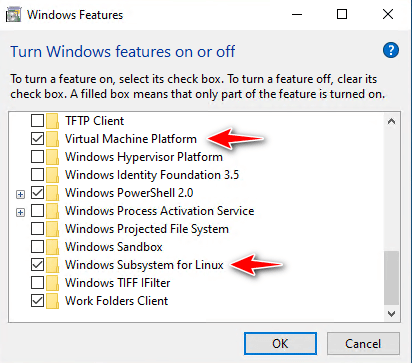
2. Select the checkboxes to enable Virtual Machine Platform and Windows Subsystem for Linux. It could take a while, once done let’s restart your computer.

3. Once the computer restarted, we need update WSL1 to WSL2 using the following command:
PS C:\> wsl --update
Checking for updates...
Downloading updates...
Installing updates...
This change will take effect on the next full restart of WSL. To force a restart, please run 'wsl --shutdown'.
Kernel version: 5.10.102.1
4. Get the list of valid distributions that can be installed.
PS C:\> wsl -l -o
The following is a list of valid distributions that can be installed.
Install using 'wsl --install -d <Distro>'.

NAME            FRIENDLY NAME
Ubuntu          Ubuntu
Debian          Debian GNU/Linux
kali-linux      Kali Linux Rolling
openSUSE-42     openSUSE Leap 42
SLES-12         SUSE Linux Enterprise Server v12
Ubuntu-16.04    Ubuntu 16.04 LTS
Ubuntu-18.04    Ubuntu 18.04 LTS
Ubuntu-20.04    Ubuntu 20.04 LTS
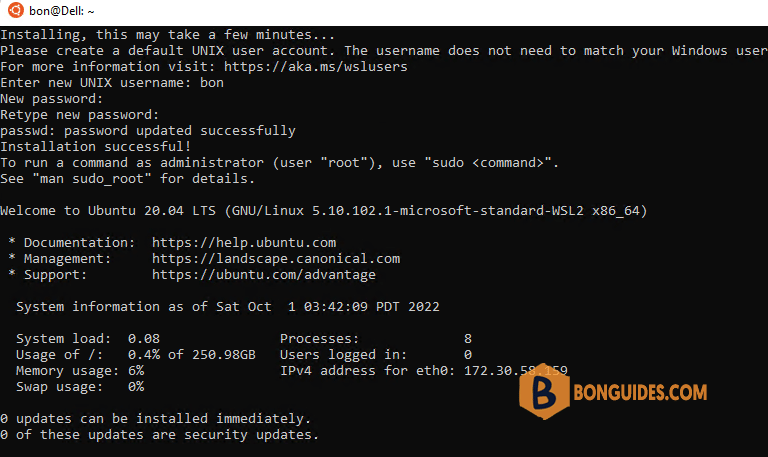
5. Install a Linux distro in WSL. In the first run, you need configure the username and password.
PS C:\> wsl --install -d ubuntu
Downloading: Ubuntu
Installing: Ubuntu
Ubuntu has been installed.
Launching Ubuntu...
Enbale WSL using PowerShell
1. Right click on Windows start icon then open Windows PowerShell admin.
2. Run the following commands to enable Windows Subsystem for Linux and Virtual Machine Platform then restart your computer.
dism.exe /online /enable-feature /featurename:Microsoft-Windows-Subsystem-Linux /all /norestart
dism.exe /online /enable-feature /featurename:VirtualMachinePlatform /all /norestart
3. Update WSL1 to WSL2 using –update parameter.
wsl --update4. Install a Linux distro in WSL.
wsl --install -d ubuntu5. Get the list of installed distros.
PS C:\> wsl -l -v
  NAME      STATE           VERSION
* Ubuntu    Running         2


