Table of Contents
Default PSRemoting Settings on Windows
Since PSRemoting was born in Windows, it comes enabled by default but not universally and also not for all Windows OS versions.
On Windows Server, PSRemoting is enabled sometimes but not all of the time depending on what network profile Windows is running under. Below you’ll find a handy table to help you determine if your Windows OS has PSremoting enabled or not.
| Operating System | Network Profile | PSRemoting |
|---|---|---|
| Windows 7, 8, 10, 11 | Domain/Private/Public | Disabled |
| Windows Server 2008 R2 | Domain/Private/Public | Disabled |
| Windows Server 2012 & Newer | Domain/Private | Enabled |
| Windows Server 2012 & Newer | Public | Enabled within the same subnet |
Enabling PowerShell remoting in a domain (single computer)
Windows PowerShell remoting is infinitely easier to configure in a domain environment because all domain member computers trust each other implicitly.
PS C:\Windows\system32> Get-NetConnectionProfile

Name                     : duybao.me
InterfaceAlias           : Ethernet0
InterfaceIndex           : 12
NetworkCategory          : DomainAuthenticated
DomainAuthenticationKind : Ldap
IPv4Connectivity         : Internet
IPv6Connectivity         : NoTraffic
Thus, turning on PowerShell remoting on a Windows client or server computer is simply a matter of opening an elevated PowerShell console session and issuing the following statement:
Enable-PSRemoting -ForceThe -Force parameter is technically optional, but I recommend that you use it; otherwise, you’ll be stuck passing through confirmation prompts.
PS C:\Windows\System32> Enable-PSRemoting

WinRM has been updated to receive requests.
WinRM service type changed successfully.
WinRM service started.

WinRM has been updated for remote management.
WinRM firewall exception enabled.
Configured LocalAccountTokenFilterPolicy to grant administrative rights remotely to local users.
The Enable-PSRemoting command makes the following changes to your system:
- Starts the Windows Remote Management (WinRM) service and sets it for automatic startup
- Creates a listener to accept remote requests on any IP address
- Enables a firewall exception for WS-Management
- Makes some additional under-the-hood changes to support PowerShell remoting sessions and workflows
You might wonder what the difference is between Enable-PSRemoting and, say, winrm quickconfig. Technically speaking, not much. In fact, running Enable-PSRemoting performs all the work of winrm quickconfig but includes additional Windows PowerShell-specific environment changes. Long story short: If you run Enable-PSRemoting, you don’t need to run winrm quickconfig.
PS C:\Windows\System32> winrm quickconfig -quiet
WinRM is not set up to receive requests on this machine.
The following changes must be made:

Start the WinRM service.
Set the WinRM service type to delayed auto start.

WinRM has been updated to receive requests.

WinRM service type changed successfully.
WinRM service started.
WinRM is not set up to allow remote access to this machine for management.
The following changes must be made:

Enable the WinRM firewall exception.
Configure LocalAccountTokenFilterPolicy to grant administrative rights remotely to local users.

WinRM has been updated for remote management.

WinRM firewall exception enabled.
Configured LocalAccountTokenFilterPolicy to grant administrative rights remotely to local users.
How do you know is has been enabled? Run a test command such as the following command, which creates a remote session on the local computer. If remoting is configured correctly, the command creates a session on the local computer and returns an object that represents the session.
PS C:\Windows\System32> New-PSSession

 Id Name            ComputerName    ComputerType    State         ConfigurationName     Availability
 -- ----            ------------    ------------    -----         -----------------     ------------
  1 WinRM1          localhost       RemoteMachine   Opened        Microsoft.PowerShell     Available
Enable PSRemoting Using Group Policy
The best option for enabling WinRM across a wide range of computers is through group policy. When using Group Policy, you can create a single Group Policy Object and apply that policy across thousands of computers at once.
To use Group Policy to enable WinRM across many computers at once, you’re going to need to set three different configuration items:
- Enable the WinRM service.
- Open the Windows Firewall port for WinRm.
- Creating the WinRM listener and allow connections to it.
Enabling the WinRM Service
1️⃣ First, RDP to a domain controller or, better yet, install the remote server administrator tools (RSAT) package on a domain-joined workstation. You should now have the Group Policy Management Console (GPMC) available.
2️⃣ Enable the WinRM service on all target computers by Open up the GPMC and create a GPO. We recommand you create a separate OU for the computers that you want to enable PSRemoting. Instead of editing the Default Domain Policy.

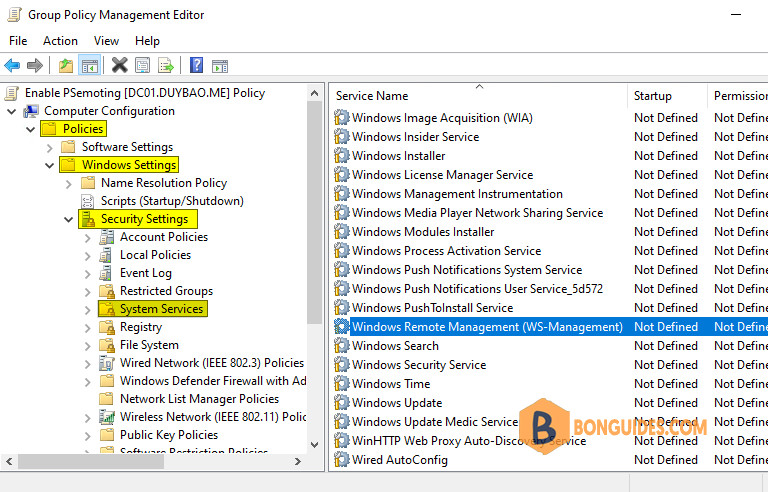
3️⃣ When editing the GPO, navigate to Computer Configuration —> Windows Settings —> Security Settings —> System Services.
4️⃣ Double click on Windows Remote Management (WS-Management) to configure it.
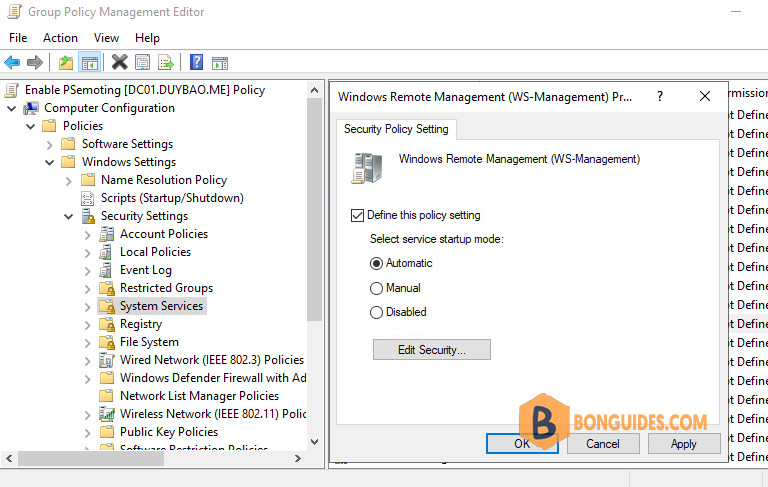
5️⃣ In the configuration panel check the box for Define this policy setting. Select the radio button for Automatic to set the WinRm service to start automatically on boot. Click OK to confirm the setting.
Opening the Windows Firewall Port
Next, you need to open the WinRM port on all of the target computers. While still editing the GPO created above:
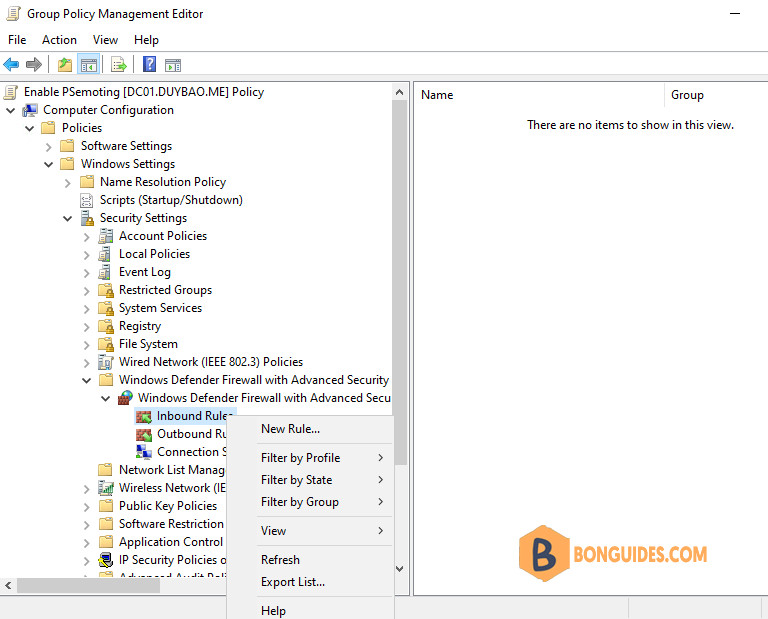
1️⃣ Navigate to Computer Configuration —> Windows Settings —> Security Settings —> Windows Defender Firewall with Advanced Security.
2️⃣ Click on the New Inbound Rule to create a new inbound rule.
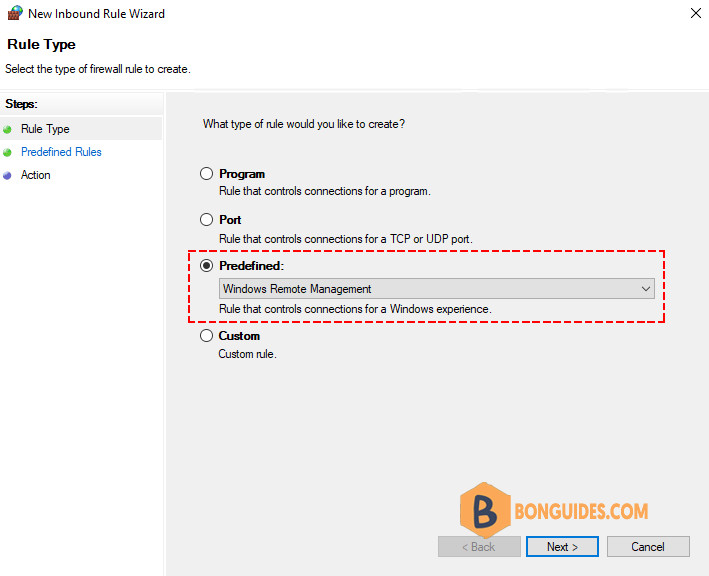
3️⃣ On the first page select Predefined and select Windows Remote Management as shown below.
4️⃣ On the next page, check the box for the Domain/Private network rule unless you know that Public networks are used in your environments and you will need to allow remote connections from them.
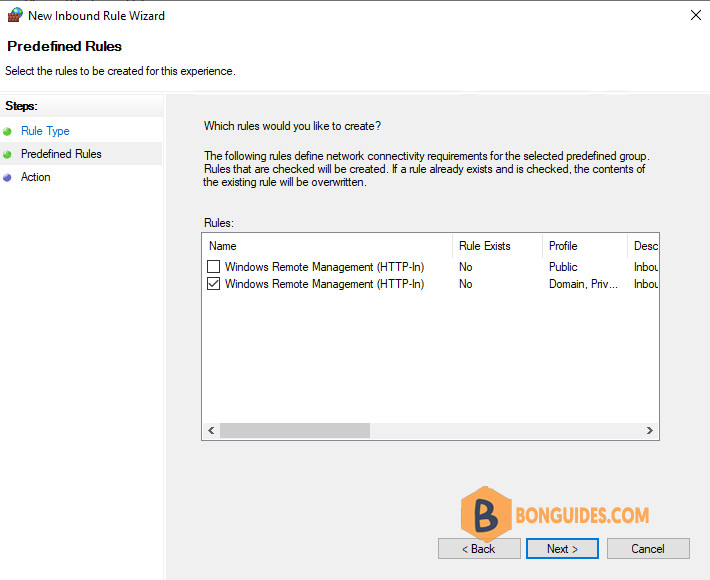
5️⃣ On the next page leave the default of Allow the connection and click Finish to create the rule.
Create the WinRM Listener and Filter List
The final configuration item to add to your GPO is creating the WinRM listener ad allowing connections to that WinRM listener. This setting creates the WinRM listener for HTTP and allows connections to it from the specified IPs or IP ranges.
While still editing the WinRM GPO:
1️⃣ Navigate to Computer Configuration —> Administrative Templates —> Windows Components —> Windows Remote Management (WinRM) —> WinRM Service.
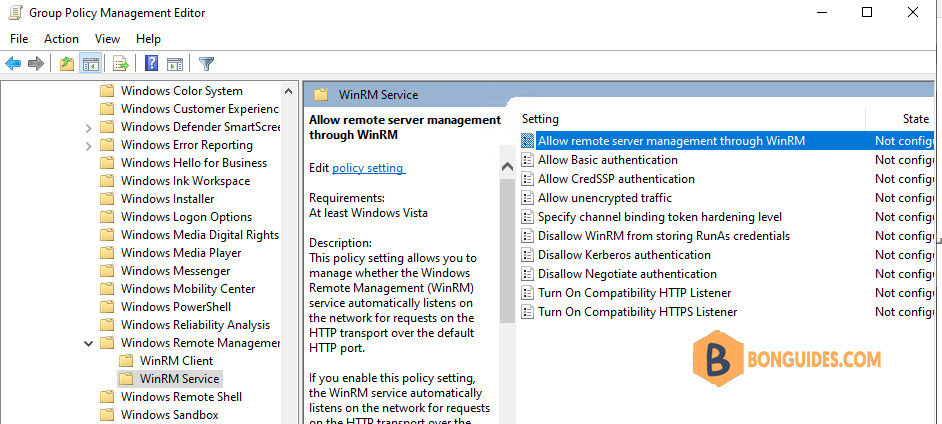
2️⃣ Select Enabled for the setting Allow remote service management through WinRM. Under the Allow remote server management through WinRM setting, provide an asterisk (*) for both the IPv4 filter and IPv6 filter as shown below.
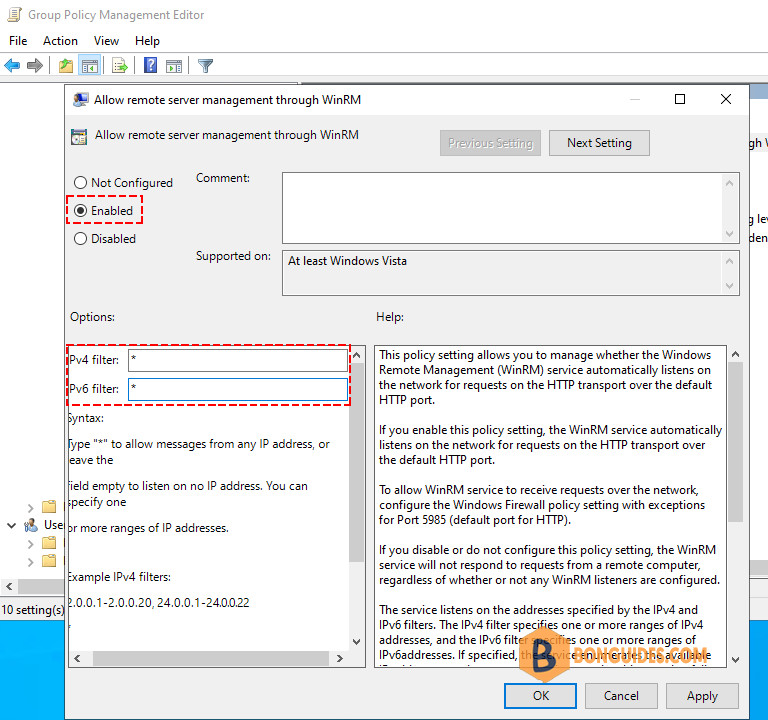
3️⃣ Click OK to confirm the newest GPO setting.
Applying the GPO
On client computers, this is done by default every 90 minutes, with a randomized offset of plus or minus 30 minutes. Admin can force it using gpupdate /force command to take the changes immediately.
PS C:\Users\admin.DUYBAO> Get-WSManInstance winrm/config/listener -Enumerate

cfg                   : http://schemas.microsoft.com/wbem/wsman/1/config/listener
xsi                   : http://www.w3.org/2001/XMLSchema-instance
Source                : GPO
lang                  : en-US
Address               : *
Transport             : HTTP
Port                  : 5985
Hostname              :
Enabled               : true
URLPrefix             : wsman
CertificateThumbprint :
ListeningOn           : {10.10.18.111, 127.0.0.1, ::1, fe80::4010:cb41:c00b:30b6%11}
Testing Remote Access
On the local computer, make sure that the remote computer now accepts remote connections via PSRemoting. This is optional step, but it could help for troubleshooting.
PS C:\Users\Administrator> Test-NetConnection HR-PC001 -Port 5985

ComputerName     : HR-PC001
RemoteAddress    : 10.10.18.111
RemotePort       : 5985
InterfaceAlias   : Ethernet0
SourceAddress    : 10.10.19.22
TcpTestSucceeded : True

PS C:\Users\Administrator> Test-WSMan HR-PC001

wsmid           : http://schemas.dmtf.org/wbem/wsman/identity/1/wsmanidentity.xsd
ProtocolVersion : http://schemas.dmtf.org/wbem/wsman/1/wsman.xsd
ProductVendor   : Microsoft Corporation
ProductVersion  : OS: 0.0.0 SP: 0.0 Stack: 3.0
Because we’re in a domain environment, we don’t need to enter username and password for PSRemoting. PowerShell will user the current log on credentials.
PS C:\Users\Administrator> Enter-PSSession -ComputerName HR-PC001
[HR-PC001]: PS C:\Users\Administrator\Documents> hostname
HR-PC001
If you want to remote PowerShell using different credential, you can put it into the Enter-PSSession command. For example, we’ll create a remote session with Chris’s account:
PS C:\Users\Administrator> Enter-PSSession -ComputerName HR-PC001 -Credential duybao\chris
[HR-PC001]: PS C:\Users\chris\Documents> whoami
duybao\chris
Alternatively, if you don’t want to create a full session to the remote computer. you can execute commands and scripts on remote workgroup computers using the Invoke-Command. For example, restart a computer remotely:
Invoke-Command -ComputerName HR-PC001 –ScriptBlock {
    Restart-Computer
}
Use the -Credential parameter in all remote commands. This is required even when you connect as the current user. If you don’t want to type the password every command, you can create a variable as follows:
PS C:\> $cred = Get-Credential
cmdlet Get-Credential at command pipeline position 1
Supply values for the following parameters:
Credential

PS C:\> Invoke-Command -ComputerName HR-PC001 -Credential $cred -ScriptBlock {
    Restart-Computer
}
Install application remotely using PSRemoting
Once the computers can be managed using PSRemoting, we can install applications on these clients remotely. For example, we’ll install Zoom Client app on IT-PC001.
- Copy the installer from file server to the admin share of the client.
- Run the remote command on the client with Invoke-Command cmdlet.
$file = "\\fileserver\dataroom\public\zoom.msi"
Copy-Item -Path $file -Destination "\\IT-PC001\C$\Windows\Temp\zoom.msi" -Force
Invoke-Command -ComputerName 'IT-PC001' -ScriptBlock {
    Start-Process -FilePath 'msiexec.exe' -ArgumentList "/i C:\Windows\Temp\zoom.msi /qn" -Wait
}
If you want to install an app on multiple devices, you can use the below script:
$file = "\\fileserver\dataroom\public\zoom.msi"
$computers = @('IT-PC001','HR-PC001','HR-PC002')

foreach ($computer in $computers) {
    Copy-Item -Path $file -Destination "\\$computer\C$\Windows\Temp\zoom.msi"
    Invoke-Command -ComputerName $computer -ScriptBlock {
        Start-Process -FilePath 'msiexec.exe' -ArgumentList "/i C:\Windows\Temp\zoom.msi /qn" -Wait
    }
}
Enabling PowerShell remoting in a workgroup
When your computers exist outside of an Active Directory domain, PowerShell remoting is certainly possible, but it is quite a bit more tedious to set up. One approach involves the use of digital certificates; the other, which we’ll use here, implements the TrustedHosts list.
Not a reader? Watch this related video tutorial:


