Table of Contents
In this article, we will disable the IP check function on CyberPanel. Why is there an IP check and in what cases to disable IP check?
IP check on CyberPanel
By default, when your IP accesses the CyberPanel admin page, CyberPanel will check your IP to set up a session. For example, when you use IP 1.1.1.1 to access CyberPanel, CyberPanel will check IP 1.1.1.1 to grant your browser a session with IP 1.1.1.1.
However, because your public IP is constantly changing, just press reload or perform an operation on CyberPanel immediately the session will be out because CyberPanel checks the IP when it is not 1.1.1.1 anymore but another IP like 2.2.2.2. You will then see a message as follows:

This IP check is to improve the security of the server. Not only CyberPanel but on other controls like cPanel, DirectAdmin still has this function. However, during use, it will be difficult when you use a dynamic IP that changes constantly, making you unable to log in and use it.
Disable IP Check on CyberPanel
1. To disable the IP check on CyberPanel, we first need to SSH into your VPS/server with root privileges
sudo su -2. Backup the IP check file then open it using the nano editor:
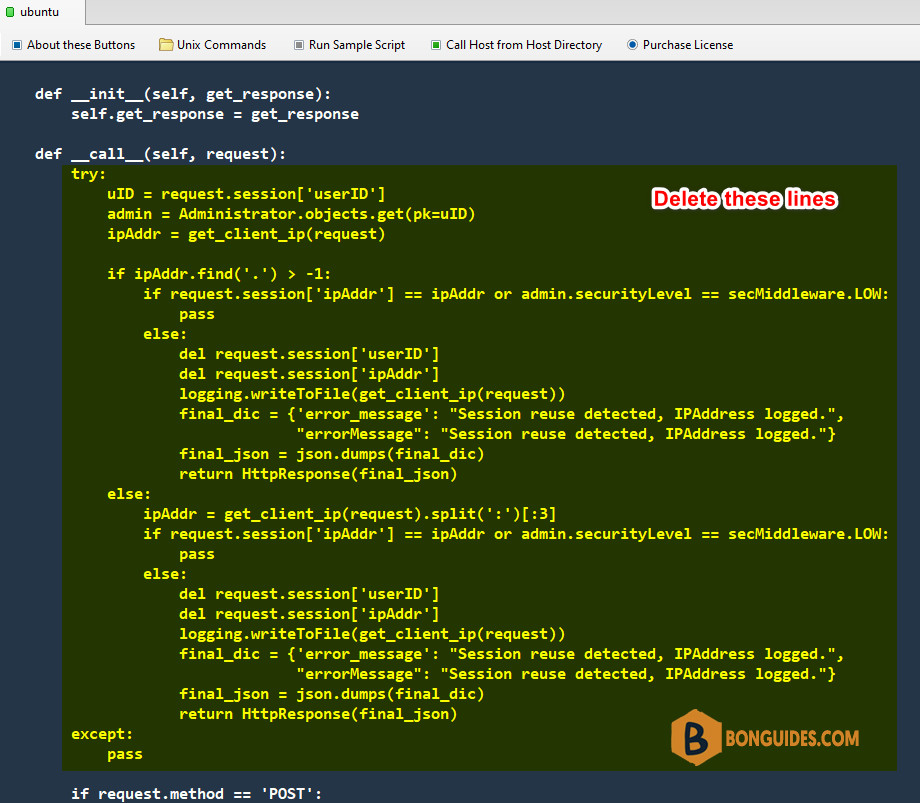
cp /usr/local/CyberCP/CyberCP/secMiddleware.py /usr/local/CyberCP/CyberCP/secMiddleware.py.baknano /usr/local/CyberCP/CyberCP/secMiddleware.py3. After opening the secMiddleware.py file, find and delete the lines from the try: paragraph to the pass line as shown below:

4. After deleting the paragraphs in the secMiddleware.py file. We need to restart the service to apply the change. You use the following command to start the service:
systemctl restart lscpdConclusion
Hope this article will help you disable this feature to work more smoothly. We don’t recommend disabling it due to security issues. However, sometimes it’s really annoying when your IP changes constantly, leading to not being able to log in to handle work.


