Table of Contents
Adobe Acrobat Reader is a free PDF reader for Windows users. In this post, we will show you how to deploy it for the enterprise through Microsoft Intune. There are two ways to deploy it through Intune:
- Deploy the app from the Microsoft Store. Intune automatically keeps the apps up to date when a new version becomes available.
- Deploy the app with Intune Win32 apps. If you need more controls when deployed, this method would be a good option.
Prerequisites
The following criteria should be met for Acrobat Reader deployment:
- OS version: Windows 10 version 1607 or later (Enterprise, Pro or Education editions).
- The application size must not be greater than 30 GB per app.
- Devices must be enrolled in Intune and either:
- Azure AD registered (Workplace Join)
- Azure AD joined (Entra ID Joined)
- Hybrid Azure AD joined
Method 1: Deploy from the Microsoft Store
Deploying apps from the Microsoft Store supports Universal Windows Platform (UWP) apps, desktop apps packaged in .msix, and now Win32 apps packaged in .exe or .msi installers. This is the easiest way to install an app on Intune-managed devices. Below are detailed steps:
1. Login to Microsoft Intune Admin Center and navigate to Apps > All apps > Click on +Add.
2. On the flyer window at the right side of the screen, select Microsoft Store app (new) from the App type drop-down list and click on Select.
3. In the search box, type the name of the app that you want to find. You can also search by other app details, such as publisher, type, or store app ID. Once you search, a list of apps are displayed.
4. After selecting the app, most of the information related to the app will be auto-filled including Name, Package Identifier, Publisher, Description, etc. You can modify some of this information if you want.
Install behavior: Depending upon the application, you may be able to toggle between System and User context. But if the Install behavior is pre-selected and greyed out then it cannot be changed.
- System context: Azure AD registered, Azure AD joined (Entra ID Joined), Hybrid Azure AD joined.
- User context: Azure AD joined (Entra ID Joined), Hybrid Azure AD joined.
5. In most cases, it makes sense to choose Add all devices for the Required section of the assignments to catch all endpoints. But you can choose any specific device or user groups you have if you’re looking to install only on a subset of devices.
Quick snapshot about Assignment in Intune:
- Required: The app is deployed automatically on devices in the selected groups.
- Available for enrolled devices: The app will not be installed automatically. Instead, it will be made available for installation from the Company Portal app or website.
- Uninstall: The app is uninstalled from devices in the selected groups if Intune has previously installed the application onto the device via an “Available for enrolled devices” or “Required” assignment using the same deployment.
Select Next to display the Review + create page after you finish setting the assignments for the apps.
6. Select Create to add the app to Intune.
7. Once the app is created, it will be installed on the managed devices on the next time they check in with Intune. For quick check in, you can restart a managed device or run the below command to force sync.
Restart-Service -Name IntuneManagementExtensionWith Intune, you can also track the progress of any deployment. To do it, go to Microsoft Intune admin center > Apps > All apps and click the app from the list. The items from the left-hand menu allow you to access various deployment progress information:
- Overview – here you can get general information on installation status for devices and users in the form of charts.
- Device install status & User install status – allow you to view the install status lists showing specific devices and users.
Finally, by clicking Properties, you can edit your app deployment policy.
In some cases, some apps don’t support to installing from Microsoft Store. So, we need to use the Intune Win32 app deployment method to deploy .exe or .msi installers to managed devices.
Prepare Win32 App content for Intune
Before we can add a Win32 app to Microsoft Intune for deployment, we must prepare the app by using the Microsoft Win32 Content Prep Tool.
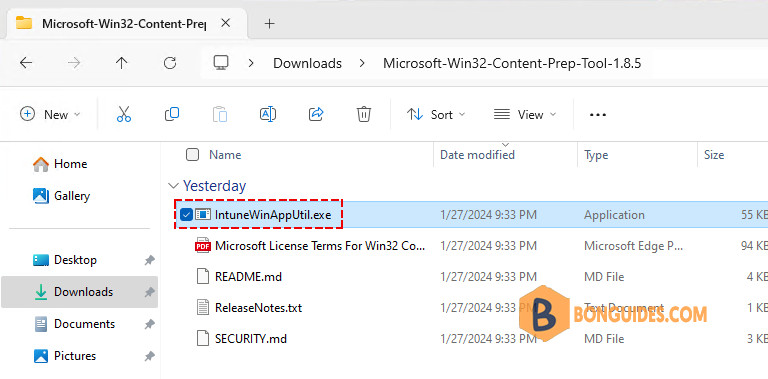
1. Download the Microsoft Win32 Content Prep Tool from GitHub as a .zip file. Extract the zipped file we’ve the prep tool (IntuneWinAppUtil.exe), the license, a readme, and the release notes.

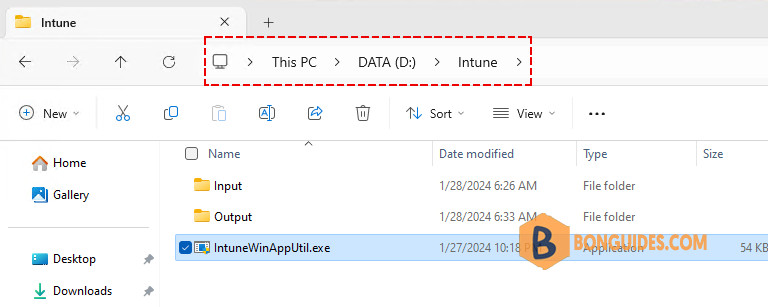
2. Create the folders for package creation. For example, we’ve created:
- D:\Intune\Input: This folder is for all setup files (.exe, .msi, folders …). All files and folders in this folder will be compressed into an .intunewin file.
- D:\Intune\Output: Output folder for the generated .intunewin file.
- IntuneWinAppUtil.exe: Copy the extracted file to D:\Intune fodder. The Intune Win32 prep tool compresses all files and folders when it creates .intunewin file. Hence, it’s important to not keep the tool in application installation source folder.

3. Download Adobe Acrobat Reader for Enterprise from https://get.adobe.com/reader/enterprise/. Rename it to setup.exe then copy it to D:\Intune\Input folder.

4. Now, open the PowerShell (Terminal) and change the directory to root of the folder you created (D:\Intune).
PS C:\> cd D:\Intune\
PS D:\Intune> ls

    Directory: D:\Intune

Mode                 LastWriteTime         Length Name
----                 -------------         ------ ----
d-----         1/26/2024   8:39 AM                Input
d-----         1/26/2024   8:39 AM                Output
-a----         1/26/2024   8:42 AM          55184 IntuneWinAppUtil.exe
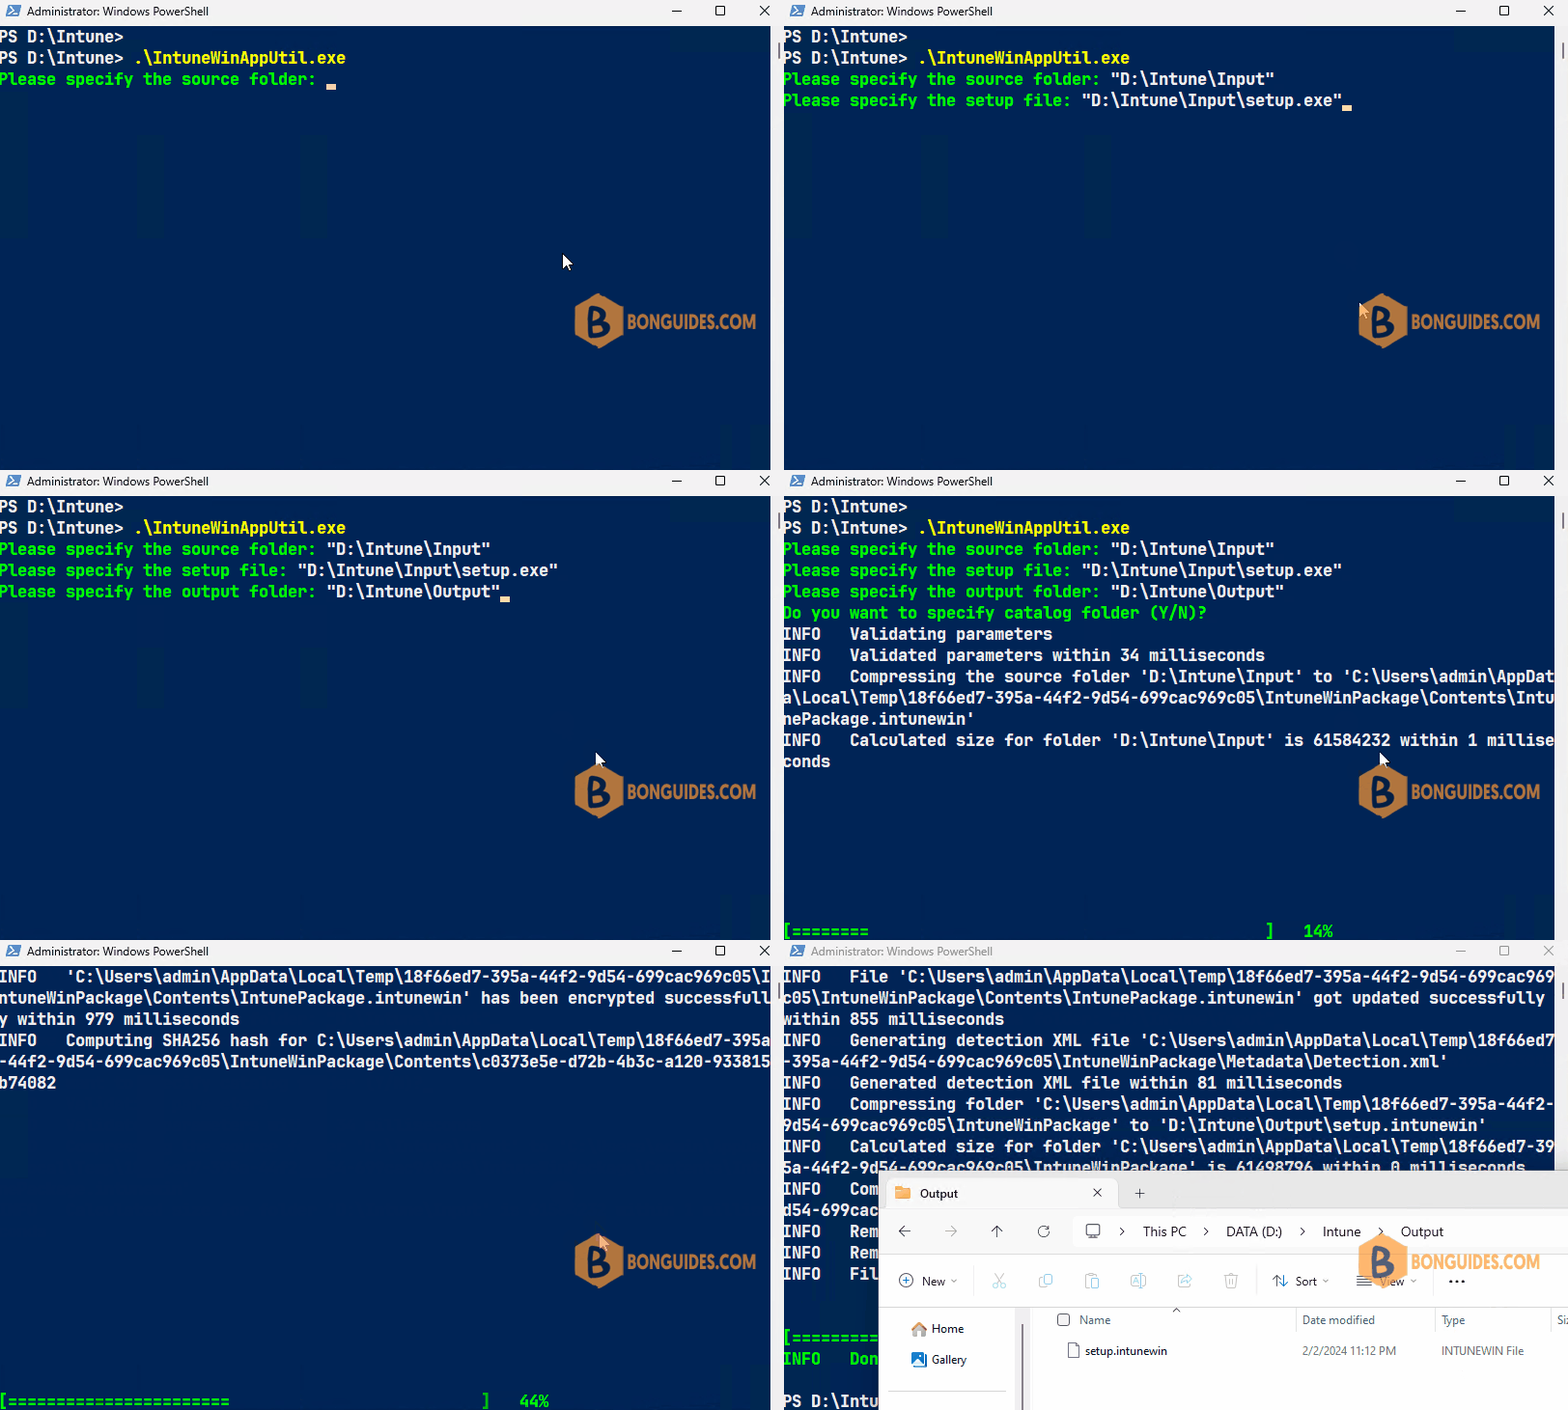
5. Run IntuneWinAppUtil.exe and provide the required information.
\IntuneWinAppUtil.exePS D:\Intune> .\IntuneWinAppUtil.exe
Please specify the source folder: "D:\Intune\Input"
Please specify the setup file: "D:\Intune\Input\setup.exe"
Please specify the output folder: "D:\Intune\Output"
Do you want to specify catalog folder (Y/N)?NFor instance, below is the output when we create .intunewin file for the Acrobat Reader application.

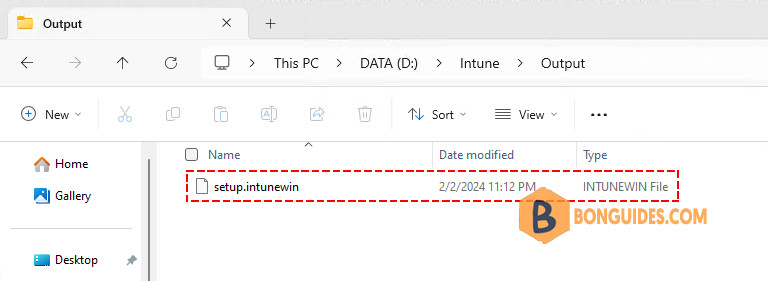
When completed, you can navigate to the output folder to verify the intunewin package has been created.

The package is ready for upload and delivery to managed devices using Microsoft Intune.
Bonus: If you don’t want to do the above steps manually. You can download the compressed file that we’ve created for this post. So, you can go to the next step immediately after downloading the intunewin package.
Method 2: Deploy Adobe Acrobat Reader with Intune (Win32)
The app installer (.intunewin) has been created. Now, we can use the Microsoft Intune admin center to deploy it on the managed devices remotely and automatically.
App information
1. Login to Microsoft Intune Admin Center and navigate to Apps > All apps > Click on +Add.
2. On the flyer window at the right side of the screen, select Windows app (Win32) from the App type drop-down list and click on Select.
3. On the App package file page, click on the browse button and select the package that you’ve converted in the previous steps. Click on OK to proceed.
4. Fill in the other details such as Application Name, Description, Publisher and version, etc. Click on Next to move to the next page.
Program
1. The Install and Uninstall command fields are automatically populated if the package is being created from an MSI installer. In this case, we use an .exe file for package creation, so we need to enter them manually for Acrobat Reader as follows:
- Install command: setup.exe /sAll /rs /msi EULA_ACCEPT=YES
- Uninstall command: msiexec.exe /x {AC76BA86-7AD7-1033-7B44-AC0F074E4100} /qn
Bonus: We can use PowerShell scripts or batch files to trigger the installation. This approach will provide better control and sequence. For example:
- You can update the command line to enable verbose logging.
- You want to send an email after the app is installed.
Related: Visit this post to read more about using batch files instead of a single-line command in Install / Uninstall command in Intune.
Requirements
1. On the Requirements page, you need to configure the mandatory requirements at least.
- Win32 Apps Requirements are rules that must met for the application to get installed.
- You can specify the requirements when creating Win32 app.
- The application will install only if requirements are met.
For example, we have configured the following mandatory requirements for the deployment.
- Operating System architecture: 64-bit
- Minimum Operating System: Windows 10 1607
Detection rule
1. On the Detection rules page, you need to configure at least one Detection rule.
- The Intune Detection Rules are used to determine the presence of a Win32 app.
- The detection rules ensure that app installation only starts if it’s not installed yet.
- Related: How to use the Intune Detection Rules.
To add a Detection rule, select “Manually configure detection rules” in Rule format and click on Add link.
2. On the flyer window, you can select any one of the below detection rule types:
- MSI: In most cases, the MSI product code will populate automatically. Otherwise, you need to provide the MSI product code manually.
- File: Verify based on file or folder detection, date, version, or size.
- Registry: Verify based on value, string, integer, or version.
Dependencies (Optional)
App dependencies are applications that must be installed before a Win32 app can be installed. Here can chain applications and it’s dependencies to get installed in a sequence. This setting is optional.
Supersedence (Optional)
In Microsoft Intune, Supersedence enables you to update and replace existing Win32 apps with newer versions of the same app or an entirely different Win32 app. This is an optional feature hence we will skip this.
Assignment
You can assign this profile to an Entra security group, including users or devices. For a controlled deployment, it’s recommended to add devices to a group and target it. Once testing is successful and you want to apply the setting to all managed devices, you can also choose to + Add all devices.
Quick snapshot about Assignment in Intune:
- Available for enrolled devices: Assign the app to groups of users who can install the app from the Company Portal app or website.
- Required: The app is deployed automatically on devices in the selected groups.
- Uninstall: The app is uninstalled from devices in the selected groups automatically.
You can also configure the following settings on the Assignment page.
- End User notifications
- Delivery optimization priority
- App Availability
- App Installation deadline
We would also recommend changing the end-user notifications to hide all toast notifications unless you’re interested in getting slack messages from every single concerned user in the office about the strange installation notification they’re receiving.
Review + create
Click on the Next on Assignment page to move to Review + create page. On the Review + create page, review the settings and click on Create.
The app is being created, you can monitor the progress from the Notification area.
Sync devices with Intune
The device check-in process might not begin immediately. If you’re deploying this app on a test device, you can manually kickstart the Intune sync either from the device itself or remotely through the Intune admin center.
For quick check-in, you can restart a managed device or run the below PowerShell command to force sync.
Restart-Service -Name IntuneManagementExtensionInstallation is logged in the IntuneManagementExtension.log that can be found under:
C:\ProgramData\Microsoft\IntuneManagementExtension\Logs\IntuneManagementExtension.logTracking deployment in Intune
End User Experience
If you do not disable the toast notification, users may see a notification appear in the system tray via the Microsoft Intune Management Extension, indicating that the app has been installed successfully.
On a target computer by your deployment, open the Company Portal or the Installed apps section on Windows Settings to verify the app is installed.
Tracking deployment in Intune
With Intune, you can also track the progress of any deployment. To do it, go to Microsoft Intune admin center > Apps > All apps and click the app from the list. The items from the left-hand menu allow you to access various deployment progress information:
- Overview – here you can get general information on installation status for devices and users in the form of charts.
- Device install status & User install status – allow you to view the install status lists showing specific devices and users.
Finally, by clicking Properties, you can edit your app deployment policy.
Troubleshooting App Installation Issues
If you encounter an issue during the deployment. You must troubleshoot your deployment based on the error code. We’ve gathered extra resources for better Win32 App troubleshooting :
Conclusion
Deploying applications with Microsoft Intune provides a centralized, secure, and cost-effective way to manage and distribute software in an organization. With the ability to monitor the deployment progress from the Intune admin portal, IT administrators can ensure that the applications are deployed and functioning as intended on their managed devices.
Related: Below is the list of our posts that will help you to configure and manage devices
- Prepare Win32 app package for upload.
- Understanding Intune Detection Rules.
- Deploy an Win32 App with Dependencies.
- Upgrade or Replace app with Supersedence in Intune.
- Assign Apps to Groups with Microsoft Intune.
- Force sync devices in Intune.
- Access and Read Intune Management Extension Logs.
- Deploy Microsoft Store Apps Using Intune.
- Deploy PowerShell Script using Intune


What about auto updates?? Does deploying the Adobe app from the Microsoft Store (Method 1) Auto update Adobe so I don’t have to deal with packaging up newer versions.
Thanks for documenting the installation process.
Regarding mixing of LOB, MSStore, win32apps etc. what is the general consensus to use?
I read Autopilot could hang because if not all win32apps then multiple installations could happen at once and therefore locking or failing installations.