Learning and Sharing
  • Home
  • Blog
  • Linux
  • macOS
  • Virtualization
    • VMware
    • VirtualBox
  • Windows
    • Windows 11
    • Windows 10
    • Windows Server
  • Series
    • Symantec
    • Intune
    • Microsoft Azure
    • Powershell
    • VirtualBox
    • VMware
    • PowerShell Learning
    • Microsoft Graph
  • More
    • Auto Installation
    • AEC Installation
  • Contact
No Result
View All Result
No Result
View All Result

How to Create a macOS Big Sur Bootable USB Drive on MacBook

November 26, 2022
in Blog, macOS
0
ADVERTISEMENT

Table of Contents

You can use an external drive or secondary volume as a startup disk from which to install the Mac operating system.

You don’t need a bootable installer to upgrade macOS or reinstall macOS, but it can be useful if you want to install macOS Big Sur on multiple computers without downloading the installer each time, or you’re unable to install a compatible macOS from the Finder or macOS Recovery.

What You Will Need Before Starting

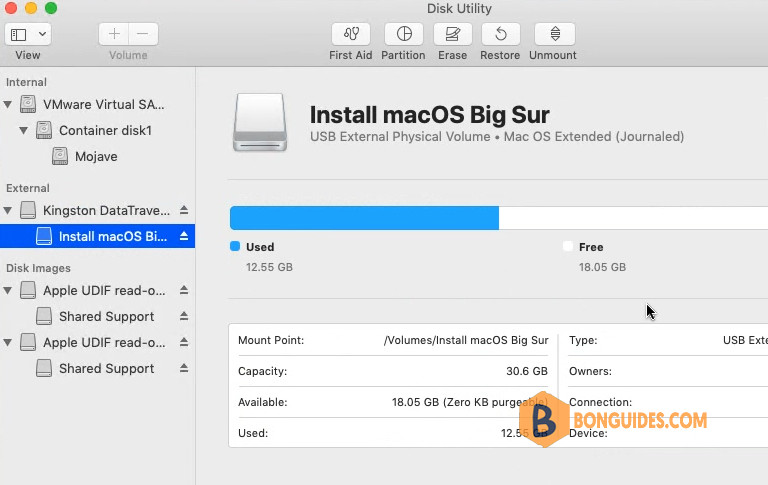
  • USB flash drive or other secondary volume with at least 14GB of available storage, formatted as Mac OS Extended.
  • Installer for macOS Big Sur. To get the full installer, your Mac must be using the latest version of OS X El Capitan, the latest version of macOS Sierra, or any later version of macOS.
  • Download a macOS Big Sur installer from Apple.

Download a macOS Big Sur installer from Apple

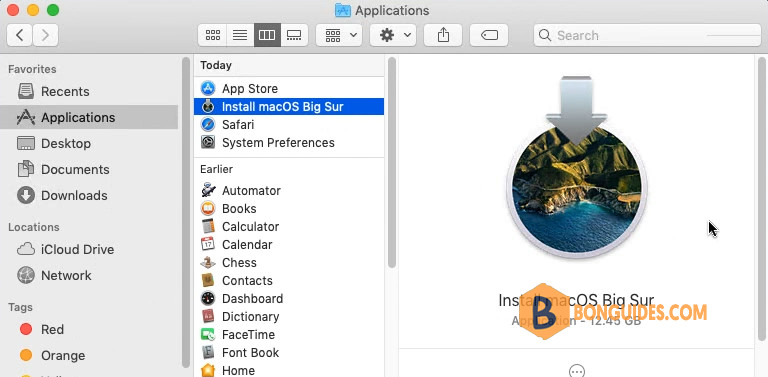
Visit this link https://support.apple.com/kb/HT211683 then download a macOS Big Sur installer from Apple. Once the installer was downloaded, it will be saved in the Applications folder.

Format the USB device

1. Insert the USB flash drive that you’re using for the bootable installer into your Mac.

2. Open Disk Utility then enable Show All Devices option.

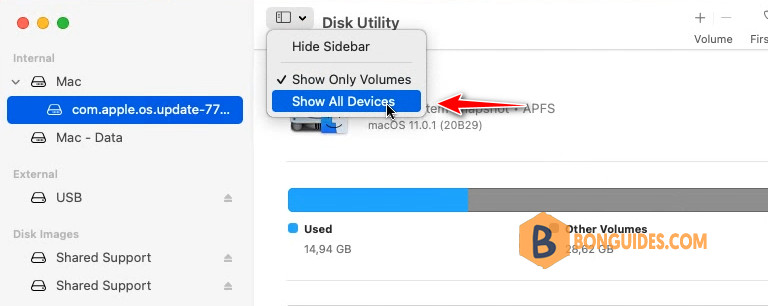
3. Select the USB stick form the left side then click on  button.

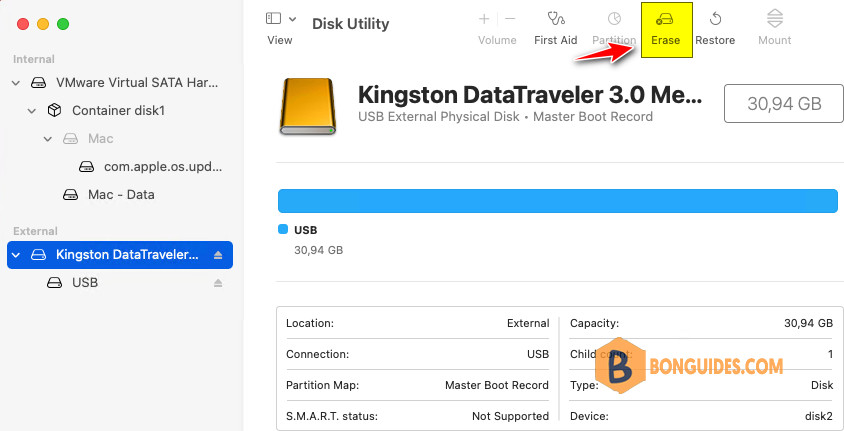
4. Erase the USB Stick as follows:

  • Name: Untitled
  • Format: Mac OS Extended (Journaled)
  • Scheme: GUID Partition Map

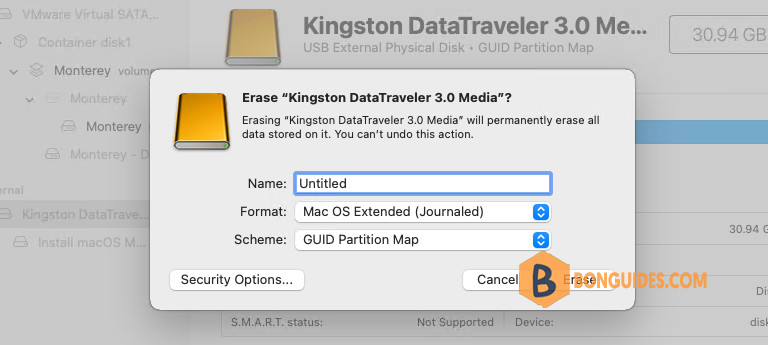
Now, the USB stick was formatted, you can close the Disk Utility then moving to next steps to create an macOS USB bootable stick.

Create a macOS Bootable USB Installer

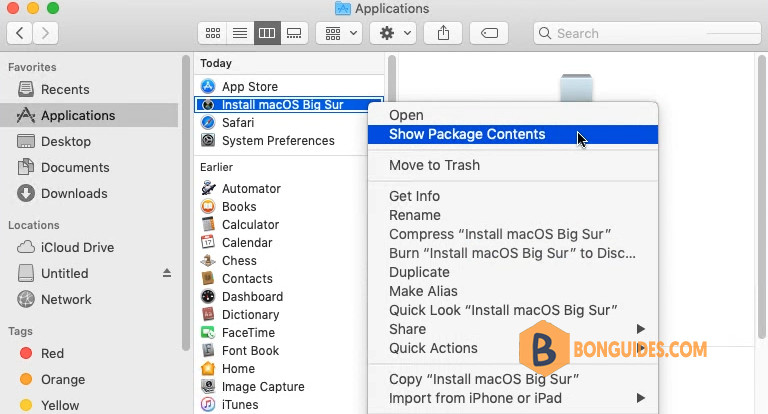
1. Open Finder then navigate to the Applications folder.

2. Right click on the downloaded macOS Big Sur installer then select Show Package Contents.

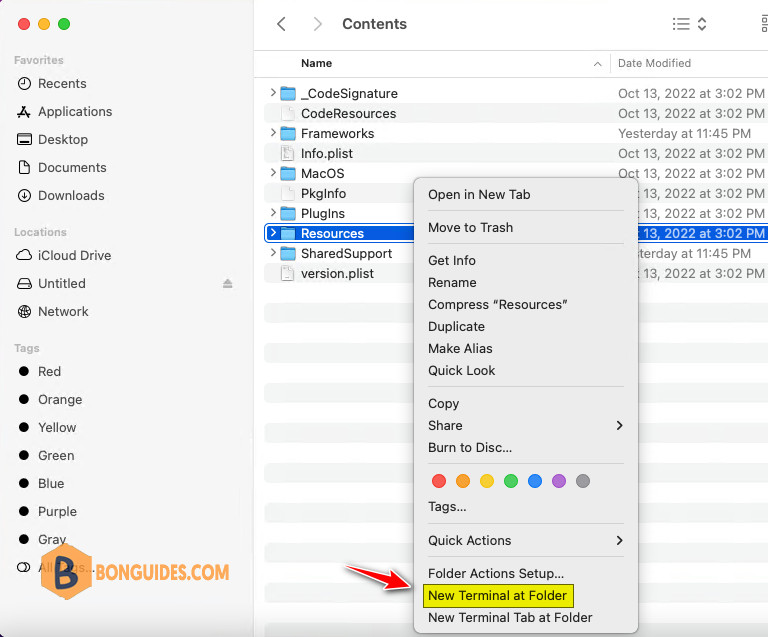
3. Enter the Contents folder and right-click on the Resources folder then select New Terminal at Folder.

4. Type or paste the command below into Terminal, then press . If the volume has a different name, replace Untitled in the command with the name of your volume.

sudo ./createinstallmedia --volume /Volumes/Untitled

5. When prompted, type your administrator password. Terminal doesn’t show any characters as you type. Then press Return. 

6. When prompted, type to confirm that you want to erase the volume, then press Return. Terminal shows the progress as the volume is erased then create an bootable USB device.

sudo ./createinstallmedia --volume /Volumes/Untitled 
Password:
Ready to start.
To continue we need to erase the volume at /Volumes/Untitled.
If you wish to continue type (Y) then press return: Y
Erasing disk: 0%... 10%... 20%... 30%... 100%
Making disk bootable...
Copying to disk: 0%... 10%... 20%... 30%... 40%... 50%... 60%... 70%... 80%... 90%... 100%
Install media now available at "/Volumes/Install macOS Monterey"

It could take several minutes to complete. Once done, you can remove the USB stick from your Mac then boot into new Mac to do a fresh installation.

ADVERTISEMENT
5/5 - (1 vote)
Previous Post

How to Create a macOS Monterey Bootable USB Drive on MacBook

Next Post

How to Create a macOS Catalina Bootable USB Drive on MacBook

Related Posts

Running Hyper-V and VMware Workstation on The Same Machine

August 15, 2024

How to Uninstall All Autodesk Products At Once Silently

July 29, 2024
Ftr5

How to Uninstall the Autodesk Genuine Service on Windows

July 29, 2024
Ftr19

How to Fix Windows Cannot Read the ProductKey From the Unattend Answer File in VirtualBox

July 26, 2024
Ftr25

How to Update Windows Terminal in Windows 10/11

July 26, 2024

How to Disable The Beep Sound in WSL Terminal on Windows

July 26, 2024

Leave a Reply Cancel reply

Your email address will not be published. Required fields are marked *

Recent Posts

  • How To Turn On uBlock Origin Extension in Chrome (2025)
  • Images Hidden Due To Mature Content Settings In CivitAI
  • Azure OpenAI vs Azure AI Hub, How to Choose the Right One for Your Needs

Categories

Stay in Touch

Discord Server

Join the Discord server with the site members for all questions and discussions.

Telegram Community

Jump in Telegram server. Ask questions and discuss everything with the site members.

Youtube Channel

Watch more videos, learning and sharing with Leo ❤❤❤. Sharing to be better.

Newsletter

Join the movement and receive our weekly Tech related newsletter. It’s Free.

General

Microsoft Windows

Microsoft Office

VMware

VirtualBox

Technology

PowerShell

Microsoft 365

Microsoft Teams

Email Servers

Copyright 2025 © All rights Reserved. Design by Leo with ❤

No Result
View All Result
  • Home
  • Linux
  • Intune
  • macOS
  • VMware
  • VirtualBox
  • Powershell
  • Windows 10
  • Windows 11
  • Microsoft 365
  • Microsoft Azure
  • Microsoft Office
  • Active Directory

No Result
View All Result
  • Home
  • Linux
  • Intune
  • macOS
  • VMware
  • VirtualBox
  • Powershell
  • Windows 10
  • Windows 11
  • Microsoft 365
  • Microsoft Azure
  • Microsoft Office
  • Active Directory