Table of Contents
Although PHP can be installed on CentOS quickly and easily through package manager (like yum or dnf), it is often not the latest version that installed. Therefore, if you want the latest functions or features, it is better to install PHP from source.
We will use the currently latest stable version 8.1.2 of PHP as an example to show how to compile, install, and configure PHP.
Compared to installing PHP by package manager, compiling PHP from source takes more steps, and is more likely to get us into unexpected troubles. However, as long as we are patient enough to figure out the cause of the problem, it should be easily solved.
Prepare Environment
1. First, we will download the package using the link copied from the Gzip package file on the PHP download page https://www.php.net/downloads
cd /tmp && curl -LO https://www.php.net/distributions/php-8.1.2.tar.gz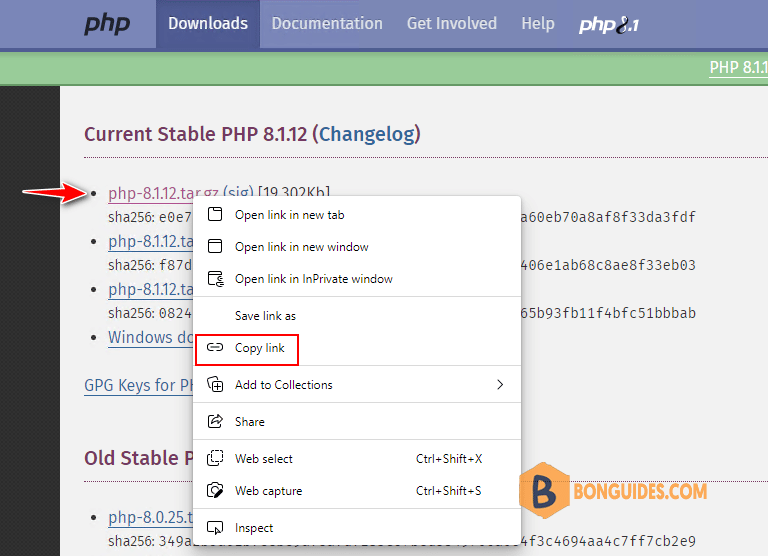
2. Extract the PHP source package and switch to the directory of the source (note that we will stay in this directory for all operations unless otherwise specified).
tar -xvf php-8.1.2.tar.gz && cd php-8.1.23. PHP is written mainly in C language. Before compiling PHP, we need to make sure C Compiler is installed on CentOS. We also need to install the build automation tool Make, which will automatically build executable programs and libraries from source code according to the configured Makefile.
sudo yum install -y gcc makeConfigure Features
1. You will find a shell script named configure under this directory, which is a configure script file from PHP source. This script file does two things: one is to customize PHP features in a fine-grained manner by the rich options it provides; the other is to match the libraries in system and the libraries PHP depends on to be compiled.
# ls -l /tmp/php-7.4.32
total 4472
-rw-rw-r--.  1 root root    3471 Sep 28 05:09 azure-pipelines.yml
drwxrwxr-x.  2 root root    4096 Sep 28 05:09 build
-rwxrwxr-x.  1 root root    4012 Sep 28 05:09 buildconf
-rw-rw-r--.  1 root root     346 Sep 28 05:09 buildconf.bat
-rw-rw-r--.  1 root root   12737 Sep 28 05:09 CODING_STANDARDS.md
-rw-r--r--.  1 root root  782609 Oct 28 22:44 config.log
-rwxr-xr-x.  1 root root     352 Oct 28 22:44 config.nice
-rwxr-xr-x.  1 root root   47394 Oct 28 22:44 config.status
-rwxr-xr-x.  1 root root 2393556 Sep 28 05:09 configure
-rw-rw-r--.  1 root root   44195 Sep 28 05:09 configure.ac
-rw-rw-r--.  1 root root   20278 Sep 28 05:09 CONTRIBUTING.md
...
For more details on the functions referred by option description, you can go to PHP Function Reference.
2. In order to handle requests to PHP programs by FastCGI protocol in cooperation with web server, the PHP in this article is compiled to support FPM (FastCGI Process Manager). It also need to support OpenSSL, zlib, cURL, GD library (as well as GD supports to webP, JPEG, FreeType), Multibyte String, Zip, and two extensions of mysqli and PDO_MYSQL to access MySQL. These features correspond to configure options as follows:
+--------------------------------+-----------------------------------------------+
|    Configure Options           |                Features                       |
+================================+===============================================+
| –prefix                        | To specify installation directory             |
+--------------------------------+-----------------------------------------------+
| –enable-fpm                    | To support FPM                                |
+--------------------------------+-----------------------------------------------+
| –with-openssl                  | To support OpenSSL                            |
+--------------------------------+-----------------------------------------------+
| –with-zlib                     | To support zlib                               |
+--------------------------------+-----------------------------------------------+
| –with-zip                      | To support Zip                                |
+--------------------------------+-----------------------------------------------+
| –with-curl                     | To support cURL                               |
+--------------------------------+-----------------------------------------------+
| –enable-gd                     | To support GD                                 |
+--------------------------------+-----------------------------------------------+
| –enable-mbstring               | To support multibyte string processing        |
+--------------------------------+-----------------------------------------------+
| –with-mysqli=mysqlnd           | To support accessing MySQL via mysqli         |
+--------------------------------+-----------------------------------------------+
| –with-pdo-mysql=mysqlnd        | To support accessing MySQL via PDO            |
+--------------------------------+-----------------------------------------------+
3. To support features mentioned above, there are software libraries that PHP depends on while compiling. If a library is missing, the running of configure script will be interrupted to throw prompt. You can run below command to install these libraries for operation system:
sudo yum install -y libxml2-devel openssl-devel sqlite-devel curl-devel libpng-devel \
libwebp-devel libjpeg-devel freetype-devel
4. Besides, we need to install the library of Libzip to let PHP be able to read and write Zip files, which is the feature required by PHP dependency manager Composer. To install Libzip on CentOS 8 and CentOS Stream 8:
sudo yum install -y libzip-devel5. After the installation, please run command below to add the path of pkg-config (the configuration file for libzip) to system environment variable PKG_CONFIG_PATH. This way, PHP configure script is able to recognize and read the libzip you installed.
export PKG_CONFIG_PATH=/usr/local/libzip/lib64/pkgconfig6. In addition to libzip, Oniguruma library is required to support multibyte string for regular expression. Since it is not included in CentOS build-in libraries, we need to manually activate or specify it.
sudo yum -y install oniguruma-devel --enablerepo=powertools7. After installing the software libraries that configure options depends on, we may run the configure script of PHP:
./configure --prefix=/usr/local/php \
--enable-fpm --with-openssl --with-zlib --with-curl --enable-gd --with-webp \
--with-jpeg --with-freetype --enable-mbstring --with-zip --with-mysqli --with-pdo-mysqlWe also used two configure options of –with-mysqli and –with-pdo-mysql to let PHP access MySQL in both ways of mysqli and PDO. This is because some PHP programs only used one of the ways to access MySQL, and we want to support that.
8. After executing the configure script, if message looks like below, it means everything is fine. Makefile is successfully generated, and we are ready to compile.
+--------------------------------------------------------------------+
| License:                                                           |
| This software is subject to the PHP License, available in this     |
| distribution in the file LICENSE. By continuing this installation  |
| process, you are bound by the terms of this license agreement.     |
| If you do not agree with the terms of this license, you must abort |
| the installation process at this point.                            |
+--------------------------------------------------------------------+

Thank you for using PHP.
Perform Compilation
1. Now you may run following command to compile PHP source code:
sudo make2. The compiling time depends on server configuration, the available system resources, and the specific configuration for compiling. If you are stuck somewhere for a long-time during compilation, it may be caused by insufficient system resources. You may need to remove the compiling setting that takes up major resource or upgrade your server configuration. After the successful compilation, you may see message below:
Build complete.
Don't forget to run 'make test'.
Optional: Perform Test
The step as follow is optional to perform. After the compilation, you may run command below to test to make sure no critical problem with the compiled PHP:
sudo make testAfter the test completed, you may notice two lists in prompt message: FAILED TEST SUMMARY and WARNED TEST SUMMARY, which list many warning items of the failed and passed tests. We do not need to be bothered. As long as the test get passed, PHP is OK to use.
Install PHP
1. After the compilation, we can use following command to install PHP under the directory we specified earlier:
sudo make install2. So far, we have finished the PHP installation. If this is your first time to install PHP, to make it easier to execute PHP commands later, please add the path of PHP executable file to system environment variable PATH by commands below:
echo 'export PATH="/usr/local/php/bin:$PATH"' >> ~/.bashrc
source ~/.bashrc
3. Now you may check the PHP version:
# php --version
PHP 8.1.2 (cli) (built: Oct 28 2022 10:23:04) (NTS)
Copyright (c) The PHP Group
Zend Engine v4.1.2, Copyright (c) Zend Technologies
Configure PHP
For PHP with FPM started, there are two kinds of configuration files, one is php.ini to configure the behavior of PHP, the other is php-fpm.conf to configure FPM (including pool configuration file in php-fpm.d folder).
All these three files do not exist from the default installation, so we need to copy them to the corresponding locations to where PHP was installed.
Configure php.ini
The command below will copy php.ini to the lib folder of the PHP installation directory:
cp php.ini-production /usr/local/php/lib/php.iniIn general, php.ini is OK to use without any modification. In some cases, for example increase upload max file size and post max size for a WordPress site.
###Increase file size in PHP
sudo sed -i 's/upload_max_filesize = 2M/upload_max_filesize = 64M/g' /usr/local/php/lib/php.ini
sudo sed -i 's/post_max_size = 8M/post_max_size = 64M/g' /usr/local/php/lib/php.ini
Configure php-fpm.conf
There are two kinds of processes after PHP-FPM get started, which are master process and pool of processes.
There is only one master process, and its role is to read and evaluate configuration, and manage the pool of processes. There can be more than one pools of processes (configured by process directives of configuration file), and its role is to handle requests.
1. Now, navigate to the configuration folder under PHP installation directory then generate the PHP-FPM configuration file and pool configuration file.
cd /usr/local/php/etc
cp php-fpm.conf.default php-fpm.conf
cp php-fpm.d/www.conf.default php-fpm.d/www.conf
There is no need to modify php-fpm.conf unless necessary. We will focus on the pool configuration file www.conf, which is under php-fpm.d directory and included by php-fpm.conf.
2. Generally, we have a user/group account whose name nginx (if Nginx is installed) is configured from web server program (Nginx). We will change the values of the two directives user and group, which are basically the username and user group of the owner of the web files (the nginx used here is the account from web server configuration).
sudo sed -i 's/user = apache/user = nginx/g' /usr/local/php/etc/php-fpm.d/www.conf
sudo sed -i 's/group = apache/group = nginx/g' /usr/local/php/etc/php-fpm.d/www.conf
3. If you want web server to communicate with FPM through Socket file, we need to set the directory of Socket file for directive listen so that FPM can write in (the path and file name are not necessary the same as below /run/php-fpm/www.sock):
sudo sed -i 's/listen = 127.0.0.1:9000/listen =\/run\/php-fpm\/www.sock/g' \
/usr/local/php/etc/php-fpm.d/www.conf
4. We also need to set the permission of the Socket file so that web server can read:
sed -i 's/;listen.owner = nobody/listen.owner = nginx/g' /usr/local/php/etc/php-fpm.d/www.conf
sed -i 's/;listen.group = nobody/listen.group = nginx/g' /usr/local/php/etc/php-fpm.d/www.conf
5. After modifying the configuration, you may run below command to test. If you can see the word successful, it means the configuration is OK for FPM running:
/usr/local/php/sbin/php-fpm -t# /usr/local/php/sbin/php-fpm -t
[28-Oct-2022] NOTICE: configuration file /usr/local/php/etc/php-fpm.conf test is successfulStart FPM
Now it is time to start FMP, then it will work with web server to handle the requests to PHP programs.
Although we can use command php-fpm to start FPM directly, in order to make it more stable (not stopped by system downtime or server maintenance), it is necessary to pass PHP FPM as a service to operation system, so FPM can get restarted with system restart.
In CenOS, we use systemd (a system and service manager) to manage all services in system. To let systemd manage PHP, we need to create a configuration file for it.
1. Create a service named php-fpm.service:
cat << EOF >> /etc/systemd/system/php-fpm.service
# BEGIN
[Unit]
Description=PHP FastCGI process manager
After=local-fs.target network.target nginx.service

[Service]
Type=forking
ExecStart=/usr/local/php/sbin/php-fpm
ExecReload=/bin/kill -USR2 \$MAINPID

[Install]
WantedBy=multi-user.target
# END
EOF
2. Let systemd reload the new configuration file, and now we can start FPM service by command below:
systemctl daemon-reload
systemctl start php-fpm && systemctl enable php-fpm && systemctl status php-fpm
Upgrade PHP
To upgrade PHP to a new version released in future, you only need to follow the step1, step2, and step3 of this post. Since configuration files will not be overwritten by the new installation, and functions related to starting FPM will also not be affected, there is no need to update them.
Conclusion
After all steps above, there are files and information that are either used for PHP or FPM configuration or used by other software (like Web service software of Nginx, Apache etc.). We listed them as below for your reference:
###Path of PHP configuration file
/usr/local/php/lib/php.ini

###Path of FPM configuration files:
/usr/local/php/etc/php-fpm.conf
/usr/local/php/etc/php-fpm.d/www.conf

###Path of FPM Socket file:
/run/php-fpm/www.sock

###Path of the configuration file of FPM as system service:
/etc/systemd/system/php-fpm.serviceAlternatively, you can create a bash script to install PHP from source as follows:
#/bin/bash
###Prepare Environment
cd /tmp && curl -LO https://www.php.net/distributions/php-7.4.32.tar.gz
tar -xvf php*.tar.gz && cd php-7.4.32

###Install software libraries that PHP depends on while compiling
sudo yum -y install libxml2-devel openssl-devel sqlite-devel curl-devel libpng-devel \
libwebp-devel libjpeg-devel freetype-devel gcc make nginx libzip-devel
export PKG_CONFIG_PATH=/usr/local/libzip/lib64/pkgconfig
sudo yum -y install oniguruma-devel --enablerepo=powertools

###Configure Features
./configure --prefix=/usr/local/php \
--enable-fpm --with-openssl --with-zlib --with-curl --enable-gd --with-webp \
--with-jpeg --with-freetype --enable-mbstring --with-zip --with-mysqli --with-pdo-mysql

###Perform Compilation and install
sudo make -j3
sudo make install

###Configure PHP
mkdir /run/php-fpm
echo 'export PATH="/usr/local/php/bin:$PATH"' >> ~/.bashrc
source ~/.bashrc
cp php.ini-production /usr/local/php/lib/php.ini
cp /usr/local/php/etc/php-fpm.conf.default /usr/local/php/etc/php-fpm.conf
cp /usr/local/php/etc/php-fpm.d/www.conf.default /usr/local/php/etc/php-fpm.d/www.conf
sudo sed -i 's/user = apache/user = nginx/g' /usr/local/php/etc/php-fpm.d/www.conf
sudo sed -i 's/group = apache/group = nginx/g' /usr/local/php/etc/php-fpm.d/www.conf
sudo sed -i 's/listen = 127.0.0.1:9000/listen =\/run\/php-fpm\/www.sock/g' /usr/local/php/etc/php-fpm.d/www.conf
sed -i 's/;listen.owner = nobody/listen.owner = nginx/g' /usr/local/php/etc/php-fpm.d/www.conf
sed -i 's/;listen.group = nobody/listen.group = nginx/g' /usr/local/php/etc/php-fpm.d/www.conf

####Create the php-fpm service
cat << EOF >> /etc/systemd/system/php-fpm.service
# BEGIN
[Unit]
Description=PHP FastCGI process manager
After=local-fs.target network.target nginx.service

[Service]
Type=forking
ExecStart=/usr/local/php/sbin/php-fpm
ExecReload=/bin/kill -USR2 \$MAINPID

[Install]
WantedBy=multi-user.target
# END
EOF

systemctl start php-fpm && systemctl enable php-fpm && systemctl status php-fpm
systemctl start nginx && systemctl enable nginx
php -v


