Table of Contents
Typically, in most network configurations, the IP address is assigned dynamically by the router DHCP server. Setting a static IP address may be required in different situations, such as configuring port forwarding or running a web server behind a NAT.
This post explains how to set up a static IP address on a CentOS server VM on VMware.
Find the available network interfaces
You can use any one of the below commands to list down the available network interfaces on the system.
ifconfig -aThe command prints a list of all the available network interfaces. In this example, the name of the interface is ens160.
# ifconfig -a
ens160: flags=4163<UP,BROADCAST,RUNNING,MULTICAST>  mtu 1500
        inet 10.10.230.5  netmask 255.255.0.0  broadcast 10.10.255.255
        inet6 fe80::7dc9:cd54:9e9b:6366  prefixlen 64  scopeid 0x20<link>
        ...
lo: flags=73<UP,LOOPBACK,RUNNING>  mtu 65536
        inet 127.0.0.1  netmask 255.0.0.0
        inet6 ::1  prefixlen 128  scopeid 0x10<host>
        ...
Configuring the Static IP Address of CentOS VM
Method 1
1. In this method, we will edit the network interface file found under directory. For interface ens160, the file name would be .
# cat /etc/sysconfig/network-scripts/ifcfg-ens160
TYPE=Ethernet
PROXY_METHOD=none
BROWSER_ONLY=no
BOOTPROTO=dhcp
DEFROUTE=yes
IPV4_FAILURE_FATAL=no
...
NAME=ens160
UUID=a50387a1-cf51-4ed3-bbd4-a6f253f71e15
DEVICE=ens160
ONBOOT=yes
2. To assign a static IP address to the interface, update the interface file as per the requirement.
vi /etc/sysconfig/network-scripts/ifcfg-ens160BOOTPROTO=none
IPADDR=192.168.1.10
NETMASK=255.255.255.0
GATEWAY=192.168.1.1
DNS1=192.168.1.1
DNS2=8.8.8.8- Set BOOTPROTO: none.
- Specify the static IP address. Under addresses: you can add one or more IPv4 or IPv6 IP addresses that will be assigned to the network interface.
- Specify the gateway4.
- Under nameservers, set the IP addresses of the nameservers.
3. Restart the network service to take the changes go into effect.
###Centos 5/6/7
service network restart

###Centos8/9
systemctl restart NetworkManager
4. Use ifconfig -a command to verify the static ip address.
# ifconfig -a
ens160: flags=4163<UP,BROADCAST,RUNNING,MULTICAST>  mtu 1500
        inet 192.168.1.10  netmask 255.255.255.0  broadcast 192.168.255.255
        inet6 fe80::7dc9:cd54:9e9b:6366  prefixlen 64  scopeid 0x20<link>
        ...
lo: flags=73<UP,LOOPBACK,RUNNING>  mtu 65536
        inet 127.0.0.1  netmask 255.0.0.0
        inet6 ::1  prefixlen 128  scopeid 0x10<host>
Also, verify the DNS server entries in /etc/resolv.conf file.
# cat /etc/resolv.conf
# Generated by NetworkManager
nameserver 8.8.8.8
nameserver 1.1.1.1Finally, verify the internet connectivity using the ping command:
# ping -c 3 google.com
PING google.com (216.58.200.238) 56(84) bytes of data.
64 bytes from tsa03s01-in-f238.1e100.net (216.58.200.238): icmp_seq=1 ttl=58 time=20.2 ms
64 bytes from tsa03s01-in-f238.1e100.net (216.58.200.238): icmp_seq=2 ttl=58 time=20.4 ms
64 bytes from tsa03s01-in-f238.1e100.net (216.58.200.238): icmp_seq=3 ttl=58 time=19.5 msMethod 2
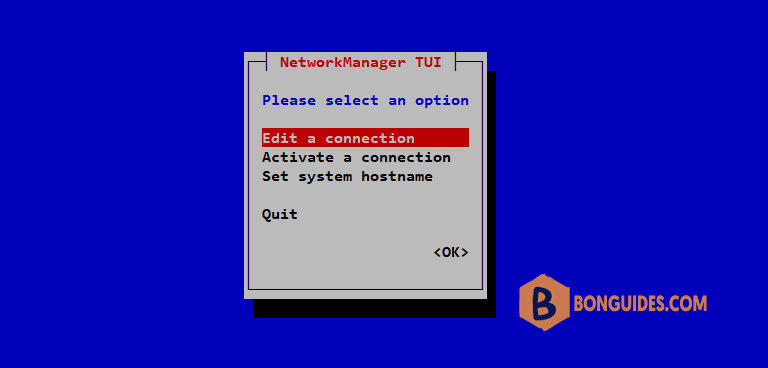
You can also use nmtui, a text-based user interface for configuring network interfaces.
1. Run the following command to install NetworkManager Text User Interface nmtui if it is not installed.
sudo yum -y install NetworkManager-tui2. Run nmtui tool.
nmtui3. Select Edit a connection and press Enter.

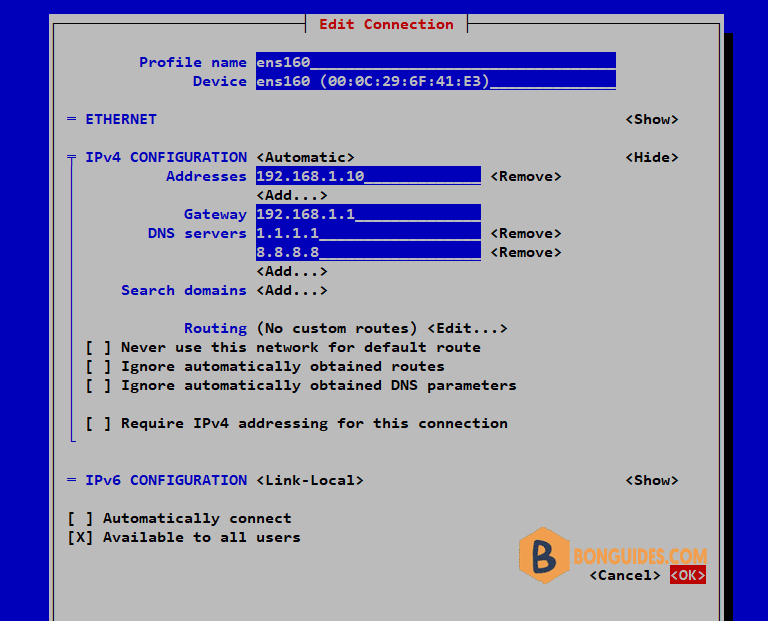
4. Select the network interface and then Edit.

5. Set the IP Address, Gateway and DNS servers then enter OK.

That’s it! You have assigned a static IP to your CentOS server.


