Table of Contents
In this post, we will cover how to set static IP address on CentOS 9/RHEL 9 systems.
It’s strongly recommended to set static IP address on your Linux system specially on servers. The main benefit of static IP address is that it will be persistent across the reboots.
There are different ways to set static ip address. We can use any one of it.
- nmcli
- nmtui
- nmstatectl
Configure static IP address using nmcli command
1. First, get the interfaces name attached to your system:
nmcli deviceIn our case, interface and connection name is ens160. So, we will assign following static IP address on this interface ens160.
# nmcli device
DEVICE  TYPE      STATE      CONNECTION
ens160  ethernet  connected  ens160
lo      loopback  unmanaged  --
2. We have two options either modify the existing connection or create a new connection. In this post, we will be modifying the existing connection.
sudo nmcli con modify 'ens160' ipv4.addresses 192.168.1.10/24
sudo nmcli con modify 'ens160' ipv4.gateway 192.168.1.1
sudo nmcli con modify 'ens160' ipv4.dns "1.1.1.1,8.8.8.8"
sudo nmcli con modify 'ens160' ipv4.method manual3. Restart the network service using the following commands.
sudo nmcli con down 'ens160'
sudo nmcli con up 'ens160'
4. Once the server restarted, let’s check to confirms that static ip address along with route and DNS ip are configured successfully.
# nmcli
ens160: connected to ens160
        ethernet (vmxnet3), 00:0C:29:8C:67:D8, hw, mtu 1500
        ip4 default
        inet4 192.168.1.10/24
        route4 192.168.0.0/24 metric 100
        route4 default via 192.168.0.1 metric 0
        inet6 fe80::20c:29ff:fe8c:67d8/64
        route6 fe80::/64 metric 1024

lo: unmanaged
        "lo"
        loopback (unknown), 00:00:00:00:00:00, sw, mtu 65536

DNS configuration:
        servers: 1.1.1.1 8.8.8.8
        interface: ens160
# ping google.com -c 3
PING google.com (142.251.220.46) 56(84) bytes of data.
64 bytes from hkg07s50-in-f14.1e100.net (142.251.220.46): icmp_seq=1 ttl=116 time=30.6 ms
64 bytes from hkg07s50-in-f14.1e100.net (142.251.220.46): icmp_seq=2 ttl=116 time=24.5 ms
64 bytes from hkg07s50-in-f14.1e100.net (142.251.220.46): icmp_seq=3 ttl=116 time=25.1 msStatic IP Address using nmtui utility
Nmtui is a text-based user interface for managing the networking on modern Linux systems.
1. First, run the following command to install NetworkManager Text User Interface nmtui if it is not installed.
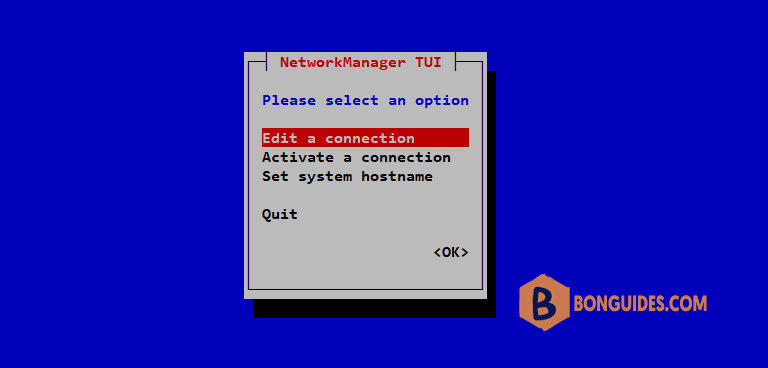
sudo dnf -y install NetworkManager-tui2. Run nmtui tool.
sudo nmtui3. Select Edit a connection and press Enter.
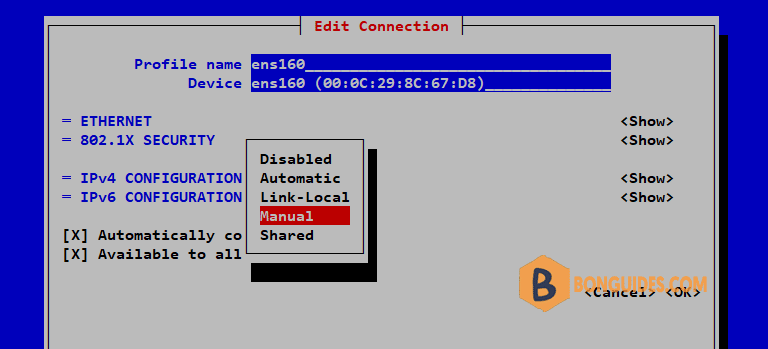
4. Select the network interface and then Edit.

5. In the following screen, change IPv4 Configuration from Automatic to Manual.
6. Set the IP Address, Gateway and DNS servers then enter OK.
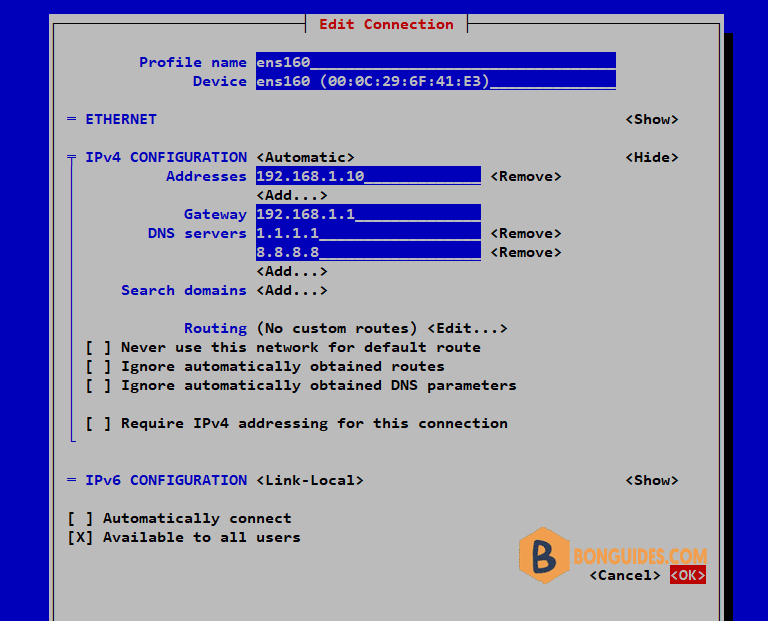
7. To make above changes into the effect, deactivate and activate the connection.
Assign static IP address using nmstatectl utility
It is also a command line utility to configure networking on CentOS 9/RHEL 9 systems. It’s not installed as a part of default installation. So, first install nmstate package using the following dnf command.
sudo dnf install -y nmstate1. To view the exiting settings of the interface, run the following command.
sudo nmstatectl show ens160The output is divided into 4 distinct sections:
- dns-resolver: This section contains the nameserver configuration for the particular interface.
- route-rules: This stipulates the routing rules.
- routes: This includes both dynamic and static routes.
- interfaces: This section specifies both the ipv4 and ipv6 settings.
You can use the NMState configuration tool to configure your hosts to the desired state using either interactive or file-based modes.
sudo nmstatectl show ens160# sudo nmstatectl show ens160
dns-resolver: {}
route-rules: {}
routes:
running:
- destination: 0.0.0.0/0
next-hop-interface: ens160
next-hop-address: 10.10.0.1
metric: 100
table-id: 254
interfaces:
- name: ens160
type: ethernet
state: up
mac-address: 00:0C:29:8C:67:D8
mtu: 1500
min-mtu: 60
max-mtu: 9000
wait-ip: any
ipv4:
enabled: true
dhcp: true
address:
- ip: 10.10.230.16
prefix-length: 16
auto-dns: true
auto-gateway: true
auto-routes: true
auto-route-table-id: 0
ipv6:
enabled: true
dhcp: true
...2. Now, create a YAML file that will specify the desired state of your network interface. Then edit it using a text editor.
sudo nmstatectl show ens160 > ens160.yml
vi ens160.yml
3. Copy the below lines and replace with your requirements then paste into the opening yaml file.
interfaces:
- name: ens160				###The interface name
  type: ethernet
  state: up
  ipv4:
    enabled: true
    address:
    - ip: 192.168.1.10			###Assign a static ip
      prefix-length: 24			###Subnet mask 24 = 255.255.255.0
    dhcp: false				###Disable dhcp mode.
dns-resolver:
  config:
    search:
    server:
    - 1.1.1.1				###A DNS server
    - 8.8.8.8				###A DNS server
routes:
  config:
  - destination: 0.0.0.0/0
    next-hop-address: 192.168.1.1	###The default gateway
    next-hop-interface: ens160
4. Save the file then apply the configuration using the following command:
sudo nmstatectl apply ens160.yml5. Finally, SSH to the CentOS 9 server using the new IP address then verify everything are working normally.
# ip add show ens160
2: ens160: <BROADCAST,MULTICAST,UP,LOWER_UP> mtu 1500 qdisc mq state UP group default qlen 1000
    link/ether 00:0c:29:8c:67:d8 brd ff:ff:ff:ff:ff:ff
    altname enp3s0
    inet 192.168.1.10/24 brd 192.168.255.255 scope global noprefixroute ens160
       valid_lft forever preferred_lft forever
    inet6 fe80::20c:29ff:fe8c:67d8/64 scope link noprefixroute
       valid_lft forever preferred_lft forever
# ping bonguides.com -c 3
PING bonguides.com (172.67.143.164) 56(84) bytes of data.
64 bytes from 172.67.143.164 (172.67.143.164): icmp_seq=1 ttl=57 time=46.0 ms
64 bytes from 172.67.143.164 (172.67.143.164): icmp_seq=2 ttl=57 time=43.6 ms
64 bytes from 172.67.143.164 (172.67.143.164): icmp_seq=3 ttl=57 time=34.0 ms# cat /etc/resolv.conf
# Generated by NetworkManager
nameserver 1.1.1.1
nameserver 8.8.8.8That’s all from this post. We hope it helps you to configure static ip address on your RHEL 9 systems from the command line.


great Tutorial Brother it Worked