Table of Contents
Remove the Message Press any key to boot
When using OSD ISO files to deploy the operating system to multiple virtual machines without manual intervention, the recurring prompt “Press any key to boot from CD or DVD” became bothersome. Unfortunately, there is no way to bypass this prompt through a parameter or option.
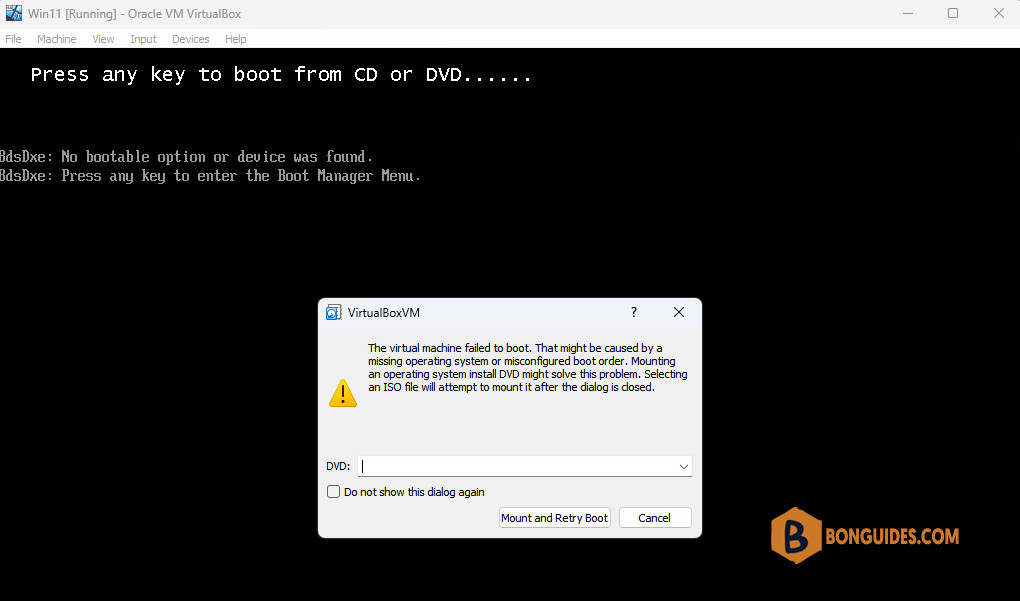
And this is especially frustrating since in SCCM, when you follow the Create Task Sequence Media wizard, you actually have an option to “Allow unattended operating system deployment.” This eliminates indeed all prompts from SCCM, but the initial prompt to boot from the media is still there and if you do not press “that” key, it does not boot from the device by default, even if you put it on the first position in the boot order.
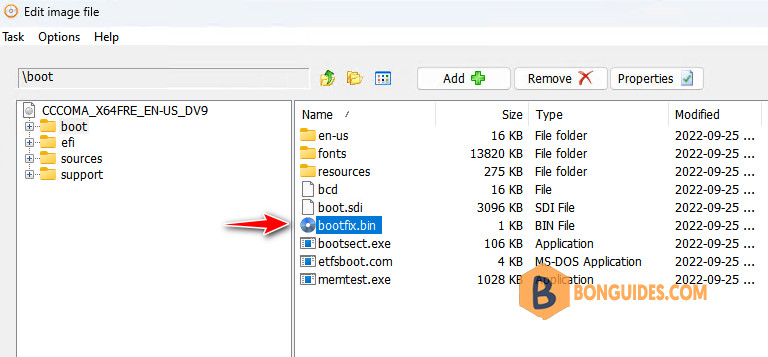
The online research leads me quickly to the solution for the BIOS architecture. There is a file (\ISO\Boot\bootfix.bin) that you can delete and then everything is fine. Of course, you need to create the bootable ISO file again and for this you need a tool such as AnyBurn. And, of course, you need to do something else for the UEFI architecture.
After taking a closer look at how the The Windows Assessment and Deployment Kit (Windows ADK) is creating the bootable iso files and correlated this with vague information from the Internet regarding the UEFI part of the issue, we found a quick and nice solution. Let’s get started.
Remove the Message Press any key to Boot from CD or DVD
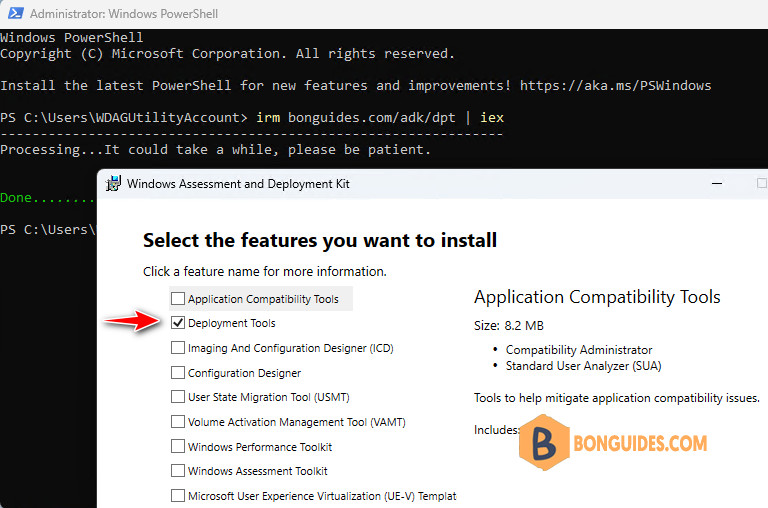
1. Before you begin, ensure you’ve installed The Windows Assessment and Deployment Kit (Windows ADK). You can install it manually or you can simply open Windows PowerShell (Terminal) as administrator, then the below command.
irm bonguides.com/adk/dpt | iex2. We just need to install the Deployment Tools instead of installing all tools. Once then, we can move forward to the next step to create a custom ISO image.
3. Run the below command in an elevated PowerShell session:
irm bonguides.com/adk/rmbootfix | iexAlternatively, you can also copy the code below and create your PowerShell script on your computer. Then, execute it manually.
$SourceISOPath = Read-Host -Prompt "Path to the source ISO file"
$UnattendedISOPath = Read-Host -Prompt "Path to the destination ISO file"

# First we make sure that ADK 10 is installed on the local computer and we get its location
$ADKProduct = $null
$ADKProduct = Get-WmiObject -Class Win32_Product | Where {$_.Name -eq "Windows Deployment Tools"}
if ($ADKProduct -ne $null) {
# Now getting the installation folder; we should have a registry key
if (!(Test-Path -Path "HKLM:\Software\WOW6432Node\Microsoft\Windows Kits\Installed Roots")) {
Write-Host -ForegroundColor Yellow "The ADK 10 application has been detected on the current computer, but the installation folder not. Aborting..."
exit
}
else {
# actual installation folder detection
$Props = Get-ItemProperty -Path "HKLM:\Software\WOW6432Node\Microsoft\Windows Kits\Installed Roots"
$ADKPath = $Props.KitsRoot10
Write-Host -ForegroundColor Green "The ADK 10 application has been detected on the current computer."
}
}
else {
Write-Host -ForegroundColor Yellow "The ADK 10 application is not detected as installed on the current computer. Aborting..."
exit
}

# Then we start processing the source ISO file
$SourceISOFullPath = ($SourceISOPath).trim('"')
try {
Mount-DiskImage -ImagePath $SourceISOFullPath
}
catch {
Write-Host -ForegroundColor Yellow 'An error occured while mounting the source ISO file. It may be corrupt. Aborting...'
exit
}
$iSOImage = Get-DiskImage -ImagePath $SourceISOFullPath | Get-Volume
$iSODrive = "$([string]$iSOImage.DriveLetter):"

# Test if we have enough memory on the current Windows drive to perform the operation (twice the size of the IS0)
$ISOItem = Get-Item -Path $SourceISOFullPath
$SystemDrive = Get-WmiObject Win32_LogicalDisk -filter "deviceid=""$env:SystemDrive"""

if (($ISOItem.Length * 2) -le $SystemDrive.FreeSpace) {
Write-Host -ForegroundColor Green "The current system drive appears to have enough free space for the ISO conversion process."
}
else {
Write-Host -ForegroundColor Yellow "The current system drive does not appear to have enough free space for the ISO conversion process. Aborting..."
exit
}

# Process the ISO content using a temporary folder on the local system drive
if (!(Test-Path -Path "$env:TEMP\sourceisotemp" -PathType Container)) {
New-Item -Path "$env:TEMP\sourceisotemp" -ItemType Directory -Force | Out-Null
}
else {
Remove-Item -Path "$env:TEMP\sourceisotemp" -Force -Confirm:$false
New-Item -Path "$env:TEMP\sourceisotemp" -ItemType Directory -Force | Out-Null
}

Write-Host -ForegroundColor Green "Extracting the content of the ISO file."
Get-ChildItem -Path $iSODrive | Copy-Item -Destination "$env:TEMP\sourceisotemp" -Recurse -Container -Force
Write-Host -ForegroundColor Green "The content of the ISO file has been extracted."

# Processing the extracted content
if (Test-Path -Path "$env:TEMP\sourceisotemp\boot\bootfix.bin" -PathType Leaf) {
Remove-Item -Path "$env:TEMP\sourceisotemp\boot\bootfix.bin" -Force -Confirm:$false
}
$oscdimg = $ADKPath + "Assessment and Deployment Kit\Deployment Tools\amd64\Oscdimg\oscdimg.exe"
$etfsboot = $ADKPath + "Assessment and Deployment Kit\Deployment Tools\amd64\Oscdimg\etfsboot.com"
$efisys_noprompt = $ADKPath + "Assessment and Deployment Kit\Deployment Tools\amd64\Oscdimg\efisys_noprompt.bin"
$parameters = "-bootdata:2#p0,e,b""$etfsboot""#pEF,e,b""$efisys_noprompt"" -u1 -udfver102 ""$env:TEMP\sourceisotemp"" ""$UnattendedISOPath"""

$ProcessingResult = Start-Process -FilePath $oscdimg -ArgumentList $parameters -Wait -NoNewWindow -PassThru

if ($ProcessingResult.ExitCode -ne 0) {
Write-Host -ForegroundColor Yellow "There was an error while creating the iso file."
}
else {
Write-Host -ForegroundColor Green "The content of the ISO has been repackaged in the new ISO file."
}

# Cleaning up
Remove-Item -Path "$env:TEMP\sourceisotemp" -Force -Recurse -Confirm:$false
Write-Host -ForegroundColor Green "The temp folder has been removed."

# Dismount the ISO file as we no longer require it
Dismount-DiskImage -ImagePath $SourceISOFullPath
Write-Host -ForegroundColor Green "The source ISO file has been unmounted."
$SourceISOPath = Read-Host -Prompt "Path to the source ISO file"
$UnattendedISOPath = Read-Host -Prompt "Path to the destination ISO file"
# First we make sure that ADK 10 is installed on the local computer and we get its location
$ADKProduct = $null
$ADKProduct = Get-WmiObject -Class Win32_Product | Where {$_.Name -eq "Windows Deployment Tools"}
if ($ADKProduct -ne $null) {
# Now getting the installation folder; we should have a registry key
if (!(Test-Path -Path "HKLM:\Software\WOW6432Node\Microsoft\Windows Kits\Installed Roots")) {
Write-Host -ForegroundColor Yellow "The ADK 10 application has been detected on the current computer, but the installation folder not. Aborting..."
exit
}
else {
# actual installation folder detection
$Props = Get-ItemProperty -Path "HKLM:\Software\WOW6432Node\Microsoft\Windows Kits\Installed Roots"
$ADKPath = $Props.KitsRoot10
Write-Host -ForegroundColor Green "The ADK 10 application has been detected on the current computer."
}
}
else {
Write-Host -ForegroundColor Yellow "The ADK 10 application is not detected as installed on the current computer. Aborting..."
exit
}
# Then we start processing the source ISO file
$SourceISOFullPath = ($SourceISOPath).trim('"')
try {
Mount-DiskImage -ImagePath $SourceISOFullPath
}
catch {
Write-Host -ForegroundColor Yellow 'An error occured while mounting the source ISO file. It may be corrupt. Aborting...'
exit
}
$iSOImage = Get-DiskImage -ImagePath $SourceISOFullPath | Get-Volume
$iSODrive = "$([string]$iSOImage.DriveLetter):"
# Test if we have enough memory on the current Windows drive to perform the operation (twice the size of the IS0)
$ISOItem = Get-Item -Path $SourceISOFullPath
$SystemDrive = Get-WmiObject Win32_LogicalDisk -filter "deviceid=""$env:SystemDrive"""
if (($ISOItem.Length * 2) -le $SystemDrive.FreeSpace) {
Write-Host -ForegroundColor Green "The current system drive appears to have enough free space for the ISO conversion process."
}
else {
Write-Host -ForegroundColor Yellow "The current system drive does not appear to have enough free space for the ISO conversion process. Aborting..."
exit
}
# Process the ISO content using a temporary folder on the local system drive
if (!(Test-Path -Path "$env:TEMP\sourceisotemp" -PathType Container)) {
New-Item -Path "$env:TEMP\sourceisotemp" -ItemType Directory -Force | Out-Null
}
else {
Remove-Item -Path "$env:TEMP\sourceisotemp" -Force -Confirm:$false
New-Item -Path "$env:TEMP\sourceisotemp" -ItemType Directory -Force | Out-Null
}
Write-Host -ForegroundColor Green "Extracting the content of the ISO file."
Get-ChildItem -Path $iSODrive | Copy-Item -Destination "$env:TEMP\sourceisotemp" -Recurse -Container -Force
Write-Host -ForegroundColor Green "The content of the ISO file has been extracted."
# Processing the extracted content
if (Test-Path -Path "$env:TEMP\sourceisotemp\boot\bootfix.bin" -PathType Leaf) {
Remove-Item -Path "$env:TEMP\sourceisotemp\boot\bootfix.bin" -Force -Confirm:$false
}
$oscdimg = $ADKPath + "Assessment and Deployment Kit\Deployment Tools\amd64\Oscdimg\oscdimg.exe"
$etfsboot = $ADKPath + "Assessment and Deployment Kit\Deployment Tools\amd64\Oscdimg\etfsboot.com"
$efisys_noprompt = $ADKPath + "Assessment and Deployment Kit\Deployment Tools\amd64\Oscdimg\efisys_noprompt.bin"
$parameters = "-bootdata:2#p0,e,b""$etfsboot""#pEF,e,b""$efisys_noprompt"" -u1 -udfver102 ""$env:TEMP\sourceisotemp"" ""$UnattendedISOPath"""
$ProcessingResult = Start-Process -FilePath $oscdimg -ArgumentList $parameters -Wait -NoNewWindow -PassThru
if ($ProcessingResult.ExitCode -ne 0) {
Write-Host -ForegroundColor Yellow "There was an error while creating the iso file."
}
else {
Write-Host -ForegroundColor Green "The content of the ISO has been repackaged in the new ISO file."
}
# Cleaning up
Remove-Item -Path "$env:TEMP\sourceisotemp" -Force -Recurse -Confirm:$false
Write-Host -ForegroundColor Green "The temp folder has been removed."
# Dismount the ISO file as we no longer require it
Dismount-DiskImage -ImagePath $SourceISOFullPath
Write-Host -ForegroundColor Green "The source ISO file has been unmounted."4. When the script runs, you need to enter the path of your original ISO file and the destination ISO as needed. That’s all you need to do. The script does the rest automatically.
# Output
PS C:\> irm bonguides.com/adk/rmbootfix | iex
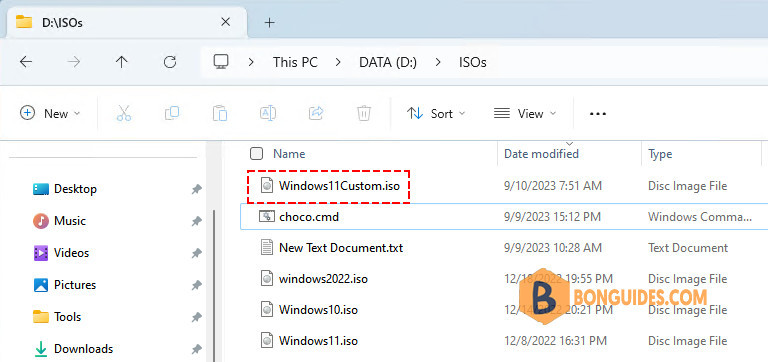
Path to the source ISO file: "D:\ISOs\Windows11.iso"
Path to the destination ISO file: "D:\ISOs\Windows11Custom.iso"It could take several minutes to complete. Please ensure that your disk has at least 15GB of free space.
The ADK 10 application has been detected on the current computer.

Attached          : True
BlockSize         : 0
DevicePath        : \\.\CDROM1
FileSize          : 5557432320
ImagePath         : D:\ISOs\Windows11.iso
LogicalSectorSize : 2048
Number            : 1
Size              : 5557432320
StorageType       : 1
PSComputerName    :

The current system drive appears to have enough free space for the ISO conversion process.
Extracting the content of the ISO file.
The content of the ISO file has been extracted.

OSCDIMG 2.56 CD-ROM and DVD-ROM Premastering Utility
Copyright (C) Microsoft, 1993-2012. All rights reserved.
Licensed only for producing Microsoft authorized content.
Scanning source tree (500 files in 43 directories)
Scanning source tree complete (944 files in 86 directories)
Computing directory information complete
Image file is 5555322880 bytes
Writing 944 files in 86 directories to D:\ISOs\Windows11Custom.iso
100% complete

Final image file is 5557428224 bytes
Done.
The content of the ISO has been repackaged in the new ISO file.
The temp folder has been removed.
Attached          : True
BlockSize         : 0
DevicePath        : \\.\CDROM2
FileSize          : 5557432320
ImagePath         : D:\ISOs\Windows11.iso
LogicalSectorSize : 2048
Number            : 2
Size              : 5557432320
StorageType       : 1
PSComputerName    :

The source ISO file has been unmounted.
5. Please ensure that the ISO image has been created in the specified destination location.
6. Finally, edit the virtual machine (VM) settings to boot from the custom ISO image file. The message “Press any key to boot from CD or DVD” should no longer appear, and you will go directly to the Windows installation screen.
Not a reader? Watch this related video tutorial:


Excellent work. It worked smoothly.
Thanks for your feedback.
I am not sure if this still works.
I just tried this on a VM. Original ISO works and I can press any key and the ISO boots. But after creating the custom ISO. I now get UEFI Boot Error.
https://imgur.com/qEiLzPw
Change the boot order of the VM.