
Table of Contents
In this step-by-step guide, I will walk you through how to add a website in CyberPanel, a free and open-source control panel for web hosting. This tutorial will provide you with all the information you need to get your website up and running in no time. So, grab a cup of coffee, sit back, and let’s get started!
What You’ll Need:
- A running server with CyberPanel installed.
- A domain name for example bonguides.com.
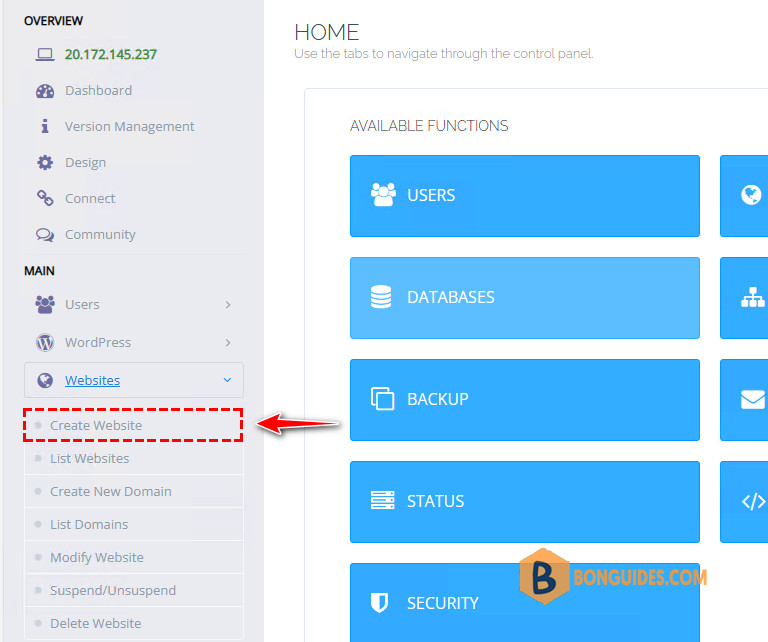
How To Add A Website In CyberPanel
1. First, you need to login to your CyberPanel. You can login as a either an administrator or a user that has a full access on Website Management.
2. From your Dashboard, go to Websites > Create Website
3. Fill in the required fields.
- Select Package – Default or your desired package (Default disk size is 1GB; Bandwidth 1GB).
- Select Owner – Select the owner of the website you want to create
- Test Domain – Toggle off unless you have an active WordPress Manager subscription
- Email – Your active email
- Select PHP – PHP version you want to install
- Additional Features – Select SSL, DKIM Support and open_basedir Protection

4. After filling out the required fields, click Create Website and wait for the process to be completed.

Now we successfully created website in CyberPanel! Regardless of what CMS you will be using, these steps are required.
Afterwards, you may:
- Create a WordPress site on CyberPanel.
- Install free SSL certificate for websites in CyberPanel.
- Redirect HTTP to HTTPS in CyberPanel
Conclusion
Congratulations! You have successfully learned how to add a website in CyberPanel. With the easy-to-use interface and powerful features, CyberPanel is an excellent choice for managing your web hosting for free.
You can also take a look at the following CyberPanel tips and tricks that help to manage CyberPanel efficiently.
- Install CyberPanel on Linux.
- Change the theme of CyberPanel.
- Add a Website in CyberPanel.
- Reset Password OpenLiteSpeed in CyberPanel
- Create a WordPress Website in CyberPanel
- Install the SSL Certificate on CyberPanel.
- Redirect HTTP to HTTPS in CyberPanel
- Reset the Admin Password on CyberPanel
- Acess OpenLiteSpeed Console in CyberPanel
- How to Upgrade CyberPanel
- Change Default Port for CyberPanel
- Disk Usage Show 0MB in CyberPanel
- Access CyberPanel using Hostname and SSL
- How to use Get-MgUser cmdlet

