Table of Contents
Typically, in most network configurations, the IP address is assigned dynamically by the router DHCP server. Setting a static IP address may be required in different situations, such as configuring port forwarding or running a web server behind a NAT.
This post explains how to set up a static IP address on a CentOS 7/RHEL 7 server.
Find the available network interfaces
You can use any one of the below commands to list down the available network interfaces on the system.
ifconfig -aThe command prints a list of all the available network interfaces. In this example, the name of the interface is ens160.
# ifconfig -a
ens160: flags=4163<UP,BROADCAST,RUNNING,MULTICAST>  mtu 1500
        inet 10.10.230.5  netmask 255.255.0.0  broadcast 10.10.255.255
        inet6 fe80::7dc9:cd54:9e9b:6366  prefixlen 64  scopeid 0x20<link>
        ...
lo: flags=73<UP,LOOPBACK,RUNNING>  mtu 65536
        inet 127.0.0.1  netmask 255.0.0.0
        inet6 ::1  prefixlen 128  scopeid 0x10<host>
        ...
Configuring the Static IP Address of CentOS 7/RHEL 7
Method 1
1. In this method, we will edit the network interface file found under directory. For interface ens160, the file name would be .
# cat /etc/sysconfig/network-scripts/ifcfg-ens160
TYPE=Ethernet
PROXY_METHOD=none
BROWSER_ONLY=no
BOOTPROTO=dhcp
DEFROUTE=yes
IPV4_FAILURE_FATAL=no
...
NAME=ens160
UUID=a50387a1-cf51-4ed3-bbd4-a6f253f71e15
DEVICE=ens160
ONBOOT=yes
2. To assign a static IP address to the interface, update the interface file as per the requirement.
vi /etc/sysconfig/network-scripts/ifcfg-ens160BOOTPROTO=none
IPADDR=192.168.1.10
NETMASK=255.255.255.0
GATEWAY=192.168.1.1
DNS1=192.168.1.1
DNS2=8.8.8.8- Set BOOTPROTO: none.
- Specify the static IP address. Under addresses: you can add one or more IPv4 or IPv6 IP addresses that will be assigned to the network interface.
- Specify the gateway4.
- Under nameservers, set the IP addresses of the nameservers.
3. Restart the network service to take the changes go into effect.
service network restart4. Use ifconfig -a command to verify the static ip address.
# ifconfig -a
ens160: flags=4163<UP,BROADCAST,RUNNING,MULTICAST>  mtu 1500
        inet 192.168.1.10  netmask 255.255.255.0  broadcast 192.168.255.255
        inet6 fe80::7dc9:cd54:9e9b:6366  prefixlen 64  scopeid 0x20<link>
        ...
lo: flags=73<UP,LOOPBACK,RUNNING>  mtu 65536
        inet 127.0.0.1  netmask 255.0.0.0
        inet6 ::1  prefixlen 128  scopeid 0x10<host>
Also, verify the DNS server entries in /etc/resolv.conf file.
# cat /etc/resolv.conf
# Generated by NetworkManager
nameserver 8.8.8.8
nameserver 1.1.1.1Finally, verify the internet connectivity using the ping command:
# ping -c 3 google.com
PING google.com (216.58.200.238) 56(84) bytes of data.
64 bytes from tsa03s01-in-f238.1e100.net (216.58.200.238): icmp_seq=1 ttl=58 time=20.2 ms
64 bytes from tsa03s01-in-f238.1e100.net (216.58.200.238): icmp_seq=2 ttl=58 time=20.4 ms
64 bytes from tsa03s01-in-f238.1e100.net (216.58.200.238): icmp_seq=3 ttl=58 time=19.5 msMethod 2
You can also use nmtui, a text-based user interface for configuring network interfaces.
1. Run the following command to install NetworkManager Text User Interface nmtui if it is not installed.
sudo yum -y install NetworkManager-tui2. Run nmtui tool.
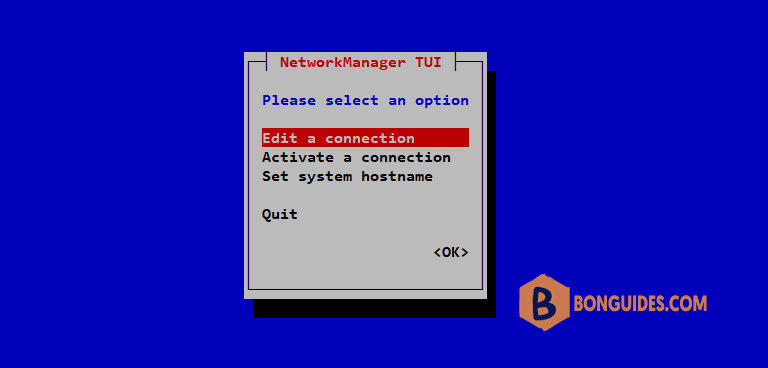
nmtui3. Select Edit a connection and press Enter.

4. Select the network interface and then Edit.

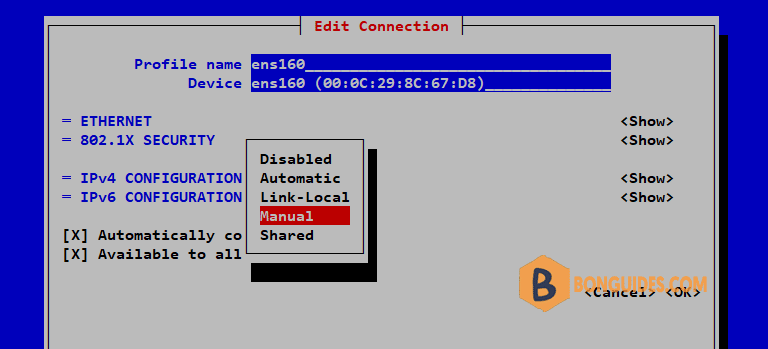
5. In the following screen, change IPv4 Configuration from Automatic to Manual.

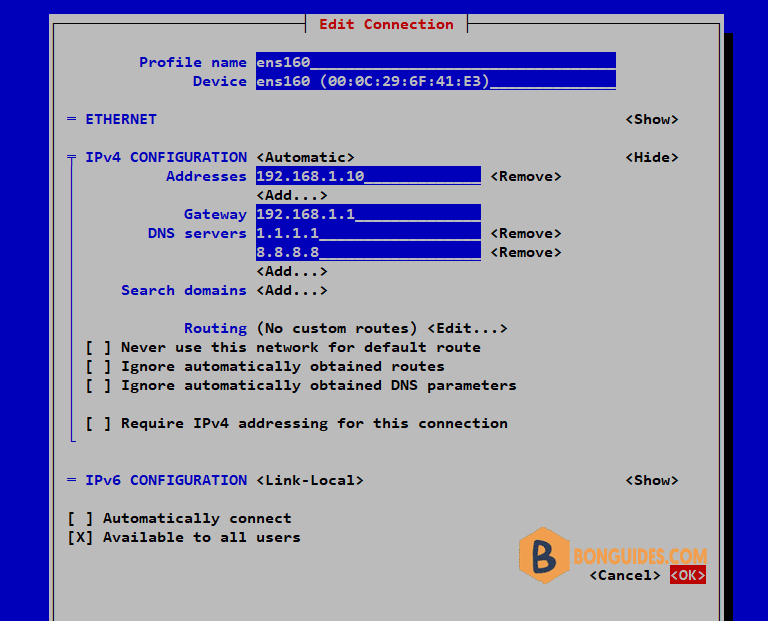
6. Set the IP Address, Gateway and DNS servers then enter OK.

To make above changes into the effect, deactivate and activate the connection or restart your server.
That’s it! You have assigned a static IP to your CentOS 7 or RHEL 7 server.


