
Table of Contents
You can simplify the deployment of the operating system on typical workstations (servers) if you add all the necessary drivers to the Drive Store of your Windows installation USB stick. In this case, after installing Windows, you don’t have to manually download and install specific drivers (including AHCI/RAID/NVMe or network cards) on each computer.
Before you begin
- We use drive E for example, don’t forget to replace it in the below commands.
- Driver letter for our USB stick is G. Remember to change it to fit with yours in step 4, 5.
Add Drivers into Windows USB Boot Device
1️⃣ Right click on the Windows Start icon then open PowerShell or Terminal as administrator.
2️⃣ Create two folders, in this case we’ll create the folders in the E drive.
New-Item E:\drivers, E:\wim -Type Directory3️⃣ Copy drives in to E:drivers folder. You can create sub-folders for each driver if you want to keep things organized. The driver files will usually be in the form of .inf, .sys, and .cat files. Example below:
Note
Many vendors (including Dell, HP, Lenovo, etc.) supply their drivers in the form of self-extracting exe or zip archive files. Such archives must be unpacked to a local disk so that inf, cat, and sys files are located in the directory with the driver.
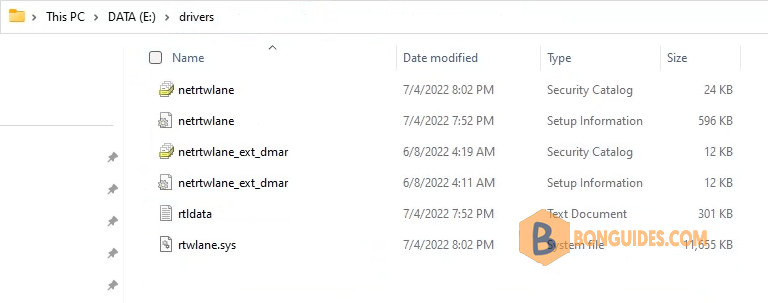
4️⃣ Now we have to find the index number of the OS edition. In this example we have a Wndows 10 (22H2) image, we will use PRO edition to add drivers to, so let’s go for the index number 6.
dism /Get-WimInfo /WimFile:G:\Sources\install.wim#Output
Deployment Image Servicing and Management tool
Version: 10.0.22621.1
Details for image : F:\Sources\install.wim
...
Index : 6
Name : Windows 10 Pro
Description : Windows 10 Pro
Size : 15,435,570,649 bytes
...
The operation completed successfully.5️⃣ Now we have to mount the image of your preferred Windows edition (in this example Windows 10 Pro) using it’s index number to E:wim folder.
dism /Mount-Image /ImageFile:G:\Sources\install.wim /Index:6 /MountDir:E:\wim#Output
Deployment Image Servicing and Management tool
Version: 10.0.22621.1
Mounting image
[==========================100.0%==========================]
The operation completed successfully.6️⃣ You can use this command for adding all the drivers in the folder and subfolders from E:drivers to E:wim.
dism /Image:E:\wim /Add-Driver /Driver:E:\drivers /Recurse /ForceUnsigned#Output
Deployment Image Servicing and Management tool
Version: 10.0.22621.1
Image Version: 10.0.19043.928
Searching for driver packages to install...
Found 2 driver package(s) to install.
Installing 1 of 2 - E:\temp\drivers\WLAN\netrtwlane.inf: The driver package was successfully installed.
Installing 2 of 2 - E:\temp\drivers\WLAN\netrtwlane_ext_dmar.inf: The driver package was successfully installed.
The operation completed successfully.7️⃣ When all drivers are added, we have to commit the changes to the Windows image.
dism /Unmount-Image /MountDir:E:\wim /Commit#Output
Deployment Image Servicing and Management tool
Version: 10.0.22621.1
Saving image
[==========================100.0%==========================]
Unmounting image
[==========================100.0%==========================]
The operation completed successfully.8️⃣ We no longer need the folders that be created in the previous step,we can delete them.
Remove-Item E:\drivers, E:\wim -RecurseThat’s it. Now you can use the USB boot device to install Windows with the additional drivers.


